
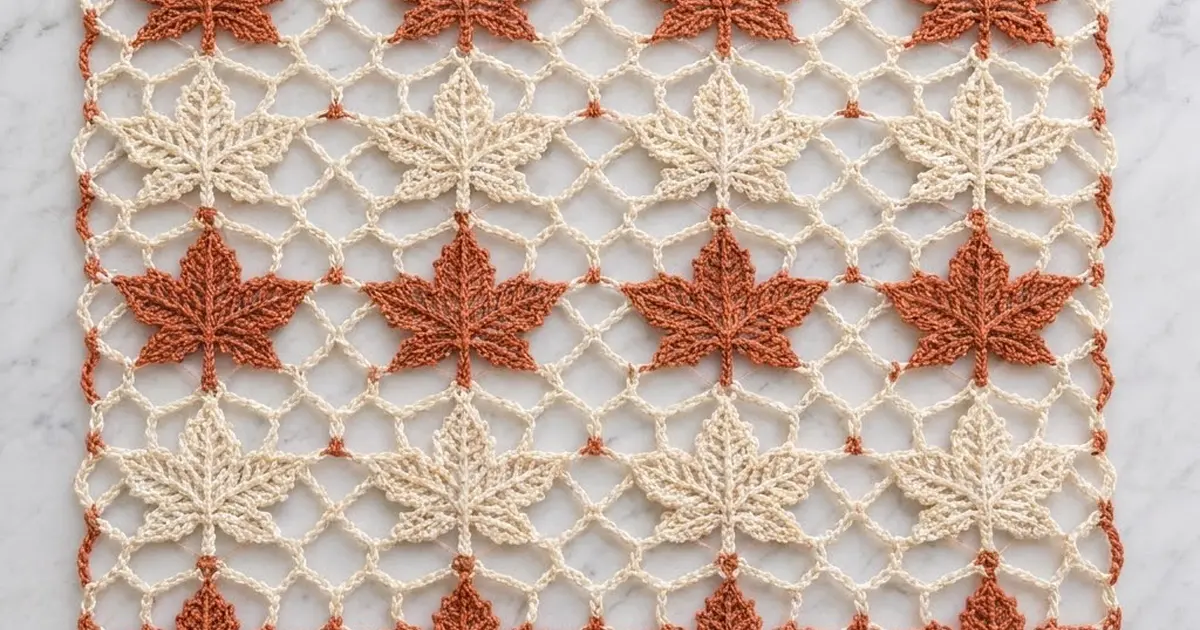
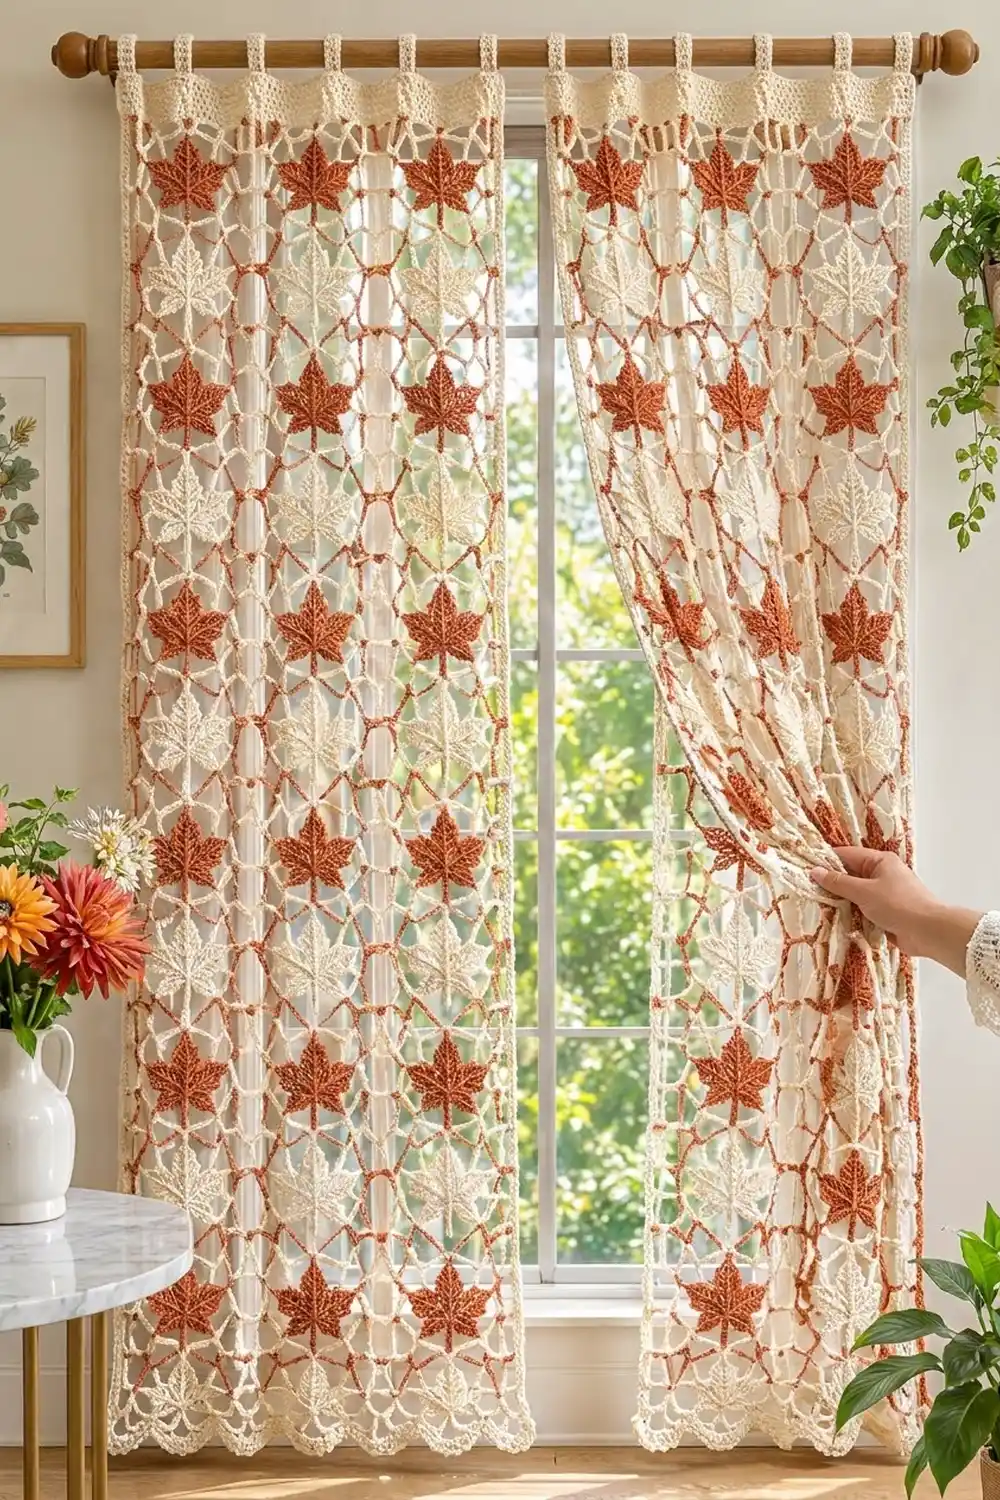
These curtains bring a falling-leaves look to a window without blocking the light. Each panel is a grid of five-pointed maple leaves held in an open cream chain mesh. Daylight comes through the net, and the solid leaves stay easy to see from across the room.
The palette uses two colors, warm rust and soft cream. Rows of rust leaves alternate with rows of cream leaves, and every leaf sits in the same cream mesh. Each lobe has a raised center vein that gives the leaves a carved, textured look.
The pattern uses US crochet terms. Each finished panel measures 25 in (63.5 cm) wide by 79.25 in (201.3 cm) long, plus five rust hanging tabs. The pattern makes a pair of panels.
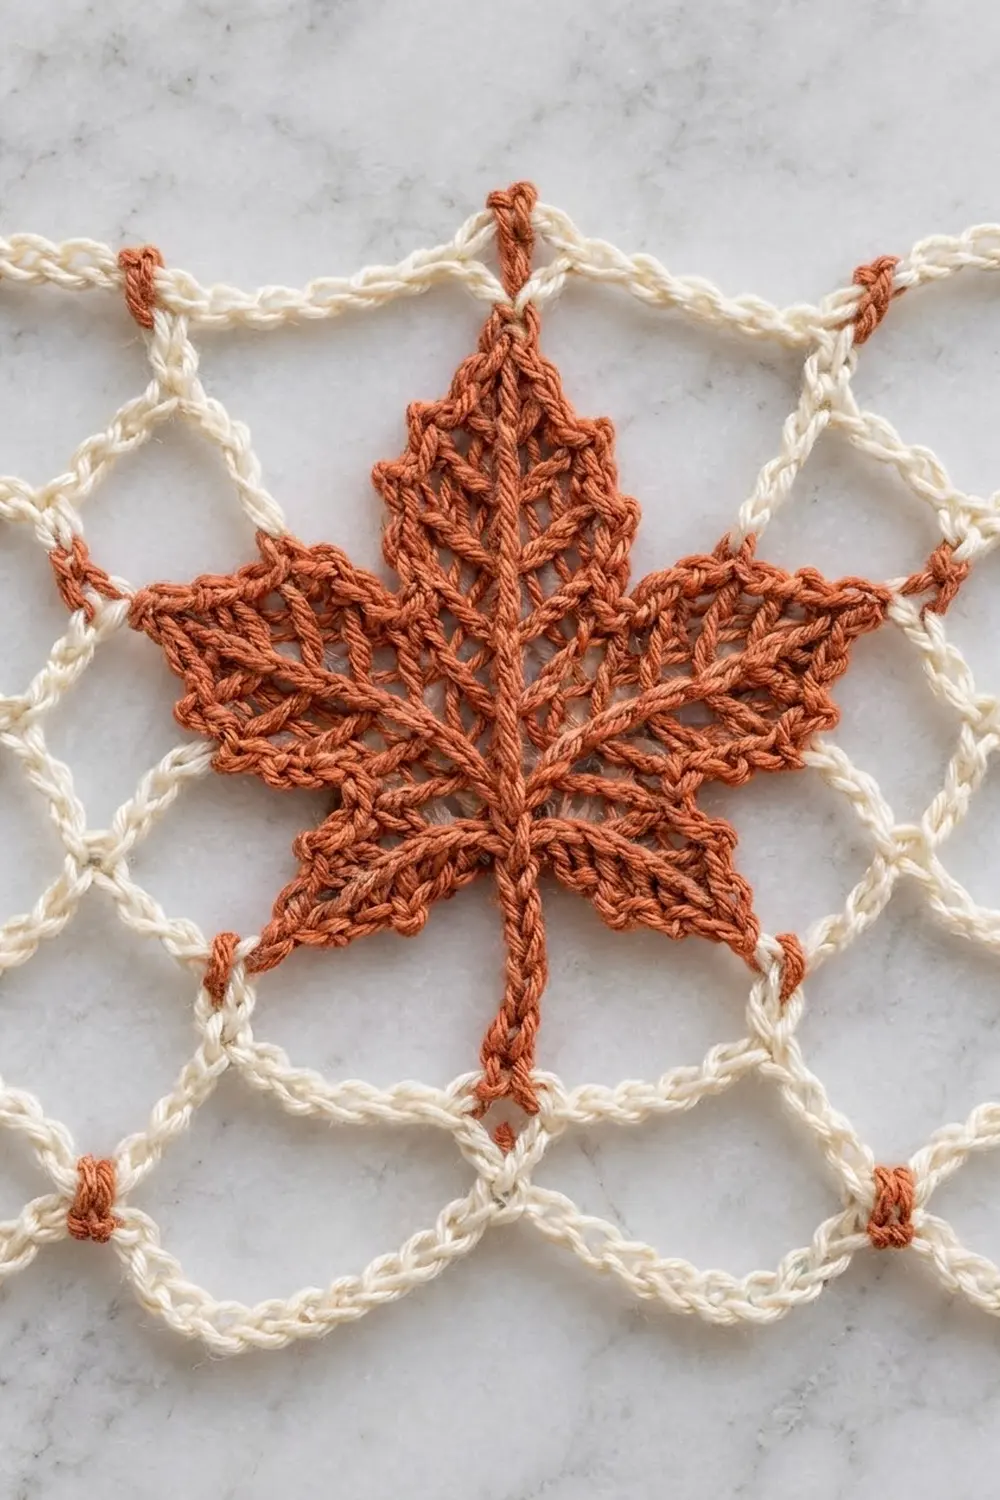
Each leaf is worked in rounds. You build a chain “spine” for each lobe, then work stitches up and down both sides of it. Two cream mesh rounds turn the leaf into a 6 in (15.2 cm) square motif. You join the motifs as you go, then add a two-round border and rust tabs.
Finished Size and Construction
- Finished panel size: 25 in x 79.25 in (63.5 cm x 201.3 cm), tabs not included
- Skill level: Intermediate
- Terminology: US
- Yarn weight: DK (#3) cotton or cotton blend
- Hook: 4.0 mm (G-6)
- Number of pieces: 52 motifs per panel, 104 for the pair
- Layout: 4 motifs across x 13 motifs down per panel
- Motif size: 6 in (15.2 cm) square, blocked
- Size before border: 24 in x 78 in (61.0 cm x 198.1 cm)
- Border depth: 0.5 in (1.3 cm) on the top and sides, 0.75 in (1.9 cm) on the scalloped bottom
- Tabs: 5 per panel, about 1.7 in (4.3 cm) wide, folded into a 2 in (5.1 cm) loop
Materials
Use a smooth DK cotton with good stitch definition, about 115 m per 50 g. Mercerized cotton shows the veins best and hangs well in sunlight. Fuzzy yarns blur the mesh, so avoid them.
- Rust (leaves and tabs): 250 g, about 575 m (5 balls of 50 g)
- Cream (leaves, mesh, and border): 550 g, about 1,265 m (11 balls of 50 g)
These amounts cover two panels and include a margin of about 15% for the test motif and differences in tension.
Tools:
- 4.0 mm (G-6) crochet hook
- Tapestry needle
- Stitch markers
- Rust-proof pins and a large blocking surface
- Measuring tape
- Spray bottle
Abbreviations (US Terms)
- ch – chain
- sl st – slip stitch
- sc – single crochet
- hdc – half double crochet
- dc – double crochet
- tr – treble crochet
- sp – space
- st(s) – stitch(es)
- RS / WS – right side / wrong side
Special stitch – Spine-N: Ch N + 1, then sl st in the 2nd ch from the hook and in each remaining ch back to the base (N sl sts). The skipped first chain is the tip ch. For example, a Spine-10 is ch 11 followed by 10 sl sts.
Gauge and Checkpoints
Measure gauge on one complete motif. Make one rust motif and block it before you start the rest.
- After leaf Rnd 2: the circle measures 1.25 in (3.2 cm) across.
- After leaf Rnd 4: the leaf measures 4.5 in (11.4 cm) wide from side tip to side tip and 5 in (12.7 cm) tall, stem included.
- After Rnd 5: the mesh ring measures about 5.25 in (13.3 cm) across.
- After Rnd 6, blocked: the motif is a 6 in (15.2 cm) square.
- Border gauge: 29 sc = 6 in (15.2 cm), or about 4.8 sc per inch.
- Tab gauge: 18 sc rows = 4 in (10.2 cm).
If your blocked motif is larger than 6.25 in (15.9 cm), go down to a 3.5 mm hook. If it is smaller than 5.75 in (14.6 cm), go up to a 4.5 mm hook. Blocking can correct small differences in the mesh, but the leaf itself should match closely.
Motif Pattern
Leaf (make in rust or cream)
Rnd 1: Make a magic ring. Ch 1, 12 sc in ring. Join with sl st to first sc. (12 sc)
Rnd 2: Ch 1, 2 sc in each st around. Join. (24 sc)
Rnd 3 (spines): Ch 1. Sc in first st, Spine-6 (stem). Sc in next 4 sts, then make the next spine. Work this repeat 5 times, making the spines in this order: Spine-6 (first lower lobe), Spine-9 (first upper side lobe), Spine-10 (top lobe), Spine-9 (second upper side lobe), Spine-6 (second lower lobe). Sc in next 3 sts. Join to first sc. (24 sc and 6 spines)
Each spine stands on its base sc, which are sts 1, 5, 9, 13, 17, and 21. There are 3 plain sc between each pair of spines.
Rnd 4 (lobes): Do not ch. Sl st in next 3 sc. Work the first lower lobe around its spine, skipping the base sc:
- Lower lobe (Spine-6): Working up the free loops of the spine chain from base to tip: dc in next 2, hdc in next 2, sc in next 2. (Sc, ch 2, sc) in tip ch. Working down the sl sts from tip to base: sc in next 2, hdc in next 2, dc in next 2. (14 sts and 1 ch-2 tip)
Sl st in next 3 sc.
- Upper side lobe (Spine-9): Up: tr in next 2, dc in next 3, hdc in next 2, sc in next 2. (Sc, ch 2, sc) in tip ch. Down: sc in next 2, hdc in next 2, dc in next 3, tr in next 2. (20 sts and 1 ch-2 tip)
Sl st in next 3 sc.
- Top lobe (Spine-10): Up: tr in next 3, dc in next 3, hdc in next 2, sc in next 2. (Sc, ch 2, sc) in tip ch. Down: sc in next 2, hdc in next 2, dc in next 3, tr in next 3. (22 sts and 1 ch-2 tip)
Sl st in next 3 sc. Work an upper side lobe. Sl st in next 3 sc. Work a lower lobe. Sl st in next 3 sc, then sl st in the stem’s base sc. Leave the stem spine unworked. Fasten off.
Rnd 4 count: 14 + 20 + 22 + 20 + 14 = 90 lobe sts, plus 19 sl sts (6 groups of 3, plus 1 at the stem), for 109 sts and 5 ch-2 tips.
The sl sts between the lobes create the deep notches. The spine running up the middle of each lobe forms the raised center vein.
Mesh (cream on every motif)
Rnd 5: With RS facing, join cream with sc in the ch-2 tip of the top lobe. Ch 9, sc in next upper side tip; ch 9, sc in next lower tip; ch 9, sc in the stem tip ch; ch 9, sc in next lower tip; ch 9, sc in next upper side tip; ch 9, join to first sc. (6 sc and 6 ch-9 loops)
Label the loops in order: L1 (top to upper side), L2, L3 (lower tip to stem), L4 (stem to lower tip), L5, and L6 (upper side to top).
Rnd 6 (square): Sl st into L1.
- In L1: sc, ch 7, sc, ch 11 (corner), sc. Ch 7.
- In L2: sc, ch 7, sc. Ch 7.
- In L3: sc, ch 11 (corner), sc, ch 7, sc. Ch 7.
- In L4: sc, ch 7, sc, ch 11 (corner), sc. Ch 7.
- In L5: sc, ch 7, sc. Ch 7.
- In L6: sc, ch 11 (corner), sc, ch 7, sc. Ch 7, join to first sc.
Rnd 6 count: 16 sc, 12 ch-7 side loops, and 4 ch-11 corner loops. Each side has a corner loop, 3 side loops, and another corner loop, and neighboring sides share their corner loop. The leaf sits upright, with the top lobe pointing up and the stem pointing down. Fasten off the first motif. On later motifs, use the joining method below for any side that touches a finished motif.
Make All Pieces
Every motif has a cream mesh. Only the leaf color changes.
| Motif | Per panel | For the pair |
|---|---|---|
| Rust leaf | 28 | 56 |
| Cream leaf | 24 | 48 |
| Total | 52 | 104 |
Layout for one panel (R = rust leaf, C = cream leaf), top to bottom:
Row 1:  R R R R
Row 2:  C C C C
Row 3:  R R R R
Row 4:  C C C C
Row 5:  R R R R
Row 6:  C C C C
Row 7:  R R R R
Row 8:  C C C C
Row 9:  R R R R
Row 10: C C C C
Row 11: R R R R
Row 12: C C C C
Row 13: R R R R
Seven rust rows and six cream rows give 7 x 4 = 28 rust motifs and 6 x 4 = 24 cream motifs. Make all the leaves (Rnds 1-4) first, then add the mesh as you join.
Joining
Join as you go on Rnd 6. Work Rnd 6 as written until you reach a side that touches a finished motif.
Joining a side loop: Instead of ch 7, ch 3, sl st into the matching ch-7 loop of the neighboring motif, ch 3.
Joining a corner loop: Instead of ch 11, ch 5, sl st into the neighbor’s ch-11 corner loop, ch 5. Where three or four motifs meet, sl st into the existing joining sl st so that all the corners share one point.
Each joined side connects 3 side loops and 2 corner loops, loop to loop. The chain lengths do not change (3 + 1 + 3 = 7 and 5 + 1 + 5 = 11), so joined motifs stay the same size as the first one.
Tension: Make the joining chains as loose as your regular chains. Tight joins pucker the mesh and make the panel shorter. After each row, lay it flat and check that the leaves point up.
Size checkpoint: After the first row of 4 motifs, the strip should measure 24 in (61.0 cm) wide when lightly stretched. After all 13 rows, the panel should measure 24 in x 78 in (61.0 cm x 198.1 cm).
Border
Work the border in cream. The border gauge is 29 sc per motif side, which equals 6 in (15.2 cm).
Rnd 1: With RS facing, join cream in one of the panel’s corner loops. Work into the motif loops all the way around:
- 4 sc in the outer ch-5 section of each joined corner loop
- 7 sc in each ch-7 side loop
- (4 sc, ch 3, 4 sc) in each of the 4 unjoined corner loops at the panel corners
Join to first sc.
Each motif side gives 4 + 21 + 4 = 29 sc. The 4 sc on each side of a panel corner count toward that side’s total, and the ch-3 sp is not counted as a stitch.
- Top and bottom edges: 4 x 29 = 116 sc each
- Long sides: 13 x 29 = 377 sc each
- Plus 4 ch-3 corner sps
Rnd 2: Ch 1. Along the top edge and both long sides, sc in each sc. Work (sc, ch 2, sc) in each corner ch-3 sp. Along the bottom edge, after the corner: sk 1 st, 5 dc in next st, sk 1 st, sc in next st. Repeat 29 times, so the last sc goes in the 116th st. Join.
- Top edge: 116 sc + 2 corner sc = 118 sc
- Long sides: 377 sc + 2 corner sc = 379 sc each
- Bottom edge: 29 scallops (145 dc and 29 sc) between the corner sc
Why the math works: The scallop repeat uses 4 sts, and 116 bottom-edge sts make exactly 29 repeats. Every motif gives exactly 29 sc per side, so the border matches the mesh gauge and lies flat. That works out to 116 sc across 24 in (61.0 cm) and 377 sc along 78 in (198.1 cm), both about 4.8 sc per inch.
Hanging Tabs (rust)
With RS facing, work across the 118 sts of the top edge, starting at the right corner sc.
Skip 5 sts. Join rust in the next st.
Row 1: Ch 1, sc in same st and in next 7 sts. (8 sc)
Rows 2-18: Ch 1, turn, sc in each st. (8 sc)
Fasten off, leaving a 12 in (30.5 cm) tail.
Skip 17 sts, then work the next tab in the following 8 sts. Continue until you have 5 tabs. The spacing adds up to 5 + (8 + 17) x 4 + 8 + 5 = 118 sts.
Fold each tab to the WS and whipstitch Row 18 to the back of border Rnd 1. Each loop fits a rod up to 1 in (2.5 cm) thick.
Final Blocking
- Weave in all ends along the mesh chains, splitting the yarn as you go.
- Lay the panel flat on a large blocking surface or on clean sheets on the floor.
- Measure out a 25 in x 79.25 in (63.5 cm x 201.3 cm) rectangle.
- Pin the four corners, then pin the edges at each motif seam, every 6 in (15.2 cm).
- Spread each leaf with your fingers so that all five tips point outward.
- Spray until the panel is damp but not soaked.
- Let it dry completely before you remove the pins.
- Block the second panel to the same measurements.
Final Quality-Control Checklist
- Each motif measures 6 in (15.2 cm) square.
- Each leaf has 5 lobes, a stem, and a raised vein on every lobe.
- Leaf rows alternate rust and cream, starting and ending with rust.
- All leaves point up.
- At every corner junction, the corners meet at one point.
- Border Rnd 1 has 116 sc on the top and bottom and 377 sc on each long side.
- The bottom edge has 29 scallops.
- Each panel has 5 evenly spaced tabs.
- Both panels measure 25 in x 79.25 in (63.5 cm x 201.3 cm).
Troubleshooting
Leaf curls or cups: The spines are too tight. Chain the spines more loosely, or use a 4.5 mm hook for the spines only.
No visible vein: On the way up each lobe, work into the free loops of the spine chain, not into the sl sts.
Mesh puckers between motifs: The joining chains are too tight. Redo the join with looser chains.
Panel is too short: Check your motif gauge. Blocking adds about 0.25 in (0.6 cm) per motif at most.
Border ruffles: You have extra sc in the loops. Recount to 29 per motif side.
Tabs twist: Pin each tab straight before you sew it down.
Care
Hand wash in cool water with mild soap, roll in a towel to press out the water, and dry flat. Pin back to size if the mesh relaxes.
Final Notes
The measurements build on each other. A 4.5 in (11.4 cm) leaf becomes a 6 in (15.2 cm) motif. A grid of 4 x 13 motifs makes a 24 in x 78 in (61.0 cm x 198.1 cm) panel. The border adds 0.5 in (1.3 cm) on the top and sides and 0.75 in (1.9 cm) at the bottom, so the finished panel measures 25 in x 79.25 in (63.5 cm x 201.3 cm). Check your size at each stage and both panels will hang evenly.
Happy crocheting!