

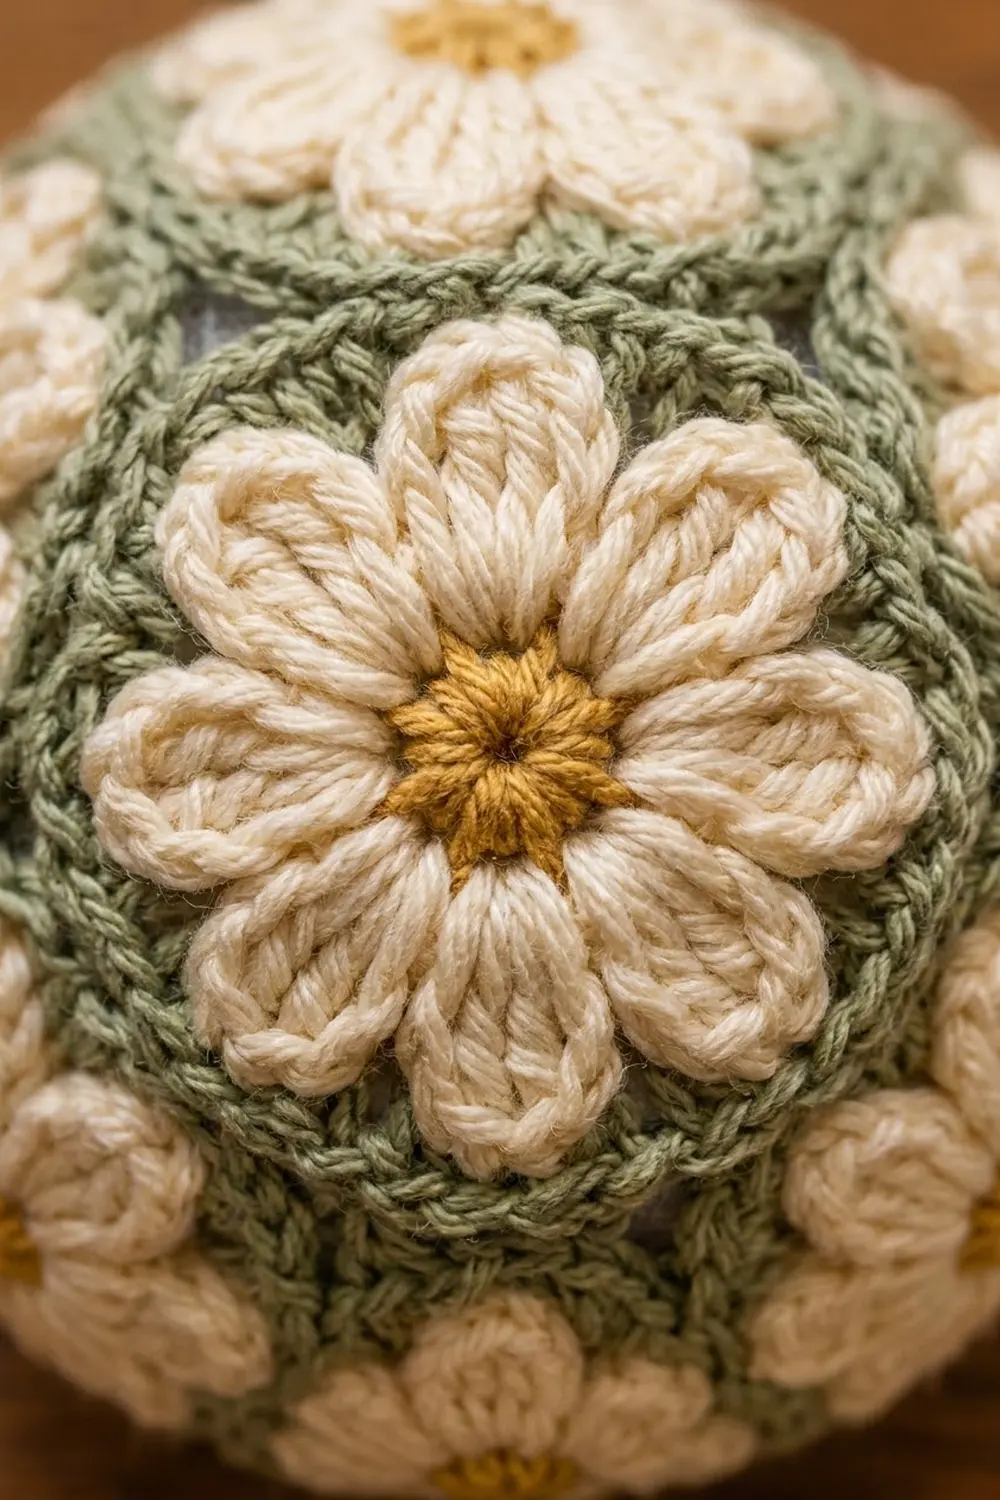
This ornament ball is covered in small cream daisies. Each flower has a warm mustard-gold center and is outlined in soft sage green. When the twelve flowers are joined, the green edges become raised ridges that frame every bloom, a bit like a garden trellis wrapped around a sphere.
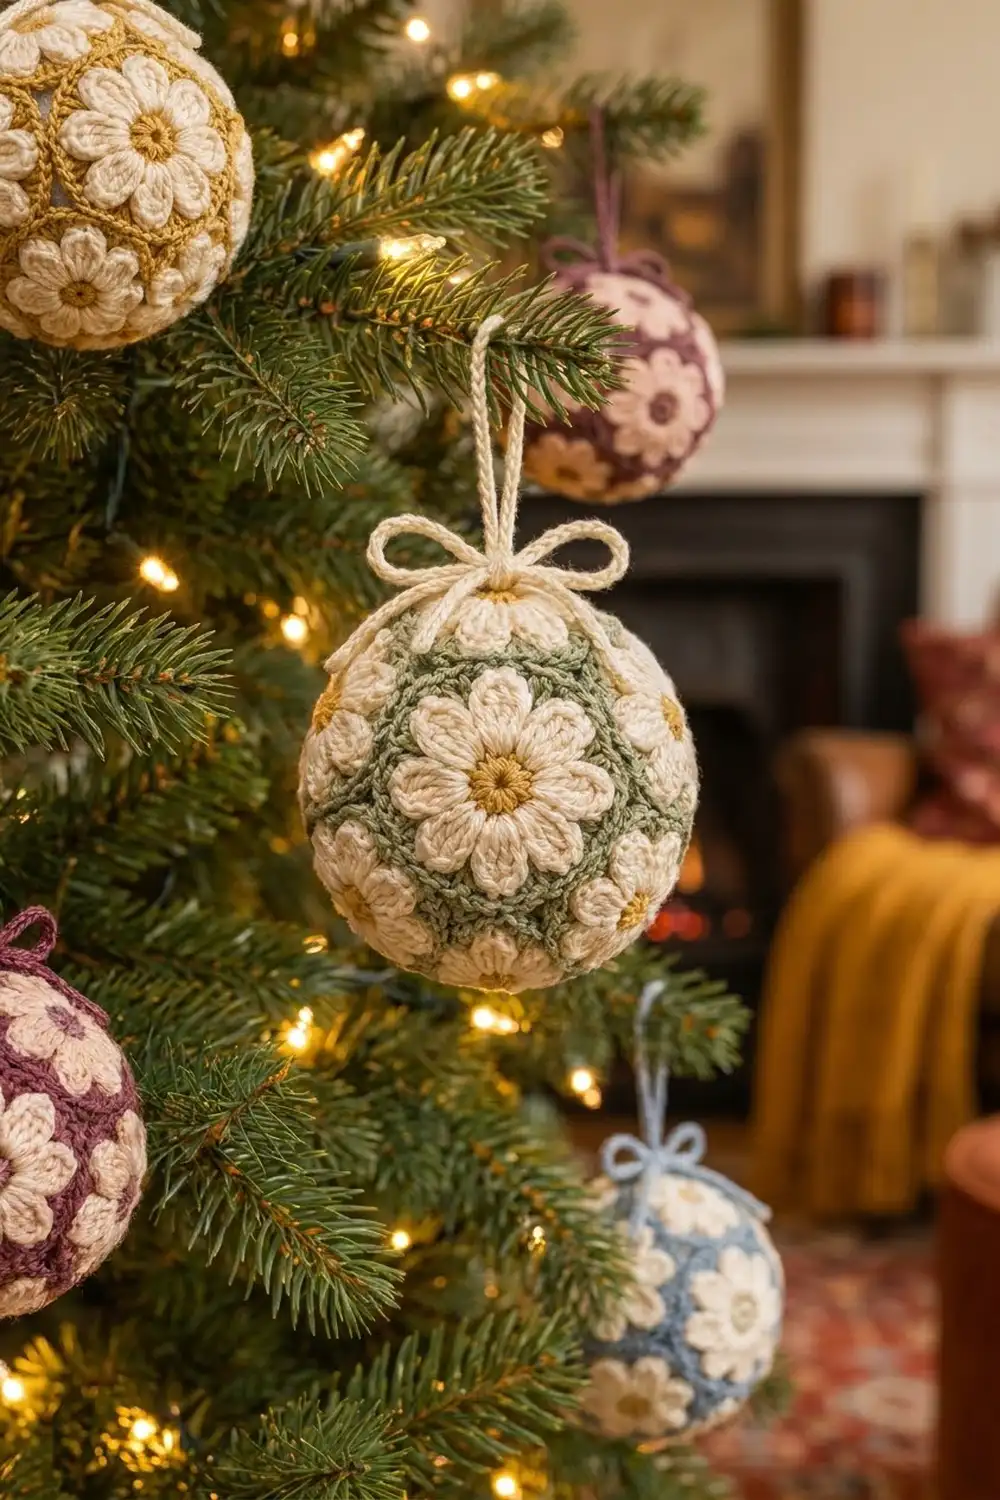
The palette is calm and vintage: cream, sage and gold. It suits both rustic and classic trees. A cream chain loop and a small bow finish the top, so the ornament is ready to hang.
This pattern uses US crochet terms. The finished ball measures about 3½ in (8.9 cm) across between the seam ridges and about 3¾ in (9.5 cm) across the ridges. Each flat motif measures 2⅛ in (5.4 cm) across.
The construction is simple:
– Crochet 12 round flower motifs.
– Whipstitch 11 of them together into an open shell.
– Stuff the shell, then close it with the twelfth motif.
– Work a green slip-stitch ridge over every seam.
– Add the hanging loop and bow.
Finished Size and Construction
- Finished ball: 3½ in (8.9 cm) between ridges; 3¾ in (9.5 cm) across ridges
- Skill level: Intermediate
- Terminology: US crochet terms
- Yarn weight: Sport weight (2) cotton or cotton blend
- Hook: 3.0 mm
- Number of pieces: 12 flower motifs, plus 1 hanging loop and 1 bow
- Layout: Dodecahedron. Each motif joins five neighbours, for 30 seams in total.
- Motif size: 2⅛ in (5.4 cm) across when flat
- Ball size before border (seam ridges): 3½ in (8.9 cm)
- Border depth: The seam ridges stand about ⅛ in (0.3 cm) proud of the surface.
Materials
Choose a smooth, mercerized sport-weight cotton. It shows the petal texture clearly and holds its shape once stuffed. Fuzzy yarns blur the green ridges, so avoid them. The amounts below assume a yarn of about 150 m per 50 g (3 m per gram).
- Gold (A): 2 g, about 6 m
- Cream (B): 12 g, about 36 m (motifs, loop and bow)
- Sage green (C): 9 g, about 27 m (edging rounds, joining and seam ridges)
These quantities include a margin of about 20% for gauge swatches and tails.
Tools:
– 3.0 mm crochet hook
– Tapestry needle
– 6–8 locking stitch markers
– About 10 g (0.35 oz) polyester fiberfill
– Rustproof pins and a foam blocking mat
– Scissors
– Small ruler or tape measure
Abbreviations (US Terms)
- ch – chain
- sl st – slip stitch
- sc – single crochet
- hdc – half double crochet
- dc – double crochet
- sc2tog – single crochet 2 together
- BLO – back loop only
- MR – magic ring
- st(s) – stitch(es)
Special stitch – surface slip stitch (surf sl st): Hold the yarn behind the work. Insert the hook from front to back through the fabric, pull up a loop, and draw it through the loop on your hook. A row of these makes a raised, chain-like line on the right side.
Gauge and Checkpoints
Make one full motif before anything else, and measure it.
Gauge: 6 sc = 1 in (2.5 cm), measured along Round 5.
Check the motif at each stage. Measure across the widest point, with the motif lying flat and unstretched:
- After Round 1: ½ in (1.3 cm)
- After Round 2: ⅞ in (2.2 cm)
- After Round 3: 1¾ in (4.4 cm), from petal tip to petal tip
- After Round 4: 2 in (5.1 cm)
- After Round 5: 2⅛ in (5.4 cm)
If your motif is bigger than 2⅛ in (5.4 cm): Go down to a 2.75 mm hook. Large motifs make a ball that is too large, and the seams can gape.
If your motif is smaller than 2 in (5.1 cm): Go up to a 3.25 mm hook. Small motifs make a ball that is stiff and hard to stuff evenly.
Stitch counts matter more than size here. Every motif must end with exactly 40 sts, or the joining will not line up.
Flower Motif (Make 12)
Round 1 (A, gold): Make a MR. Ch 1, then work 8 sc into the ring. Pull the ring closed and sl st to the first sc. Fasten off. (8 sc)
Round 2 (B, cream): Join B in any sc. Ch 1, then work 2 sc in each st around. Sl st to the first sc. (16 sc)
Round 3 (B, cream) – petals: Ch 1.
1. *In the next st, work (hdc, 2 dc).
2. In the following st, work (2 dc, hdc).
3. Repeat from * around.
This makes 8 petals of 6 sts each. Sl st to the first hdc and fasten off. (48 sts: 8 petals × 6 sts)
Each petal grows from 2 sts of Round 2, so the petals sit side by side with a natural dip between them. That dip gives the daisy shape.
Round 4 (C, sage) – trim round: Join C in the first dc of any petal. Ch 1.
1. *Work 1 sc in each of the 4 dc of the petal.
2. Sc2tog over the last hdc of this petal and the first hdc of the next petal.
3. Repeat from * around.
Sl st to the first sc. (32 sc worked 1-per-stitch + 8 sc2tog = 40 sts)
The sc2tog at each petal junction pulls the edging into the dips, which creates the gentle scallop seen in the photo.
Round 5 (C, sage): Ch 1. Work 1 sc in the BLO of each st around. Sl st to the first sc. (40 sc)
Fasten off and leave a 16 in (40.6 cm) tail. You will use this tail for joining.
Working in the BLO leaves the front loops of Round 4 as a fine line on the right side. It also gives a firm edge to sew into.
Mark the sides: Count the 40 sts of Round 5 into 5 sides of 8 sts each. Place a marker between sts 8 and 9, 16 and 17, 24 and 25, 32 and 33, and 40 and 1.
These markers are points, not stitches. Each side has exactly 8 sts, and no stitch belongs to two sides. (5 sides × 8 sts = 40 sts)
Make All Pieces
Make 12 motifs. The colors are the same for all of them:
- A (gold): Round 1, 12 times
- B (cream): Rounds 2–3, 12 times
- C (sage): Rounds 4–5, 12 times
Weave in the A and B tails on the wrong side as you finish each motif. Keep the long C tail.
Layout map (numbers are motifs):
            [1]            <- top
   [2] [3] [4] [5] [6]     <- upper ring (each touches 1)
   [7] [8] [9] [10] [11]   <- lower ring (zig-zags under upper ring)
           [12]            <- bottom (closes the ball)
- Each upper-ring motif touches motif 1, its two ring neighbours, and two lower-ring motifs.
- Each lower-ring motif touches two upper-ring motifs, its two ring neighbours, and motif 12.
Joining
Method: Hold two motifs with their wrong sides together and their right sides facing out. Line up one 8-st side of each motif, point to point. With the C tail, whipstitch through the back loops of Round 5 only, matching 1 st to 1 st. Each seam uses exactly 8 stitch pairs.
Joining order:
1. Join motif 1 to motifs 2, 3, 4, 5 and 6, one side each. (5 seams)
2. Join the neighbouring sides within the upper ring: 2–3, 3–4, 4–5, 5–6 and 6–2. This cups the piece into a bowl. (5 seams, 10 total)
3. Join each lower-ring motif into the V between two upper-ring motifs: 7 to 2 and 3, 8 to 3 and 4, 9 to 4 and 5, 10 to 5 and 6, and 11 to 6 and 2. (10 seams, 20 total)
4. Join the neighbouring sides within the lower ring: 7–8, 8–9, 9–10, 10–11 and 11–7. (5 seams, 25 total)
Three motifs meet at every point. Take one extra stitch through all three corners before moving on, to close any pinhole.
Tension advice: Pull each stitch just snug enough that the loops lie side by side. If you pull too hard, the seams pucker and the ball turns lumpy. If the stitches are too loose, the stuffing will show.
Size checkpoint: The open shell should have five free 8-st sides around its opening. The opening should measure about 2 in (5.1 cm) across.
Stuff and close: Pull fiberfill into small wisps and fill the shell firmly but evenly. Roll it between your palms as you go. Sew motif 12 into the opening, one side at a time, adding stuffing just before the last side. (5 seams, 30 total)
Total check: 30 seams × 8 pairs = 240 pairs. That uses all 12 × 40 = 480 edge sts.
Border: Green Seam Ridges
The “border” on this ball is a raised surface ridge worked over every seam. This ridge makes the green net that frames each flower.
Border gauge: 6 surf sl st = 1 in (2.5 cm). One seam is 8 sts long, which is 1⅓ in (3.4 cm).
Ridge round:
1. With C, start at any point where three motifs meet. Work 1 surf sl st into the center of each whipstitched stitch pair, so you place 8 surf sl st per seam.
2. Ignore the turning point between seams. Turn and continue along the next seam.
3. Plan a path that covers several seams in one length of yarn, then fasten off and start again where needed. Every seam should be covered once and only once.
Counts:
– Per seam: 8 surf sl st, the same as the 8-st side of one motif.
– Total: 30 seams × 8 = 240 surf sl st.
Why the math works: Each seam joins two 8-st sides into 8 stitch pairs, and you work 1 ridge stitch per pair. The ridge therefore matches one motif’s per-side count exactly, with no extra stitches at the points. Because the points are not stitches, nothing is counted twice. The ridge lies flat and does not pull the ball out of round.
Hanging loop: With B, ch 40 (about 6 in, 15.2 cm). Fold the chain in half and sew both ends securely to the center of motif 1.
Bow: With B, ch 60 (about 9 in, 22.9 cm). Wrap the chain around the base of the loop, tie a bow, and secure the knot with a few stitches.
Final Blocking
- Before joining, pin each motif to 2⅛ in (5.4 cm) and steam it lightly. Hold the iron above the motif; do not press. Let each motif dry fully.
- After stuffing, roll the ball between your palms for a minute to even out the fiberfill.
- Hover steam over the ball, turning it as you go, to relax the seam ridges.
- While it is warm, gently press any flat spots outward from inside by working fiberfill with a blunt needle through a seam gap.
- Let the ball dry completely before hanging it.
- Steam the bow lightly and shape the loops with your fingers.
Final Quality-Control Checklist
- All 12 motifs have 40 sts in Round 5.
- All 12 motifs measure 2⅛ in (5.4 cm) across.
- There are 30 seams, each with 8 stitch pairs.
- No pinholes at any of the 20 points where three motifs meet.
- Every seam is covered by 8 surf sl st, for 240 in total.
- The ball measures 3½ in (8.9 cm) between ridges and 3¾ in (9.5 cm) across ridges.
- No fiberfill shows through the seams.
- The loop is centered on motif 1, and the bow is secure.
- All tails are woven into the inside of the ball.
Troubleshooting
- Petals look flat: Your tension on Round 3 is too tight. Loosen the dc slightly, or go up a hook size for Round 3 only.
- Edge ruffles after Round 4: You missed an sc2tog. Recount; you should have 40 sts.
- Sides don’t line up when joining: Re-place the markers so that each side has 8 sts.
- Holes at the points: Add one extra stitch through all three corners.
- Lumpy ball: Pull the fiberfill into smaller wisps, and roll the ball between your palms more.
- Ridge puckers: Your surf sl st are too tight. Work them more loosely, or use a 3.25 mm hook for the ridge.
Care
Spot clean with cool water and mild soap, then reshape the ball and let it air dry. Store it in a box with tissue paper so it keeps its round shape.
Final Notes
Here is the measurement chain from start to finish:
1. Each motif ends at 40 sts and 2⅛ in (5.4 cm) across.
2. Its 5 sides have 8 sts each.
3. The 30 seams use 8 stitch pairs each.
4. The 240 ridge stitches match the seams 1 for 1.
5. The finished ball is 3½ in (8.9 cm) between ridges and 3¾ in (9.5 cm) across them.
If your first motif’s stitch counts and size are right, everything after it will line up. Once you have the method down, try the gold, plum or blue colorways for a whole set of ornaments.
Happy crocheting!