

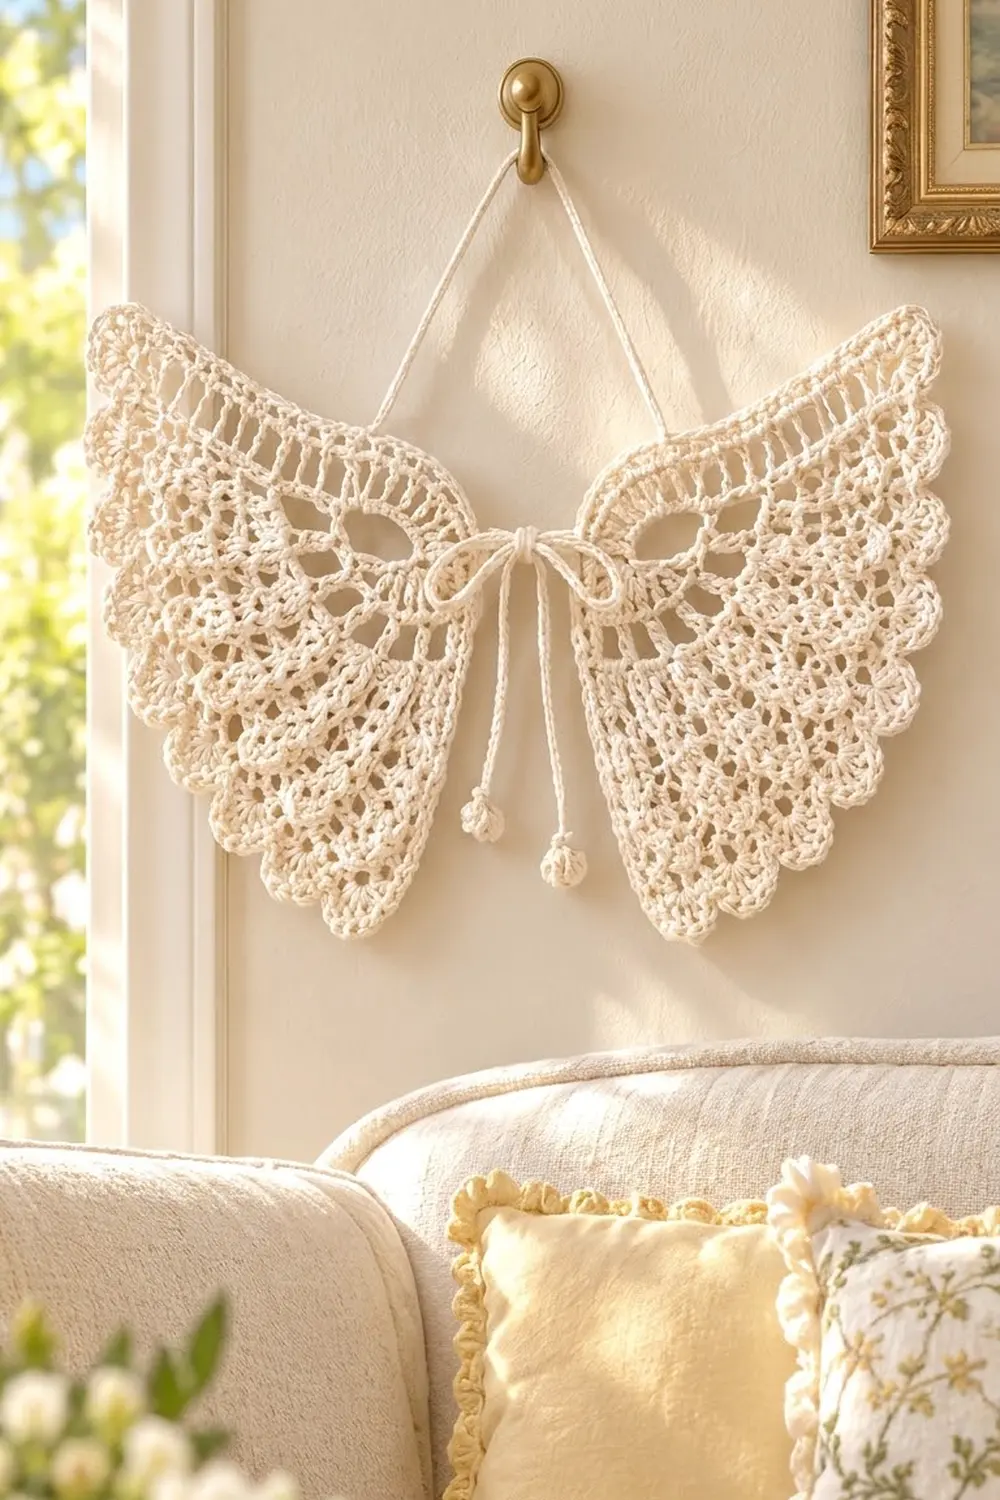
These lace angel wings are made in a single soft cream cotton thread. Each wing has a straight top edge with a picot trim, an open filet ladder band, a chain-loop mesh that tapers toward the wingtip, and a lower edge of fan-shaped scallops. A little chain-cord bow with two tiny bobble ends sits where the wings meet, and a chain loop hangs the piece from a hook.
The style is light, airy, and a little vintage. It looks lovely on a nursery wall, above a reading chair, or as a memorial keepsake. It also makes a thoughtful gift for a new baby or a christening. Because it uses one color, the stitch pattern does all the work.
This pattern uses US crochet terms. The finished wall hanging measures 14 in (35.6 cm) wide by 5.25 in (13.3 cm) tall at the deepest point, not counting the hanging loop.
You make two identical wings in rows from the top edge down, shaping them with short rows, and finish each one with a scallop row. Then you flip one wing over to mirror it, sew the top bands together at the center, and work a picot border across both top edges in one pass. Finally, you add the bow and the hanging loop.
Finished Size and Construction
- Finished size: 14 in (35.6 cm) wide x 5.25 in (13.3 cm) tall
- Skill level: Intermediate
- Terminology: US crochet terms
- Yarn weight: Size 3 cotton crochet thread (light fingering)
- Hook: 2.25 mm (US B-1)
- Number of pieces: 2 wings, plus 2 chain cords
- Layout: 2 wings side by side, mirror images, joined at the center top
- Piece size (one wing, before border): 7 in (17.8 cm) wide x 5 in (12.7 cm) deep at the inner edge
- Size before border (joined): 14 in (35.6 cm) x 5 in (12.7 cm)
- Border depth: 0.25 in (0.6 cm), top edge only
Materials
Pick a mercerized cotton thread with a crisp twist. It shows lace stitches clearly and blocks well. Avoid fuzzy or very soft yarns, because the chain loops will lose their shape.
- Cream: about 40 g / 110 m (120 yd) of size 3 cotton crochet thread
One 50 g ball is enough for the whole project.
Tools:
- 2.25 mm (US B-1) crochet hook
- Tapestry needle
- Scissors
- 5 stitch markers
- Rust-proof pins and a blocking mat
- Spray bottle with water
- Optional: liquid starch or fabric stiffener
- Small brass wall hook for display
These quantities include a margin of about 25% for checking your gauge and for any ripping back.
Abbreviations (US Terms)
- ch – chain
- sl st – slip stitch
- sc – single crochet
- dc – double crochet
- yo – yarn over
- sk – skip
- sp(s) – space(s)
- RS – right side
- st(s) – stitch(es)
Special stitches
- Shell: 7 dc in the same loop.
- Picot: ch 3, sl st in the 3rd ch from the hook.
- Bobble end: in the 3rd ch from the hook, (yo, insert hook, pull up a loop, yo, pull through 2 loops) 5 times, yo, pull through all 6 loops on the hook.
Gauge and Checkpoints
Gauge: 14 sc = 2 in (5.1 cm). 4 loop rows = 1.5 in (3.8 cm) unblocked.
Rather than making a separate swatch, make one wing first and check your measurements as you go. Lace changes shape a lot when you block it, so lightly pin and steam the wing before you decide whether your gauge is right.
Checkpoints for one wing:
- After Row 1: 7 in (17.8 cm) wide.
- After Row 3: the top band is 0.75 in (1.9 cm) deep.
- After Row 13: 4.5 in (11.4 cm) deep at the inner edge.
- After the Scallop Row: 5 in (12.7 cm) deep at the inner edge.
If Row 1 is wider than 7 in (17.8 cm), go down a hook size. If it is narrower, go up a hook size. If your width is right but the loop rows come out too long, tighten your chains a little. You can also make ch-4 loops instead of ch-5 loops, but use the same loop length on both wings. Write down your hook size and loop length so the second wing matches.
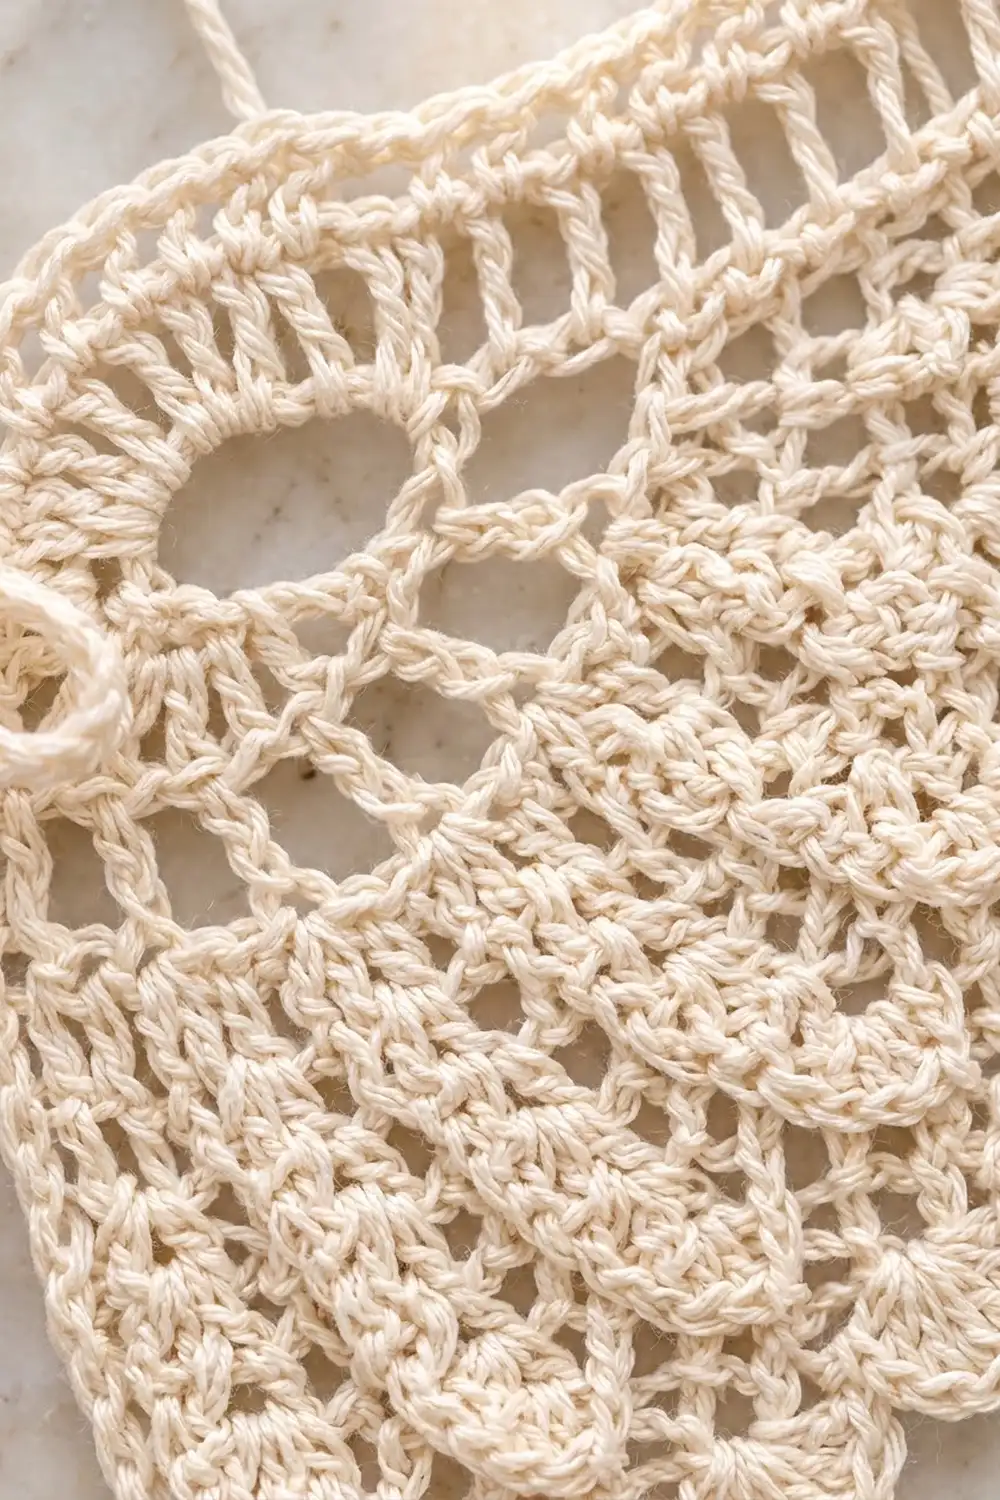
Wing (Make 2)
Each wing starts at the outer wingtip with the foundation chain. Row 1 is worked from the inner edge to the outer edge, so the rows that start at the outer end are always even-numbered.
Top Band
Foundation: Ch 50.
Row 1 (RS): Sc in the 2nd ch from the hook and in each ch across. Turn. (49 sc)
Row 2: Ch 3 (counts as dc), sk the first sc, ch 2, sk 2 sc, dc in the next sc; repeat from * 15 more times. Turn. (17 dc, 16 ch-2 sps)
This row forms the open ladder band and covers all the stitches: 1 + (16 x 3) = 49.
Row 3: Ch 1, sc in the first dc, 2 sc in the next ch-2 sp, sc in the next dc; repeat from * across, working the last sc in the 3rd ch of the turning ch. Turn. (17 sc + 32 sc = 49 sc)
Loop Mesh
The lower wing is a net of ch-5 loops. Two rules shape the wing:
- Odd rows (inner edge to outer end): leave the last loop of the previous row unworked. This drops 1 loop.
- Even rows (outer end to inner edge): sl st into the center of the first loop to step in. The loop count stays the same, but the row moves half a loop toward the inner edge.
Together, these rules make the outer edge slope from the wingtip down to the deepest point at the inner edge.
Row 4: Ch 1, sc in the first sc, ch 5, sk 3 sc, sc in the next sc; repeat from * 11 more times. Turn. (12 loops; 1 + 12 x 4 = 49 sts used)
Row 5 (odd): Ch 1, sc in the first sc, ch 5, sc in the next loop; repeat from * 10 more times. Leave the last loop unworked. Turn. (11 loops)
Row 6 (even): Sl st in the first 3 ch of the first loop, ch 1, sc in the same loop, ch 5, sc in the next loop; repeat from * 9 more times, ch 5, sc in the last sc. Turn. (11 loops)
For Rows 7–13, keep following the odd and even row rules. Each odd row has 1 fewer loop than the row before it. Each even row has the same number of loops as the row before it.
- Row 7: 10 loops
- Row 8: 10 loops
- Row 9: 9 loops
- Row 10: 9 loops
- Row 11: 8 loops
- Row 12: 8 loops
- Row 13: 7 loops. Fasten off.
When you finish, there are 5 unworked loops along the sloped outer edge: the last loop of Rows 4, 6, 8, and 10, and the last loop of Row 12.
Tip: As you work each odd row, put a stitch marker in the loop you leave unworked. That makes the 5 slope loops easy to find and count during the Scallop Row.
Scallop Row
With the RS facing, join the thread with a sl st in the first sc of Row 13 at the inner edge. Ch 1, sc in the same sc.
Across Row 13: Shell in the next loop, sc in the next sc; repeat from * 6 more times. (7 shells)
Up the slope: Shell in the next unworked loop, sc in the end sc of the next shorter row; repeat from * 4 more times. Work the final sc into the end of Row 3 at the wingtip. (5 shells)
Fasten off. (12 shells; 84 dc + 13 sc = 97 sts)
Check that the wing is 7 in (17.8 cm) wide and 5 in (12.7 cm) deep at the inner edge.
Make All Pieces
- Cream: 2 wings, about 15 g each
- Cream: 1 bow cord and 1 hanging cord, about 3 g together
Layout, as seen from the front:
[ Wing B, flipped  ][  Wing A          ]
  outer tip ... inner | inner ... outer tip
To mirror Wing B, turn it face down. The lace looks good from both sides, so neither wing shows a wrong side.
Joining
Lay the wings side by side so the inner edges touch and both foundation-chain edges are at the top. Before you sew, check that both wingtips point outward. It is easy to join two wings facing the same way by mistake.
Method: Whipstitch with the tapestry needle and a 12 in (30.5 cm) tail.
Stitch-to-stitch logic: Join only the top band, matching row end to row end:
- Row 1 sc end to Row 1 sc end
- Row 2 dc post to Row 2 dc post (2 passes, because the dc is taller)
- Row 3 sc end to Row 3 sc end
The join is 0.75 in (1.9 cm) long. Leave the loop mesh free below the band so the wings open into a soft V.
Tension: Pull the thread until the edges touch, but not so tight that they pucker. Weave in the tail along the Row 2 dc post.
Size checkpoint: The joined top edge is 49 + 49 = 98 foundation chains wide and measures 14 in (35.6 cm).
Border
The border runs along the top edge only. The lower edges are already finished with scallops.
Border gauge: 7 sc = 1 in (2.5 cm), the same as Row 1.
Border Row 1: With the RS facing, join the thread in the free loop of the first foundation ch at Wing B’s tip. Ch 1, then sc in the same loop and in each free loop across to the seam (49 sc). Continue straight across Wing A without adding a stitch at the seam (49 sc). Turn. (98 sc)
Border Row 2: Ch 1, sc in each of the next 2 sc, picot; repeat from * 48 more times. Fasten off. (98 sc, 49 picots)
Why the math works: Each wing has 49 foundation chains, so the top edge has 2 x 49 = 98 sts. You don’t add a stitch at the seam, because the sewn row ends have no foundation loop to work into. Next, 98 ÷ 2 = 49, so the picot repeat fits exactly and both ends finish the same way. At 7 sc per inch, 98 sc = 14 in (35.6 cm), which matches the joined width.
Bow and Hanging Loop
Bow cord: Ch 3, then work a bobble end in the 3rd ch from the hook. Chain until the cord measures 16 in (40.6 cm). Ch 3, work a second bobble end in the 3rd ch from the hook, and fasten off. Thread the cord through the innermost Row 4 loop of each wing, just below the seam. Tie a bow with tails about 1.5 in (3.8 cm) long.
Hanging loop: Chain until the cord measures 8 in (20.3 cm). Sew one end to a Border Row 1 sc on each side of the seam, so the cord forms a loop above the bow.
Final Blocking
- Weave in all ends. Leave the bow untied for now.
- Soak the piece in cool water for 10 minutes. Press the water out in a towel, without wringing.
- Pin the top edge straight to 14 in (35.6 cm).
- Pin each inner edge so the wing is 5 in (12.7 cm) deep below the top edge, then fan the wings slightly outward.
- Pin the center of each shell to open the scallops. Pin each ch-5 loop so it opens into a diamond.
- Pin each picot pointing up.
- Optional: mist with starch for a stiffer hanging.
- Let the piece dry completely, then unpin it and tie the bow.
Final Quality-Control Checklist
- Each wing has 49 sc in Rows 1 and 3, and 17 dc in Row 2.
- The loop counts in Rows 4–13 are 12, 11, 11, 10, 10, 9, 9, 8, 8, 7.
- Each wing has 12 shells: 7 along the bottom and 5 up the slope.
- The wings mirror each other, and both tips point outward and up.
- The seam is 0.75 in (1.9 cm) long and lies flat.
- Border Row 1 has 98 sc, and Border Row 2 has 49 picots.
- The piece measures 14 in (35.6 cm) x 5.25 in (13.3 cm).
- The bow is centered, and the bobble ends hang evenly.
Troubleshooting
- The top edge ripples: The foundation chain is too loose. Redo it with a smaller hook, then switch back to the 2.25 mm hook for Row 1.
- The top edge cups: The chain is too tight. Chain with a larger hook.
- The wing curls: The ch-5 loops are too short for your sc tension. Loosen your chains, or block with starch.
- The slope looks jagged: Make sure the sl st step-in stops at the 3rd ch, the center of the loop, and doesn’t go past it.
- The shells flare: Use 6 dc per shell on the slope only.
- The loop count is off: Check the odd rows. The last loop must be left unworked.
- The bow slips: Tie a double knot under the bow, or sew the knot to the seam with a few stitches.
- The wings droop when hung: Starch the top band, or attach the hanging loop slightly farther from the seam.
Care
Hand wash in cool water with mild soap, then reshape the piece and pin it flat to dry. If you used starch, starch it again after washing.
Final Notes
Each measurement builds on the one before it. With 14 sc = 2 in (5.1 cm), the 49 sc of Row 1 make a 7 in (17.8 cm) wing. The 0.75 in (1.9 cm) top band plus 10 loop rows makes the inner edge 4.5 in (11.4 cm) deep, and the scallops add 0.5 in (1.3 cm) for a total of 5 in (12.7 cm). Two wings give 98 stitches across the top, or 14 in (35.6 cm). The picot border adds 0.25 in (0.6 cm), for a finished size of 14 in x 5.25 in (35.6 cm x 13.3 cm).
Happy crocheting!