

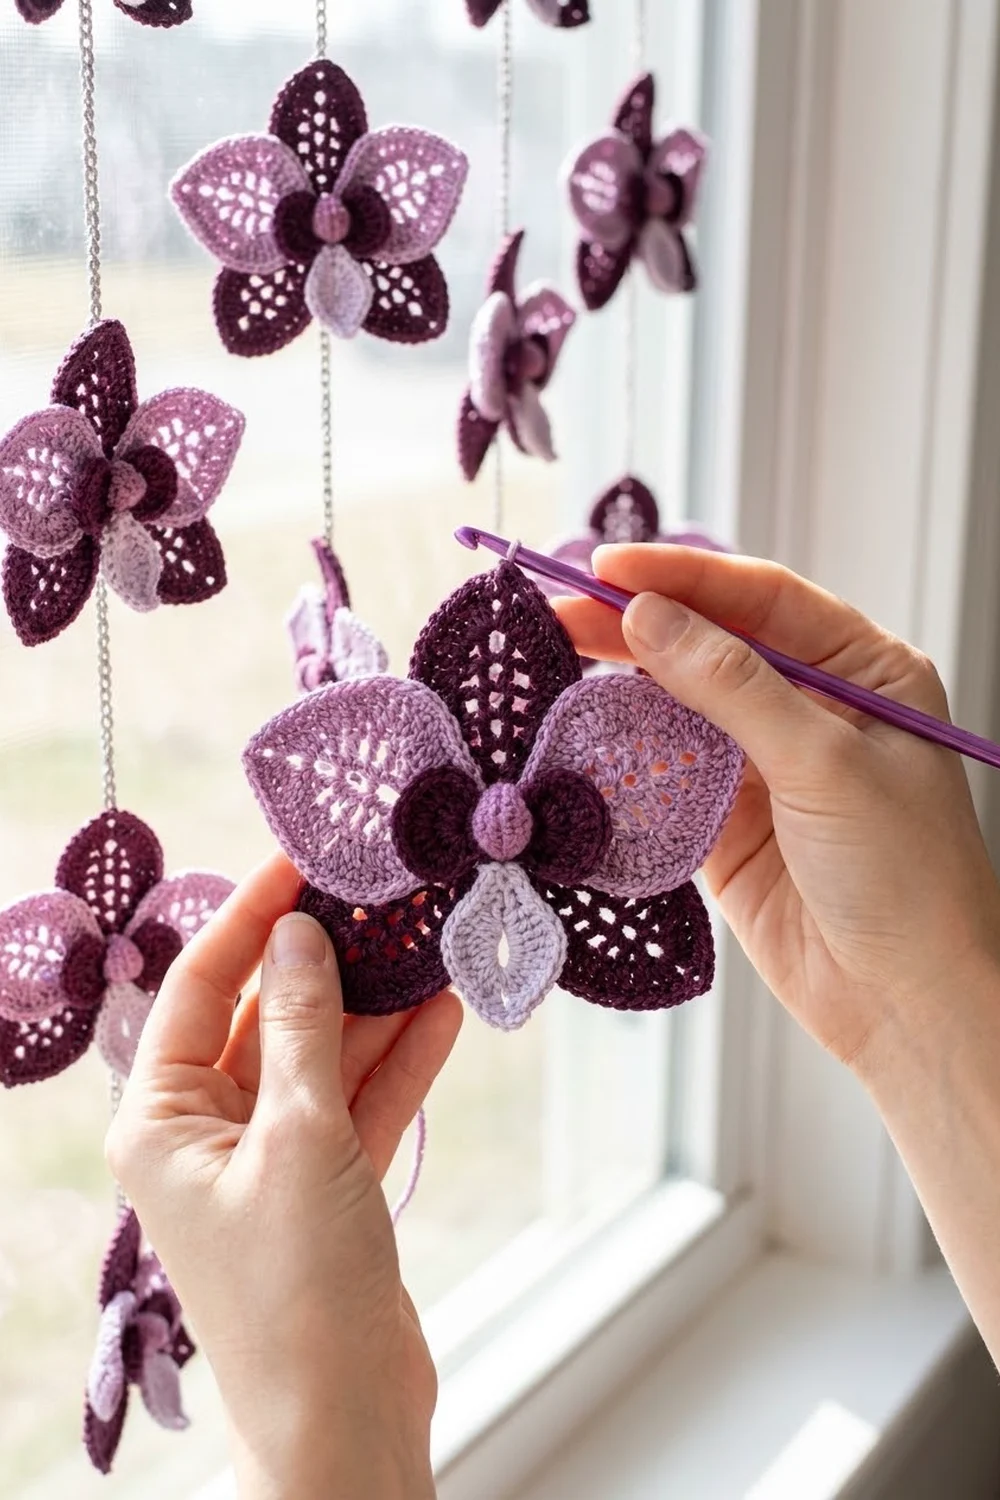
This six-petal flower looks like an orchid. Each petal is a pointed oval of open ladder mesh, so light shows through it, and a firm single-crochet outline holds the shape crisp. Two dark plum petals point straight up and down. Four lilac petals fan out on the diagonals.
A small lilac cluster with a pale lavender lip sits on top of the dark plum center. It gives the flower the look of a real orchid’s center. The style is light and romantic, with sharp points and no ruffles.
The pattern uses US crochet terms. The finished flower is 5.75 in (14.6 cm) tall from tip to tip and about 5.25 in (13.3 cm) wide.
Here’s how it’s built. You crochet a small center in rounds. Each petal is then worked straight off the center around its own foundation chain and gets a single-crochet outline. Last, you add the raised lilac cluster in the free front loops and sew on the small lavender lip.
Finished Size and Construction
- Finished size: 5.75 in (14.6 cm) tall x 5.25 in (13.3 cm) wide
- Skill level: Intermediate (working into both sides of a chain, front/back loops)
- Terminology: US
- Yarn weight: Sport (#2) cotton
- Hook: 2.75 mm (C-2)
- Number of pieces: 1 flower (plus a tiny sewn-on lip)
- Layout: 6 petals at 60° intervals around a round center
- Center size: 1.25 in (3.2 cm) across
- Petal size before edging: 2 in (5.1 cm) long x 1 in (2.5 cm) wide
- Petal size after edging: 2.25 in (5.7 cm) long x 1.25 in (3.2 cm) wide
- Edging depth: 0.125 in (0.3 cm) along the sides, about 0.25 in (0.6 cm) at the tip
Materials
Use a smooth mercerized cotton in sport weight. Mercerized cotton shows the ladder rungs clearly, holds a sharp point and blocks well. Fuzzy yarns blur the open spaces.
- Color A, dark plum: 4 g / 12 m (center and 2 petals)
- Color B, lilac: 5 g / 15 m (4 petals and the raised cluster)
- Color C, pale lavender: 1 g / 3 m (lip)
All quantities include a margin for swatching and weaving in ends.
Tools:
– 2.75 mm (C-2) crochet hook
– Tapestry needle
– 2 locking stitch markers
– Rust-proof pins and a foam blocking board
– Small scissors
– Ruler or tape measure
Abbreviations (US Terms)
- ch – chain
- sl st – slip stitch
- sc – single crochet
- hdc – half double crochet
- dc – double crochet
- MR – magic ring
- BLO – back loop only
- FL – front loop
- sp – space
- st(s) – stitch(es)
- rep – repeat
- pc – popcorn
Special stitch, popcorn (pc): Work 5 dc in the indicated place. Remove the hook from the loop. Insert the hook from front to back into the top of the first dc, pick up the dropped loop and pull it through. Ch 1 to close.
Working into free loops: After you work along the top of a foundation chain, rotate the piece and work into the single loop left on the underside of each chain.
Gauge and Checkpoints
Gauge: 24 sc and 26 rows = 4 in (10.2 cm) with the 2.75 mm hook.
Gauge matters less here than for a garment, but the petal proportions depend on it. Make one test petal first, following the checkpoints below.
Checkpoint 1, center: After Round 2 the center measures 1.25 in (3.2 cm) across.
Checkpoint 2, foundation: The 15 working chains of a petal foundation measure 2 in (5.1 cm) when relaxed.
Checkpoint 3, petal before edging: 2 in (5.1 cm) long x 1 in (2.5 cm) wide.
Checkpoint 4, petal after edging: 2.25 in (5.7 cm) long x 1.25 in (3.2 cm) wide.
Checkpoint 5, finished flower: 5.75 in (14.6 cm) tip to tip vertically.
If your piece is too big, go down to a 2.5 mm hook, and keep your chains snug but not tight. If it’s too small, go up to a 3.0 mm hook. The most common cause of a small petal is a tight foundation chain. Try chaining with a hook one size larger and then switching back.
Pattern
Center (Color A, dark plum)
Round 1: MR, ch 1 (does not count as a st), 12 sc in ring. Pull the ring closed and sl st to the first sc. (12 sts)
Round 2: Ch 1, 2 sc in BLO of each st around. Sl st to the first sc. (24 sts)
The 12 front loops of Round 1 stay free on the right side. You’ll use them later for the raised cluster.
Fasten off and weave in the ends. Check the center against Checkpoint 1: 1.25 in (3.2 cm).
Petal placement: Place a marker in any st of Round 2 and call it st 1. Counting from st 1, divide the 24 sts into 6 groups of 4 sts (sts 1–4, 5–8, 9–12, 13–16, 17–20, 21–24). Each group holds one petal. Inside each group:
– st 1 = petal start
– st 2 = anchor at the end of Side A
– st 3 = edging anchor
– st 4 = left free as a spacer between petals
Color order (work around in order):
– Group 1: Color A (top petal)
– Group 2: Color B
– Group 3: Color B
– Group 4: Color A (bottom petal)
– Group 5: Color B
– Group 6: Color B
The two plum petals sit directly opposite each other.
Petal (make 6, one per group)
With the right side facing, join the petal color with a sl st in st 1 of the group.
Foundation: Ch 16.
Number the chains from the base: the one nearest the center is ch #1 and the one on the hook is ch #16. Ch #16 is skipped now and becomes the tip.
Petal Round 1:
Side A, worked toward the center:
1. Sc in the 2nd ch from the hook (ch #15).
2. Hdc in the next ch (#14), then dc in the next ch (#13).
3. [Ch 1, skip the next ch, dc in the next ch] 5 times. The dc’s land in #11, #9, #7, #5 and #3.
4. Ch 1, skip ch #2, hdc in ch #1.
5. Sl st in st 2 of the group.
Side A count: 9 sts (1 sc, 2 hdc, 6 dc) + 6 ch-1 sps = 15 elements.
Side B, worked toward the tip into free loops:
1. Rotate the piece. Hdc in the free loop of ch #1.
2. [Ch 1, skip the next ch, dc in the next ch] 6 times. The dc’s land in #3, #5, #7, #9, #11 and #13.
3. Hdc in ch #14, then sc in ch #15.
Side B count: 9 sts (1 sc, 2 hdc, 6 dc) + 6 ch-1 sps = 15 elements.
Tip: Work (sc, ch 2, sc) into ch #16. Sl st to the first sc of Side A.
Round 1 total: 20 sts (9 + 9 + 2 tip sc), 12 ch-1 sps and 1 ch-2 sp.
The foundation chain is now the central spine. The dc’s stand on both sides of it like ladder rungs, with the ch-1 spaces as the openings between them. The sc and hdc at each end taper the petal into a pointed oval.
Check the petal against Checkpoint 3: 2 in x 1 in (5.1 cm x 2.5 cm). Don’t fasten off. Place a locking marker in the live loop and work the Edging Round from the Border section right away. Then fasten off and start the next petal in st 1 of the next group.
Raised Center Cluster (Color B, lilac)
With the right side facing, join Color B with a sl st in any free FL of Round 1 of the center.
Cluster round: *(Hdc, dc, hdc) in the next FL, sl st in the next FL; rep from * 5 more times. For the final sl st, work into the joining FL.
Count: 6 mini petals of 3 sts each (18 sts) + 6 sl sts, using all 12 front loops.
Fasten off. Bring the ends to the wrong side and weave them in.
Lip (Color C, pale lavender)
MR, ch 3, 4 dc in the ring. Drop the loop and finish as a popcorn through the top of the ch-3. Ch 1, then pull the ring tight. Leave a 6 in (15.2 cm) tail.
Position the lip over the lower half of the lilac cluster with the rounded top of the popcorn pointing toward the bottom plum petal. Sew it down with 4–5 small stitches through the center rounds. Weave in the tail on the back.
Border: Petal Edging Round
This round outlines each petal. Work it right after that petal’s Round 1, in the same color.
Border gauge: One sc goes into every stitch and every ch-1 space. This adds 0.125 in (0.3 cm) along each side and about 0.25 in (0.6 cm) at the tip.
Edging round:
1. Ch 1. Sc in the same st as the join (the first sc of Side A).
2. Down Side A, work 1 sc in each st and each ch-1 sp, for 15 sc on Side A. The last sc goes into the hdc at ch #1.
3. Sl st in st 3 of the group.
4. Up Side B, work 1 sc in each st and each ch-1 sp, for 15 sc on Side B. The last sc goes into the sc at ch #15.
5. At the tip: sc in the first tip sc, (sc, ch 2, sc) in the ch-2 sp, sc in the second tip sc, for 4 sc at the tip.
6. Sl st to the first edging sc. Fasten off.
Edging total: 34 sc (15 + 15 + 4) + 1 ch-2 sp, plus 1 sl st at the base.
Why the math works: Each side of Round 1 has exactly 15 elements: 9 stitches and 6 spaces in alternating order. Along the outer edge, the top of a dc and a ch-1 space are each about one sc wide, so 1 sc per element lies flat without ruffling or pulling. At the tip, the edge turns through about 180°. The 4 sc plus the ch-2 point add the extra length the curve needs and form the sharp point. At the base, the edging needs no extra stitches because the petal is anchored to the center. The sl st into st 3 locks the petal between its start (st 1) and its spacer (st 4).
Check the petal against Checkpoint 4: 2.25 in x 1.25 in (5.7 cm x 3.2 cm).
Final Blocking
- Weave in all remaining ends along the edgings or behind the center. Don’t weave through the open spaces.
- Soak the flower in cool water for 10 minutes. Press out the water gently in a towel without wringing.
- Lay it right side up on the blocking board.
- Pin the center flat so it measures 1.25 in (3.2 cm) across.
- Pin the top and bottom petal tips so the flower measures 5.75 in (14.6 cm) tip to tip.
- Set the four lilac petals at 60° from the plum petals, with the tips evenly spaced. The width should be 5.25 in (13.3 cm).
- Pin each petal tip at its ch-2 point. Gently ease the sides into a smooth oval, opening each ladder space.
- Fluff the raised cluster and lip with your fingertips so they stand up.
- Let it dry completely before you remove the pins.
Final Quality-Control Checklist
- Center measures 1.25 in (3.2 cm), with 24 sts in Round 2.
- Six petals: plum at top and bottom, lilac on all four diagonals.
- Each petal has 6 open spaces per side and a straight, visible spine.
- Each edging has 15 sc per side and 4 sc at the tip.
- Every petal tip is a sharp point.
- One free spacer st (st 4) sits between each pair of petals.
- The raised cluster has 6 lilac mini petals, and the lavender lip faces the bottom petal.
- Finished size is 5.75 in x 5.25 in (14.6 cm x 13.3 cm).
- All ends are hidden on the wrong side.
Troubleshooting
The petal curls along the spine. The foundation chain is too tight. Chain with a hook one size larger.
The edging ruffles. You’ve added extra sc. Count to 15 per side.
The edging pulls the petal into a cup. You skipped a space or worked too tightly. Recount, and loosen your tension on the sc.
The tip is rounded instead of pointed. Make sure the ch 2 is between the two tip sc. Pin firmly at the ch-2 when blocking.
The petals are crowded or overlapping. You missed the spacer. Each petal must use exactly sts 1–3 of its group.
The raised cluster is flat. You worked it into back loops instead. Use only the free front loops of Round 1.
The flower is too small overall. Check Checkpoint 2 and go up a hook size.
Care
Hand wash in cool water with mild detergent and lay flat to dry. Reshape and re-pin the petal tips if needed.
Final Notes
Here’s the full measurement chain:
– The center is 1.25 in (3.2 cm).
– Each petal is 2 in (5.1 cm) long before edging and 2.25 in (5.7 cm) after.
– Two opposite petals plus the center give 1.25 + 2.25 + 2.25 = 5.75 in (14.6 cm) tip to tip.
– The diagonal petals give a width of about 5.25 in (13.3 cm).
If your center and your first petal pass their checkpoints, the finished flower will match. Mix and match the plum and lilac positions if you like. Just keep the stitch counts the same and the shape will hold.
Happy crocheting!