

These curtain panels pair deep plum paisleys with an airy cream lace mesh. Each paisley has a solid outer band, a lacy center of V-stitches and small shells, and a curled tip. The cream mesh frames every paisley and squares it off into a neat rectangular block.
The style is elegant and traditional, with an old-world lace feel. When the panels hang in a sunny window, the mesh glows and throws soft patterned shadows on the floor, while the plum motifs stay bold.
This pattern uses US crochet terms. Each finished panel measures 29 in wide x 84.5 in long (73.7 x 214.6 cm), including the bottom scallops and the folded rod pocket. The photo shows a matching pair, so all quantities are given for one panel and for the pair.
Construction is simple to follow. You crochet the plum paisley in the round, add the cream frame in four rounds, then join 36 blocks per panel with a flat slip-stitch seam. A three-round border, a scalloped bottom edge, and a rod pocket finish each panel.
Finished Size and Construction
- Finished panel size: 29 x 84.5 in (73.7 x 214.6 cm)
- Skill level: Intermediate
- Terminology: US crochet terms
- Yarn weight: DK (3), cotton
- Hook: 4.0 mm (US G-6)
- Number of pieces: 36 blocks per panel, 72 for the pair
- Layout: 4 blocks wide x 9 blocks tall per panel
- Block size: 7 x 9 in (17.8 x 22.9 cm)
- Panel size before border: 28 x 81 in (71.1 x 205.7 cm)
- Border depth: 0.5 in (1.3 cm) on all sides, plus 0.5 in (1.3 cm) scallops at the bottom and a 2 in (5.1 cm) rod pocket at the top
Materials
Choose a smooth mercerized or combed DK cotton of about 210 m per 100 g. Cotton drapes well, resists stretching on a long hanging panel, and shows stitch detail clearly.
- Color A, Plum: 300 g (630 m) per panel; 600 g (1,260 m) for the pair
- Color B, Cream: 750 g (1,575 m) per panel; 1,500 g (3,150 m) for the pair
Quantities include a margin of about 15% for swatching and dye-lot safety. Buy every skein of each color from the same dye lot.
Tools:
- 4.0 mm (US G-6) crochet hook
- Tapestry needle
- Stitch markers (at least 4)
- Rust-proof pins and blocking mats or a large clean surface
- Spray bottle
- Measuring tape
Abbreviations (US Terms)
- ch – chain
- sl st – slip stitch
- sc – single crochet
- hdc – half double crochet
- dc – double crochet
- tr – treble crochet
- sp(s) – space(s)
- st(s) – stitch(es)
- sk – skip
- RS / WS – right side / wrong side
Special stitches:
- V-st: (dc, ch 1, dc) in the same space.
- Shell: (2 dc, ch 1, 2 dc) in the same space.
- Standing sc: with a slip knot on the hook, insert the hook in the stitch and complete a sc as usual.
Gauge and Checkpoints
Gauge: 20 sc and 22 rows = 4 in (10.2 cm) with a 4.0 mm hook.
Make one complete block before anything else. It is your real gauge test, because lace and solid stitches behave differently.
- After paisley Rnd 5: about 4 x 5.5 in (10.2 x 14.0 cm), not counting the curl.
- After cream Rnd 2: about 6 x 8 in (15.2 x 20.3 cm), still slightly oval.
- After cream Rnd 4: 7 x 9 in (17.8 x 22.9 cm) after light blocking.
A tolerance of 0.25 in (0.6 cm) per side is fine. If the block is too big, go down to a 3.75 mm hook. If it is too small, go up to a 4.5 mm hook. Check the edge count before changing anything: the block must have 35 sc on each short side and 45 sc on each long side.
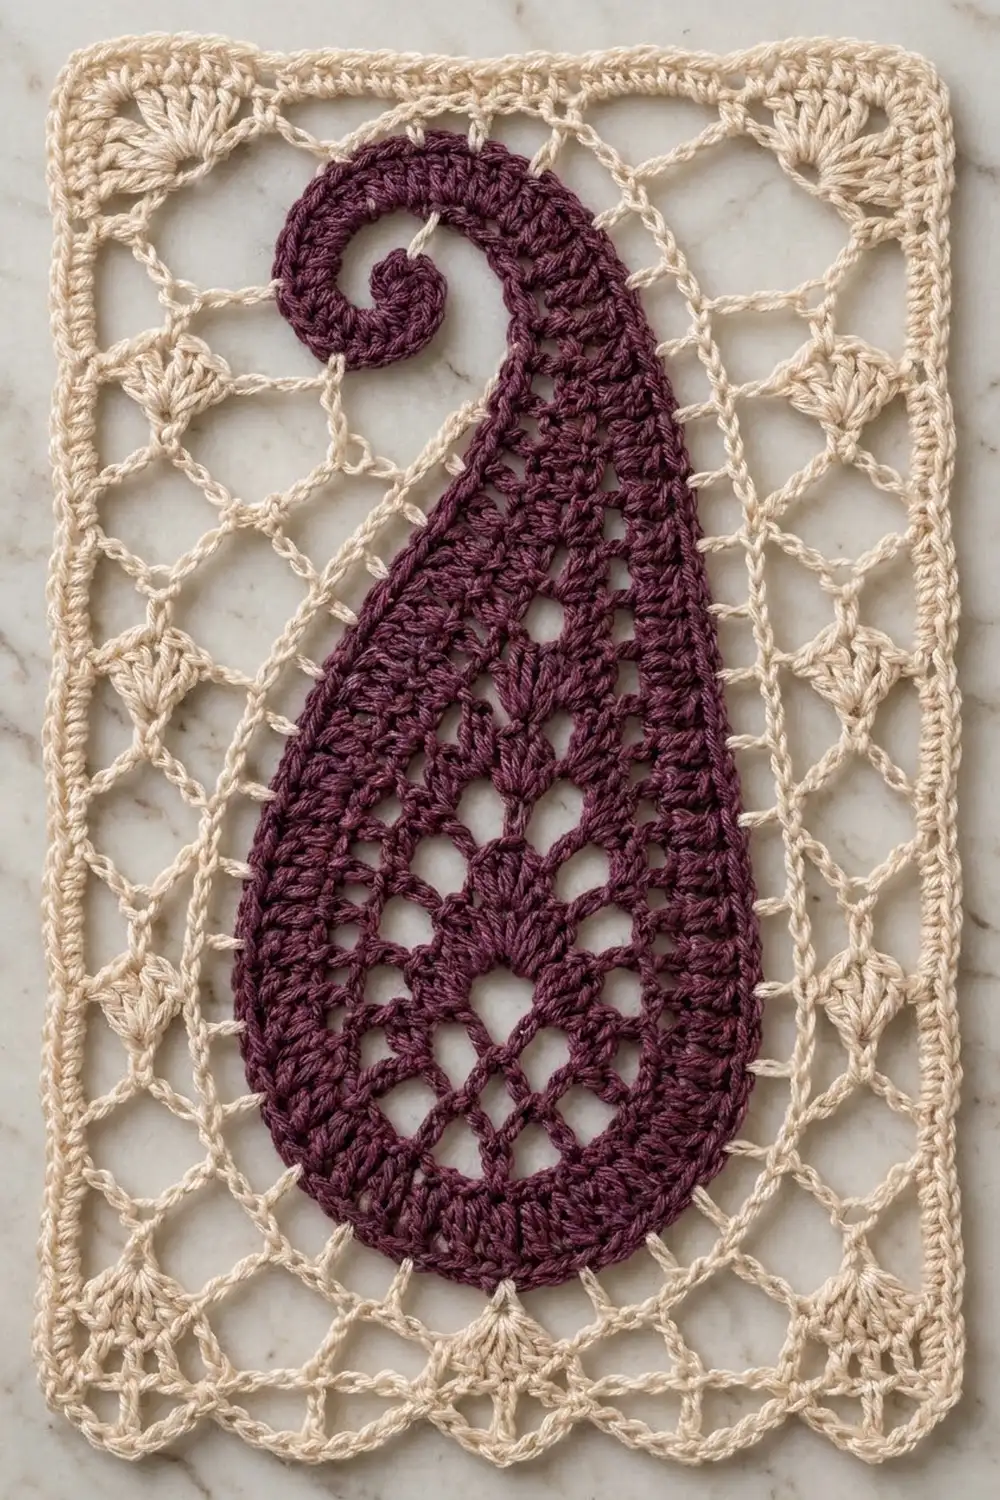
Paisley Motif (Color A, Plum)
The paisley is worked in joined rounds around both sides of a foundation chain. The wide, round end becomes the bottom of the block. The narrow tip becomes the top. Do not turn between rounds.
Foundation: With Plum, ch 12.
Rnd 1 (RS): Sc in 2nd ch from hook and in next ch, hdc in next 3 ch, dc in next 5 ch, 7 dc in last ch (round end). Working along the opposite side of the foundation: dc in next 5 ch, hdc in next 3 ch, sc in next ch, 2 sc in the first ch (the one already holding the first sc). Join with sl st to first sc. (28 sts)
Stitches 1–10 form side 1, 11–17 the round end, 18–26 side 2, and 27–28 the narrow tip.
Rnd 2 (mesh): Ch 5 (counts as dc and ch 2), sk next st, [dc in next st, ch 2, sk next st] 4 times; [dc in next st, ch 2] 7 times across the round end; [dc in next st, ch 2, sk next st] 5 times; dc in last st, ch 2. Join with sl st to 3rd ch of beginning ch-5. (18 dc and 18 ch-2 sps)
Spaces 1–5 lie along side 1, spaces 6–12 around the round end, spaces 13–17 along side 2, and space 18 at the tip.
Rnd 3 (V-sts and shells): Sl st in first ch-2 sp, ch 4 (counts as dc and ch 1), dc in same sp (first V-st made). V-st in each of next 4 sps, shell in each of next 7 sps, V-st in each of last 6 sps. Join with sl st to 3rd ch of beginning ch-4. (11 V-sts and 7 shells = 50 dc and 18 ch-1 sps)
The shells crowd the round end and create the small fan shapes inside the motif.
Rnd 4 (solid band): Ch 3 (counts as dc). Dc in next ch-1 sp and in next dc. [Dc in next dc, dc in ch-1 sp, dc in next dc] across the next 4 V-sts. Across each of the 7 shells: dc in next 2 dc, 2 dc in ch-1 sp, dc in next 2 dc. [Dc in next dc, dc in ch-1 sp, dc in next dc] across the last 6 V-sts. Join with sl st to top of beginning ch-3. (75 dc: 33 over the V-sts and 42 over the shells)
Rnd 5 (outline): Ch 1, sc in same st and in next 14 sts. Across the 42 round-end sts: [sc in next 5 sts, 2 sc in next st] 7 times. Sc in next 15 sts, sc in next st, 3 sc in next st (center of tip), sc in last st. Join with sl st to first sc. (84 sc: 15 + 49 + 15 + 5)
The center sc of the 3-sc tip group is stitch 82. Mark it.
Curl: Ch 13, 2 hdc in 3rd ch from hook and in each remaining ch across. (22 hdc) Sl st in the joining st of Rnd 5. Fasten off, leaving a 12 in (30.5 cm) tail.
The doubled hdc makes the strip curve. Roll it into a flat spiral that turns back toward the body of the paisley. With the tail, tack the coil to itself every few stitches so it lies flat, then weave in.
Cream Lace Frame (Color B, Cream)
Rnd 1: With RS facing, join Cream with a standing sc in stitch 73 (the 9th sc before the marked tip stitch). [Ch 5, sk 2 sts, sc in next st] 27 times, ch 5, sk 2 sts. Join with sl st to first sc. (28 ch-5 loops)
Number the loops from the join. Loops 3 and 4 sit over the tip.
Rnd 2: Sl st in next 3 ch, ch 1, sc in same loop. [Ch 6, sc in next loop] 27 times, ch 6. Join with sl st to first sc. (28 ch-6 loops)
Tack the outer coil of the curl to the nearest ch-6 loop with Cream so it stays in place inside the mesh.
Rnd 3 (squaring): Sl st in next 3 ch, ch 6 (counts as dc and ch 3). [Dc in next loop, ch 3] 4 times (loops 1–5 done, top edge).
- Loop 6 (corner): (2 tr, ch 4, 2 tr), ch 3.
- Loops 7–13: [dc in next loop, ch 3] 7 times.
- Loop 14 (corner): (2 tr, ch 4, 2 tr), ch 3.
- Loops 15–19: [dc in next loop, ch 3] 5 times.
- Loop 20 (corner): (2 tr, ch 4, 2 tr), ch 3.
- Loops 21–27: [dc in next loop, ch 3] 7 times.
- Loop 28 (corner): (2 tr, ch 4, 2 tr), ch 3.
Join with sl st to 3rd ch of beginning ch-6. (24 dc, 16 tr, 28 ch-3 sps, 4 ch-4 corner sps)
Each short side now has 9 sts (2 tr, 5 dc, 2 tr) and 6 ch-3 sps. Each long side has 11 sts (2 tr, 7 dc, 2 tr) and 8 ch-3 sps. The tall tr at the corners fill the deepest gaps and square the frame.
Rnd 4 (edge): Ch 1. Sc in each dc and tr, 4 sc in each ch-3 sp, and (sc, ch 2, sc) in each corner ch-4 sp. Join with sl st to first sc. Fasten off.
- Short sides: 9 + (6 x 4) + 2 corner sc = 35 sc each
- Long sides: 11 + (8 x 4) + 2 corner sc = 45 sc each
- Total: 160 sc and 4 ch-2 corner sps
Each side count includes its own 2 corner sc. At 5 sc per inch, the block measures 7 x 9 in (17.8 x 22.9 cm).
Make All Pieces
Make 36 blocks for one panel, or 72 for the pair. Each block uses about 8 g of Plum and 15 g of Cream before joining and border.
Steam or wet block every block to 7 x 9 in (17.8 x 22.9 cm) before joining. Lay out each panel with all tips pointing up:
Row 1:  [P] [P] [P] [P]   <- top (rod pocket)
Row 2:  [P] [P] [P] [P]
Row 3:  [P] [P] [P] [P]
Row 4:  [P] [P] [P] [P]
Row 5:  [P] [P] [P] [P]
Row 6:  [P] [P] [P] [P]
Row 7:  [P] [P] [P] [P]
Row 8:  [P] [P] [P] [P]
Row 9:  [P] [P] [P] [P]   <- bottom (scallops)
P = one paisley block, tip and curl at the top.
Joining
Use a flat slip-stitch seam with Cream.
- Rows: Hold two blocks RS together with long sides aligned. Insert the hook through the inner loops of both edges (back loop of the front block, front loop of the back block). Sl st loosely through each matching pair: 45 pairs per seam. Add 2 more blocks the same way for a row of 4.
- Check: each row measures 28 x 9 in (71.1 x 22.9 cm).
- Rows to panel: Join the 9 rows along their long edges. Each seam matches 4 x 35 = 140 pairs. Sl st through the paired corner ch-2 sps at every block intersection to lock the corners.
The seam matches stitch to stitch and adds no stitches. Keep the slip stitches as loose as the sc edge. Tight seams pucker lace and shorten the panel. If needed, use a 4.5 mm hook for joining only.
Checkpoint: the joined panel measures 28 x 81 in (71.1 x 205.7 cm).
Border
The border uses the same gauge, 5 sc per inch, so it lies flat without stretching.
Rnd 1: Join Cream with a standing sc in the first sc of the top edge after the top-right outer corner. Sc in each sc around. At the block seams, step from the last sc of one block to the first sc of the next; do not work into the seam corner sps. At each outer corner, ch 2 and continue on the next side. Join.
- Top and bottom: 4 blocks x 35 sc = 140 sc
- Long sides: 9 blocks x 45 sc = 405 sc
- Corners: 4 ch-2 sps
Rnd 2: Ch 1, sc in each sc, (sc, ch 2, sc) in each corner ch-2 sp. Join. (142 sc top and bottom, 407 sc long sides)
Rnd 3: Repeat Rnd 2. (144 sc top and bottom, 409 sc long sides) Fasten off.
Bottom scallops: With RS facing, join Cream with sc in the bottom-right corner ch-2 sp. [Sk 2 sts, 5 dc in next st, sk 2 sts, sc in next st] 24 times, sc in the bottom-left corner sp. Fasten off. (24 scallops)
Rod pocket:
- Row 1: With RS facing, join Cream in the top-right corner ch-2 sp, ch 2 (does not count), hdc in each of the 144 sc across. Turn. (144 hdc)
- Rows 2–14: Ch 2 (does not count), hdc in each st across. Turn. (144 hdc)
The pocket measures about 4 in (10.2 cm) deep. Fold Rows 8–14 to the WS and whipstitch the top of Row 14 to the base of Row 1. This leaves a 2 in (5.1 cm) pocket for a rod up to 1.25 in (3.2 cm) across. Leave the side ends open.
Why the math works: Rnd 1 starts at exactly the joined edge count, 140 and 405, with nothing added at the seams. Rnds 2 and 3 add only one corner sc at each end of every side, so each side grows by exactly 2 per round. The final 144 bottom sts divide evenly into 24 repeats of 6, so the scallops start and end cleanly at the corners.
Final Blocking
- Weave in all remaining ends along seams or inside the plum bands.
- Soak each panel in cool water with a little wool wash for 15 minutes.
- Press out the water gently; do not wring. Roll it in towels.
- Lay the panel flat on mats and pin it to 29 x 82 in (73.7 x 208.3 cm), not counting scallops or pocket.
- Pin out each bottom scallop and open the corner fans of the mesh.
- Check that the seams run straight and every row of paisleys is level.
- Let it dry completely before unpinning.
Final Quality-Control Checklist
- Every paisley tip points up and every curl is flat and tacked.
- Each block measures 7 x 9 in (17.8 x 22.9 cm).
- Short sides have 35 sc and long sides have 45 sc.
- Seams are flat with no puckers.
- Border Rnd 3 has 144 sc top and bottom and 409 sc on each long side.
- The bottom edge has 24 even scallops.
- The rod pocket slides over your rod easily.
- Both panels measure 29 x 84.5 in (73.7 x 214.6 cm).
Troubleshooting
- Paisley cups or ruffles: Your dc may be too tall. Try a smaller hook for the plum rounds only.
- Round end looks pointed: Check that Rnd 2 has 7 dc across the round end and Rnd 3 has 7 shells.
- Curl twists instead of lying flat: Steam it lightly, then tack it every 2–3 stitches.
- Frame won’t square: Recount the 28 loops in cream Rnd 1. A missing loop shifts every corner.
- Block too narrow: Make sure each ch-3 sp gets exactly 4 sc in Rnd 4.
- Panel shorter than expected: Seams are too tight. Rejoin with a larger hook.
- Wavy border: Recount the side totals; extra sc cause ruffles.
Care
Hand wash in cool water with mild soap and dry flat, reshaping to the blocked size. Avoid hanging the panels wet, because the weight of damp cotton stretches the lace.
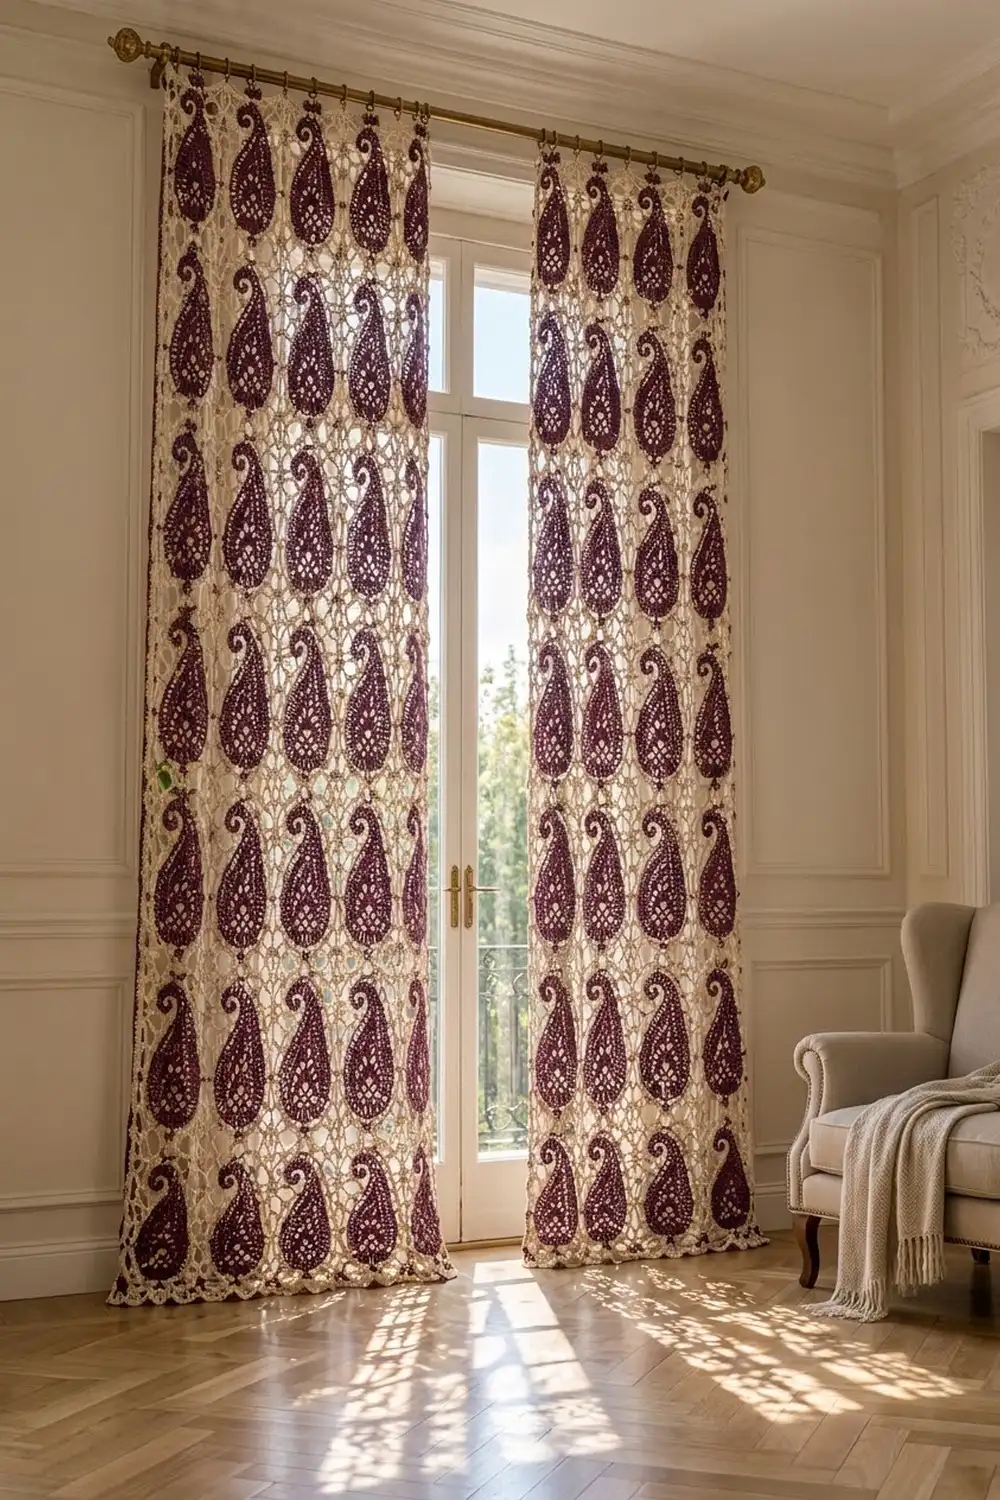
Final Notes
The measurement chain keeps the panel on track. Your gauge of 5 sc per inch sets each block at 35 x 45 sc, or 7 x 9 in (17.8 x 22.9 cm). A 4 x 9 layout gives 28 x 81 in (71.1 x 205.7 cm) before the border. The 0.5 in (1.3 cm) border brings it to 29 x 82 in (73.7 x 208.3 cm). Scallops and the folded rod pocket finish each panel at 29 x 84.5 in (73.7 x 214.6 cm).
Check each stage before moving on, and the pair will hang straight and match perfectly. Happy crocheting!