

This curtain is a grid of crocheted bows set in an open chain lattice. Each bow has two full, rounded wings made of long treble stitches that fan out from the center. A wrapped knot sits in the middle, and two solid tails angle down into a V. Light comes through the cream mesh, so the panel looks soft and lacy.
The palette uses two colors. Dusty rose bows, each with a cream knot and a thin cream outline, alternate with all-cream bows in a checkerboard. The cream lattice runs through every block and holds the whole panel together.
The pattern uses US crochet terms. The finished panel measures 51 x 59 in (129.5 x 149.9 cm) after the border, plus nine tab loops for a rod.
You build each bow from five small parts and sew them together. Two cream lattice rounds then turn the bow into a rectangular block, and you join the blocks as you go on the second round. A two-round border and the tabs finish the panel.
Finished Size and Construction
- Finished size: 51 x 59 in (129.5 x 149.9 cm), not counting tabs
- Skill level: Intermediate
- Terminology: US
- Yarn weight: Medium (#4) worsted cotton
- Hook: 4.5 mm (US 7)
- Number of pieces: 64 bow blocks
- Layout: 8 columns x 8 rows, checkerboard
- Block size: 6.25 x 7.25 in (15.9 x 18.4 cm)
- Size before border: 50 x 58 in (127.0 x 147.3 cm)
- Border depth: 0.5 in (1.3 cm) per side
Materials
Choose a smooth combed or mercerized worsted cotton, about 155 m per 100 g. Cotton holds the fan shape and doesn’t stretch much while it hangs.
- Dusty Rose: 500 g (about 775 m)
- Cream: 1,000 g (about 1,550 m)
Tools:
- 4.5 mm (US 7) hook
- Tapestry needle
- Stitch markers
- Rust-proof pins and blocking mats
- Spray bottle
- Tape measure
The quantities include a margin of roughly 10–20%.
Abbreviations (US Terms)
- ch – chain
- sl st – slip stitch
- sc – single crochet
- tr – treble crochet
- st(s) – stitch(es)
- sp – space
- sk – skip
- rnd – round
- RS / WS – right side / wrong side
- MR – magic ring
Special stitch – join loop (JL): Use a JL in place of a chain space that sits next to a finished block. For a ch-5 sp, work ch 2, sl st into the neighbor’s matching sp, ch 2. For a ch-7 sp, work ch 3, sl st into the matching sp, ch 3. The total chain length stays the same.
Gauge and Checkpoints
Gauge: 16 sc x 18 rows = 4 in (10.2 cm).
Make and block one complete block first, then check it against these measurements:
- Wing after Row 1: fan radius about 1.5 in (3.8 cm)
- Wing after Row 3: 2.25 x 3 in (5.7 x 7.6 cm)
- Tail: 4 x 1.1 in (10.2 x 2.8 cm)
- Knot strip: 1.25 x 1.75 in (3.2 x 4.4 cm)
- Assembled bow: about 4.5 in (11.4 cm) wide
- Blocked block: 6.25 x 7.25 in (15.9 x 18.4 cm)
If the block is more than 0.25 in (0.6 cm) too big, go down one hook size. If it’s too small, go up one size. If the solid parts match but the block is still off, adjust only your chain tension.
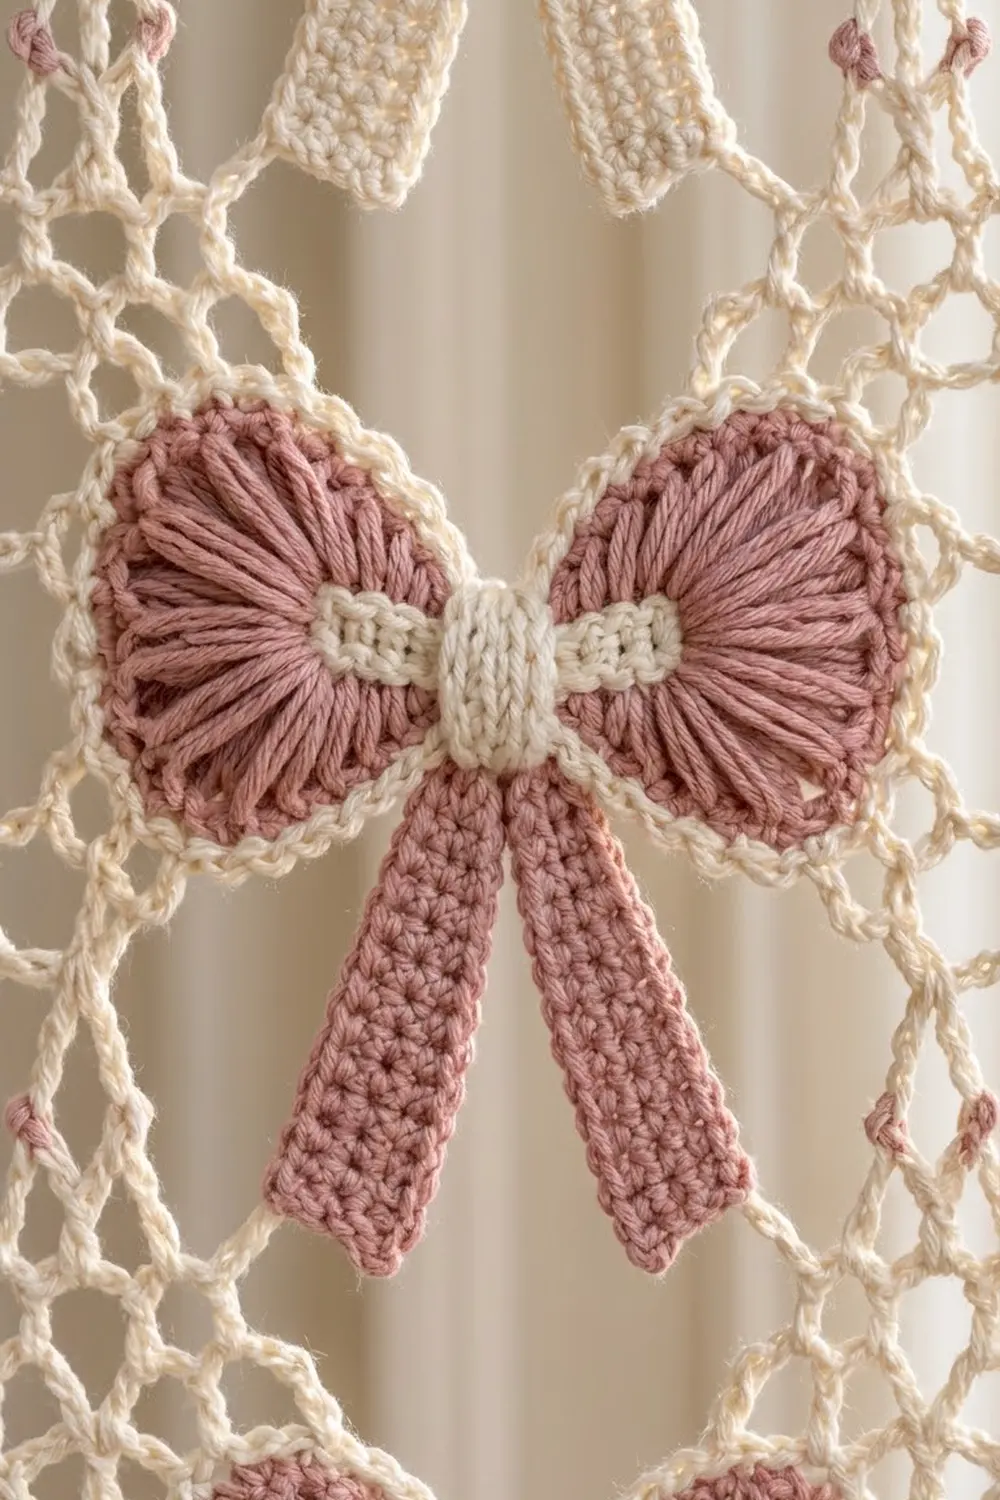
Bow Parts
Work the parts in Dusty Rose for a rose bow, or in Cream for a cream bow. Wing Row 3 and the knot are always Cream.
Wing (make 2 per bow)
Row 1: MR, ch 4 (counts as tr), 15 tr in ring, turn. (16 tr)
Pull the ring fully closed. The tr open into a rounded fan of about 300 degrees, and the closed ring becomes the pinch.
Row 2: Ch 1, sc in first tr, 2 sc in each of next 14 tr, sc in top of turning ch, turn. (30 sc)
Row 3 (Cream): Join Cream in first st, or simply continue if you’re making a cream bow. Ch 1, sc in each st across. (30 sc) Fasten off.
Weave a tail through the base of the fan and pull it gently so both row ends meet at the pinch. The wing is now a closed oval loop.
Tail (make 2 per bow)
Foundation: Ch 17.
Row 1: Sc in 2nd ch from hook and in each ch across, turn. (16 sc)
Rows 2–5: Ch 1, sc in each st across, turn. (16 sc)
Fasten off. Each tail is a solid strip with blunt ends.
Knot (make 1 per bow, Cream)
Foundation: Ch 6.
Row 1: Sc in 2nd ch from hook and in each ch across, turn. (5 sc)
Rows 2–8: Ch 1, sc in each st across, turn. (5 sc)
Fasten off and leave a 10 in (25.4 cm) tail.
Assembly
- Place the wings pinch to pinch, overlapping them by 0.25 in (0.6 cm). Tack them together.
- Lay the top of each tail behind the center. Angle the tails outward so their tips are 3.5 in (8.9 cm) apart.
- Wrap the knot vertically around the center so it covers the pinches and the tail tops. Whipstitch its ends together at the back.
- Tack through all layers so the bow can’t twist.
Lattice Frame
Work both rounds in Cream with RS facing.
Rnd 1 (anchor round):
- Join Cream with sc through the top fold of the knot.
- Ch 5 (loop 1). Count the right wing’s Row 3 from its upper end and sc in st 3.
- (Ch 5, sk 5, sc in next st) 4 times, landing in sts 9, 15, 21 and 27 (loops 2–5).
- Ch 5, sc in the outer corner of the right tail tip (loop 6).
- Ch 5, sc in the inner corner of the same tip (loop 7).
- Ch 5, sc through the bottom fold of the knot (loop 8).
- Ch 5, sc in the inner corner of the left tail tip (loop 9).
- Ch 5, sc in its outer corner (loop 10).
- Ch 5. Count the left wing’s Row 3 from its lower end and sc in st 3 (loop 11).
- (Ch 5, sk 5, sc in next st) 4 times (loops 12–15).
- Ch 5 (loop 16), sl st in first sc.
That gives 16 ch-5 loops. Mark loops 2, 7, 10 and 15 as the corners.
Rnd 2 (squaring round): Sl st into loop 1, ch 1, then work:
- Loop 1: sc, ch 7
- Loop 2 (corner): sc, ch 7, sc, ch 5
- Loops 3–6: (sc, ch 5) in each
- Loop 7 (corner): sc, ch 7, sc, ch 7
- Loops 8–9: (sc, ch 7) in each
- Loop 10 (corner): sc, ch 7, sc, ch 5
- Loops 11–14: (sc, ch 5) in each
- Loop 15 (corner): sc, ch 7, sc, ch 7
- Loop 16: sc, ch 7
Sl st in first sc.
Rnd 2 has 20 sps in total: 4 corner ch-7 sps, 6 side ch-7 sps and 10 ch-5 sps.
Spaces on each side, between the corners:
- Top: 3 ch-7 sps
- Right: 5 ch-5 sps
- Bottom: 3 ch-7 sps
- Left: 5 ch-5 sps
Opposite sides match, so every block lines up with every neighbor.
Make All Blocks
- 32 rose blocks: Dusty Rose wing Rows 1–2 and tails. Cream wing Row 3, knot and lattice. Each block uses about 13 g Dusty Rose and 6.5 g Cream.
- 32 cream blocks: all Cream, about 19.5 g each.
Work Rnd 1 on every block. Leave Rnd 2 for joining.
Layout (R = rose, C = cream):
Row 1: R C R C R C R C
Row 2: C R C R C R C R
Row 3: R C R C R C R C
Row 4: C R C R C R C R
Row 5: R C R C R C R C
Row 6: C R C R C R C R
Row 7: R C R C R C R C
Row 8: C R C R C R C R
Joining
Join as you go on Rnd 2. Work across each row from left to right, starting with the top row. The first block gets a plain Rnd 2. On every later block, use a JL in place of each sp along a side that touches a finished block:
- Left side: the 5 ch-5 sps join the neighbor’s 5 right-side ch-5 sps, one to one.
- Top side: the 3 ch-7 sps join the 3 bottom-side ch-7 sps of the block above, one to one.
- Corners: work ch 3, sl st into the neighbor’s corner sp, ch 3. If another join is already there, sl st into that same sl st so all four corners meet at one point.
The counts match exactly (5 to 5, 3 to 3), so you never add or skip a join. Keep the JL chains the same size as your free chains. Tight chains pucker the seams, and loose ones let the lattice sag.
Size checkpoints:
- Two blocks: 12.5 in (31.8 cm) wide
- One full row: 50 in (127.0 cm) wide
- Four rows: 29 in (73.7 cm) tall
- All rows: 50 x 58 in (127.0 x 147.3 cm)
Border
Border gauge: 4 sc per inch (16 sc = 4 in / 10.2 cm).
- A ch-5 sp takes 5 sc and spans 1.25 in (3.2 cm).
- A ch-7 sp takes 7 sc and spans 1.75 in (4.4 cm).
- Each block’s corner half takes 2 sc and spans 0.5 in (1.3 cm).
Rnd 1: With RS facing, join Cream at the top right corner. Along each block’s edge, work:
- 2 sc in its starting corner
- 5 sc in each ch-5 sp, or 7 sc in each ch-7 sp
- 2 sc in its ending corner
At a seam, put the first block’s 2 sc in its corner sp and the next block’s 2 sc in its ch-3 corner arc. That makes 4 sc per seam, with nothing extra. At each of the 4 outer corners, work (2 sc, ch 2, 2 sc). The ch-2 sp isn’t counted in either side. Sl st in first sc.
Per block:
- Top/bottom: 2 + (3 x 7) + 2 = 25 sc
- Left/right: 2 + (5 x 5) + 2 = 29 sc
Per side:
- Top/bottom: 8 x 25 = 200 sc each
- Left/right: 8 x 29 = 232 sc each
Rnd 2: Ch 1, sc in each sc, and work (sc, ch 2, sc) in each corner ch-2 sp. Sl st in first sc.
- Top/bottom: 200 + 2 = 202 sc each
- Left/right: 232 + 2 = 234 sc each
Tabs: Number the top-edge sts of Rnd 2 from 1 to 202, starting at the right. You’ll make 9 tabs, each 10 sts wide, with 14-st gaps. Each tab starts 24 sts after the one before: sts 1–10, 25–34, and so on up to 193–202. The check: 9 x 10 + 8 x 14 = 90 + 112 = 202.
For each tab:
- Join Cream in the first tab st.
- Ch 1, sc in the 10 tab sts, turn.
- Work 19 more rows of 10 sc. That’s 20 rows, about 4.5 in (11.4 cm).
- Fold the tab to the WS and whipstitch the last row to the base of Border Rnd 1.
Each loop is about 2.25 in (5.7 cm) deep and fits a rod up to 1 in (2.5 cm) across. Tabs are 2.5 in (6.4 cm) wide, with 3.5 in (8.9 cm) gaps.
Why the math works: at 4 sc per inch, 200 sc is 50 in and 232 sc is 58 in. Those match the joined panel exactly. The border adds no fullness, so it lies flat, and Rnd 2 adds only the stitches needed to turn the corners.
Final Blocking
- Weave in ends through solid sc areas (tails, knots or border), not through the chains.
- Soak in cool water for 15 minutes, then press the water out gently.
- Pin the panel flat to 51 x 59 in (129.5 x 149.9 cm).
- Pin every lattice join into a straight grid so each block is 6.25 x 7.25 in (15.9 x 18.4 cm).
- Open each wing into a smooth oval and pin the tails into an even V.
- Dry for 24–48 hours, then unpin.
Final Quality-Control Checklist
- 64 blocks in an 8 x 8 checkerboard
- Every wing has 30 sc and a closed, even oval shape
- Knots are centered and tacked down
- Tails point toward the lower block corners
- Block corners meet at single points
- Border counts are 202 / 234 / 202 / 234 sc
- 9 tabs, evenly spaced and secure
- Panel measures 51 x 59 in (129.5 x 149.9 cm)
Troubleshooting
- Wing cups: the tr are tight, or the ring isn’t fully closed. Relax your tension.
- Wing ruffles: the tr are loose. Use a hook half a size smaller for Row 1.
- Bow twists: tack the knot through every layer, then recheck the Rnd 1 anchor stitches.
- Lattice sags: the chains are loose. Count each chain and keep them snug.
- Border waves: there are extra stitches. Recount 25 or 29 sc per block.
- Tabs pull unevenly: recheck the 24-st spacing.
Care
Hand wash in cool water with mild soap. Lay flat to dry, re-pinning the grid if needed, and never use the dryer.
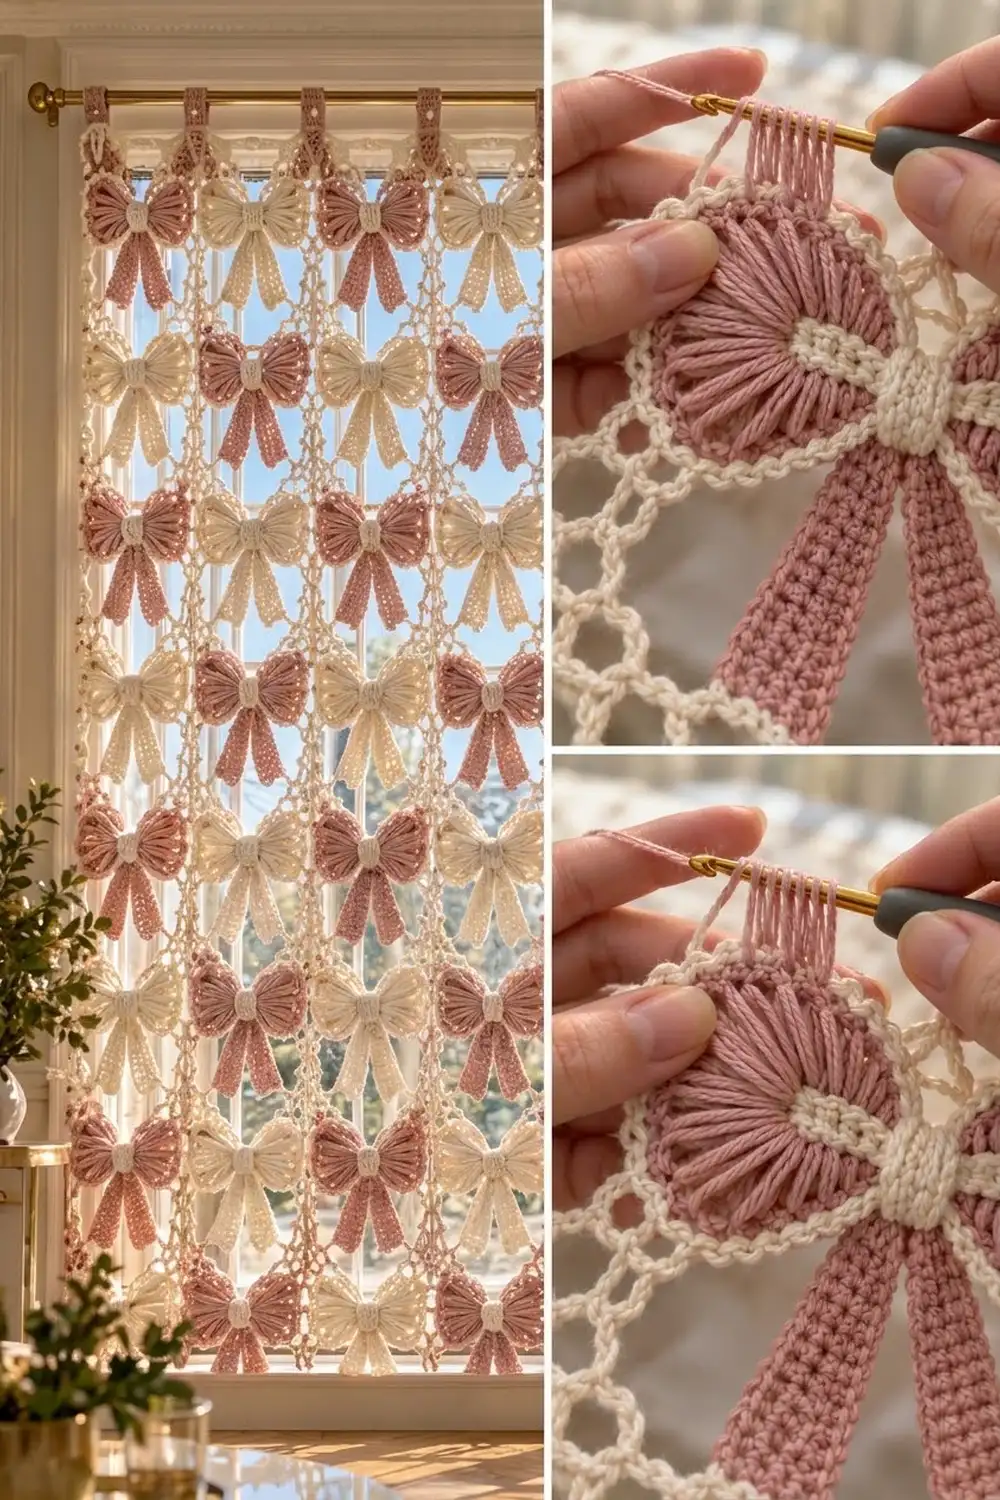
Final Notes
Each stage sets the size of the next. A gauge of 16 sc = 4 in (10.2 cm) gives a 30-sc wing and a 4.5 in (11.4 cm) bow. The bow sits in a 6.25 x 7.25 in (15.9 x 18.4 cm) block. An 8 x 8 grid of blocks measures 50 x 58 in (127.0 x 147.3 cm), and the 0.5 in (1.3 cm) border brings the panel to 51 x 59 in (129.5 x 149.9 cm). Check your first block carefully and the rest of the panel will follow.
Happy crocheting!