

This curtain panel is built from four long lace strips in raspberry and cream. Each strip is an airy honeycomb mesh with a dragonfly every 8 in (20.3 cm). The bodies are solid and textured with bobble eyes, and the wings are open ladders that let the light through.
The look is light and a little vintage, like a summer garden. Using alternating colors gives a striped effect from across the room. Up close, the dragonflies and hexagon cells are what you notice. The pattern uses US crochet terms throughout.
The finished panel measures 25.75 in (65.4 cm) wide by 81.75 in (207.6 cm) long. Bottom loops add another 0.75 in (1.9 cm). Hanging tabs rise about 2.75 in (7.0 cm) above the top edge.
You work each strip from the top down in rows. You make the dragonflies separately (one body and four wings each) and tack them onto the mesh. Then you join the strips with a zigzag chain seam and finish with a two-round border that includes the bottom loops and the hanging tabs.
Finished Size and Construction
- Finished size: 25.75 x 81.75 in (65.4 x 207.6 cm), plus loops and tabs
- Skill level: Intermediate
- Terminology: US
- Yarn weight: Sport (#2), cotton
- Hook: 4.0 mm (G/6)
- Number of pieces: 4 strips, plus 40 dragonfly appliqués (each made of 1 body and 4 wings)
- Layout: 4 strips side by side: raspberry, cream, raspberry, cream
- Piece size: each strip is 6 x 80.75 in (15.2 x 205.1 cm)
- Size before border: 24.75 x 80.75 in (62.9 x 205.1 cm)
- Border depth: 0.5 in (1.3 cm) on each side
Materials
Use a smooth, mercerized sport-weight cotton with about 150 m per 50 g. Cotton holds its shape on a hanging curtain and shows the stitch detail clearly. Avoid fuzzy or very stretchy fibers, because they blur the hexagons and let a long panel sag.
- Raspberry: 300 g (900 m). This covers 2 strips, 20 dragonflies, all three seams, the border and the tabs.
- Cream: 250 g (750 m). This covers 2 strips and 20 dragonflies.
Both amounts include a safety margin of about 10%.
Tools:
– 4.0 mm (G/6) hook
– Tapestry needle
– Stitch markers
– Rust-proof pins
– Blocking mats or a clean carpet with a towel
– Spray bottle
– Measuring tape
Abbreviations (US Terms)
- ch – chain
- sl st – slip stitch
- sc – single crochet
- hdc – half double crochet
- dc – double crochet
- sk – skip
- sp – space
- st(s) – stitch(es)
- RS / WS – right side / wrong side
Special stitches:
- Cluster: work (sc, ch 1, sc) in the same stitch or space. Clusters form the short, flat sides of each hexagon.
- Bobble: yarn over, insert hook in the stitch, pull up a loop, yarn over and pull through 2 loops. Repeat from * to * 5 times in the same stitch. Yarn over and pull through all 6 loops on the hook.
Gauge and Checkpoints
- Single crochet: 29 sc = 6 in (15.2 cm), and 4 sc rows = 1 in (2.5 cm).
- Mesh (blocked): 5 mesh rows = 4 in (10.2 cm), so each mesh row is 0.8 in (2.0 cm).
Test one repeat first. Work Rows 1–12 of the strip (2 sc rows plus 10 mesh rows) and make one dragonfly. Pin the swatch out lightly and let it dry. It should measure:
- Width: 6 in (15.2 cm)
- Height: 8.5 in (21.6 cm)
- Dragonfly: 5.5 in (14.0 cm) wingspan and 4.5 in (11.4 cm) body length
- Each wing: 2.4 x 0.9 in (6.1 x 2.3 cm)
Checkpoints:
– After Row 2: 6 in (15.2 cm) wide.
– After Row 52 (50 mesh rows): 40.5 in (102.9 cm) long.
– Finished strip: 80.75 in (205.1 cm) long.
If your swatch is too big, go down 0.25 mm. If it is too small, go up 0.25 mm. Do not change the stitch counts. The whole panel depends on 29 stitches per strip and 103 rows.
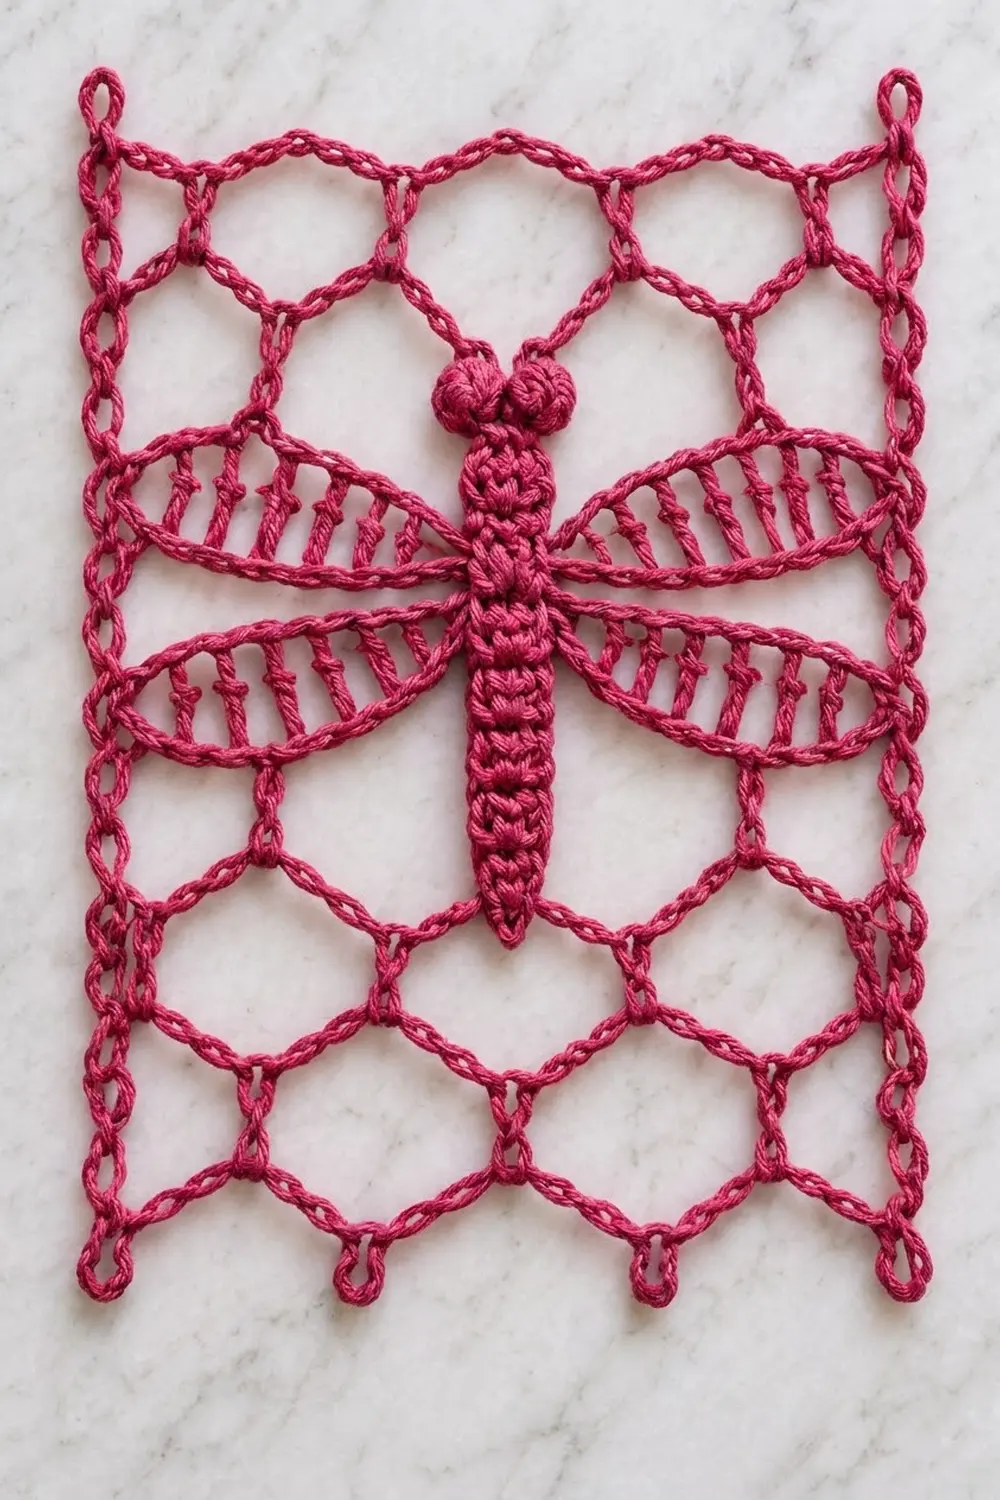
Strip (Make 4: 2 Raspberry, 2 Cream)
You work each strip from the top edge down.
Row 1 (top edge): Ch 30. Sc in 2nd ch from hook and in each ch across. Turn. (29 sc)
Row 2: Ch 1, sc in each sc across. Turn. (29 sc)
Row 3 (Mesh Row A, set-up): Ch 1, sc in first sc. Ch 4, sk 3 sc, cluster in next sc. Repeat from * 5 more times (6 times total). Ch 4, sk 3 sc, sc in last sc. Turn.
(7 ch-4 loops, 6 clusters, 2 edge sc. Check: 1 + 6 × 4 + 4 = 29 sts used.)
Row 4 (Mesh Row B): Ch 3 (counts as dc), ch 2, cluster in first ch-4 loop. Ch 4, cluster in next ch-4 loop. Repeat from * 5 more times (6 times total). Ch 2, dc in last sc. Turn.
(7 clusters, 6 ch-4 loops, 2 ch-2 half-loops, 2 dc)
Row 5 (Mesh Row A): Ch 1, sc in first dc. Ch 4, cluster in next ch-4 loop. Repeat from * 5 more times (6 times total). Ch 4, sc in 3rd ch of turning ch. Turn.
(7 ch-4 loops, 6 clusters, 2 edge sc)
Rows 6–102: Repeat Rows 4 and 5 alternately, ending with a Row 4 repeat.
– That gives 100 mesh rows in total (Rows 3–102): 10 repeats of 10 rows.
– The offset clusters open into hexagon cells.
– The turning chains and edge stitches stack into the chain columns along the sides.
Row 103 (bottom closing row): Ch 1. Work in this order:
1. Sc in first dc.
2. Sc in the ch-2 sp.
3. Sc in the ch-1 sp of each of the 7 clusters, and 3 sc in each of the 6 ch-4 loops, as you come to them.
4. Sc in the last ch-2 sp.
5. Sc in 3rd ch of the turning ch.
Count: 1 + 1 + 7 + 18 + 1 + 1 = 29 sc. Fasten off.
Strip count: 29 sts across the top and bottom, and 103 row ends down each side.
Dragonfly (Make 40: 20 Raspberry, 20 Cream)
Body
Rnd 1: Ch 21. Starting in the 2nd ch from hook, work up one side of the chain:
– sc in next 5 ch (tail)
– hdc in next 9 ch (abdomen)
– dc in next 5 ch (thorax)
– 5 dc in last ch (head)
Then work along the other side of the chain:
– dc in next 5 ch
– hdc in next 9 ch
– sc in next 5 ch
– 2 sc in the same ch as the first sc
Join with sl st to first sc. (45 sts)
The stitches grow from sc to dc, so the body is thick at the head and tapers to a pointed tail.
Eyes: Sl st in the 1st of the 5 head dc, bobble in the 2nd, sl st in the 3rd, bobble in the 4th, sl st in the 5th. (2 bobbles)
Fasten off, leaving a 16 in (40.6 cm) tail for sewing.
Wing (Make 4 per dragonfly)
Row 1: Ch 15. Dc in 5th ch from hook (the skipped 4 ch count as dc + ch-1). Ch 1, sk 1 ch, dc in next ch. Repeat from * 4 more times (5 times total). (7 dc bars, 6 ch-1 sps)
Rnd 2 (oval rim): Ch 1, rotate, and work around the ladder:
– sc in top of last dc made
– ch 2, sc in top of next dc 6 times
– ch 5 around the end bar (pointed outer tip)
– working along the base of the bars: sc in the base of the first bar, ch 2, sc in the base of the next bar 6 times
– ch 2 (inner end)
Join with sl st to first sc. (14 sc, 12 ch-2 sps, 1 ch-5 tip, 1 ch-2 inner end)
Fasten off, leaving a 6 in (15.2 cm) tail.
Assemble the Dragonfly
- Sew the inner (ch-2) ends of 2 wings to each side of the thorax dc section.
- Angle the upper pair slightly upward and the lower pair slightly downward, as in the photo.
- Check the wingspan: 5.5 in (14.0 cm).
Make All Pieces
| Color | Strips | Bodies | Wings |
|---|---|---|---|
| Raspberry | 2 | 20 | 80 |
| Cream | 2 | 20 | 80 |
Placement: Each 10-row mesh repeat holds one dragonfly in the strip’s own color.
– Center the body vertically between the 5th and 6th rows of its repeat, and horizontally on the middle cluster of the strip.
– Tack down the head, the tail tip, the body every 1 in (2.5 cm), and each wing tip to the nearest mesh knot.
Layout (top to bottom, D = dragonfly):
       S1    S2    S3    S4
Rep 1  R-D | C-D | R-D | C-D
Rep 2  R-D | C-D | R-D | C-D
 ...   (same for Reps 3-9)
Rep 10 R-D | C-D | R-D | C-D
Joining
Method: zigzag chain join with raspberry, worked from the top edge down.
- Lay Strip 1 and Strip 2 side by side, RS up, with the top edges level.
- Find the anchor points on each edge. There are 203 per edge:
- 1 anchor per sc row end (Rows 1, 2 and 103)
- 2 anchors per mesh row end (one near the top and one near the bottom of the edge post)
- Total: 3 + 100 × 2 = 203
- Join yarn with sc in the first anchor of Strip 1. Ch 2, sc in the first anchor of Strip 2. Ch 2, sc in the next anchor of Strip 1.
- Continue alternating sides until all anchors are used. (406 sc, 405 ch-2 bridges)
- Fasten off.
Join Strip 3 to Strip 2, then Strip 4 to Strip 3, the same way.
Stitch-to-stitch logic: Both edges have the same 203 anchors, so the rows on each strip line up and the hexagons stay level across seams.
Tension: Keep each ch-2 relaxed. The seam should lie flat with a gap of about 0.25 in (0.6 cm). If you pull it tight, the panel will pucker.
Size checkpoints:
– 2 strips: 12.25 in (31.1 cm) wide
– 3 strips: 18.5 in (47.0 cm) wide
– 4 strips: 24.75 in (62.9 cm) wide
Border
Border gauge: sc worked into the edges at about 4.7–5.0 sc per inch (2.5 cm), which is close to the 4.83 sc per inch body gauge. The border uses raspberry.
Round 1: Join yarn at the top right corner.
– Top: sc in each st across all 4 strips. Do not work into the seam chains. (4 × 29 = 116 sc)
– Corner: ch 2.
– Side: 1 sc in each sc row end and 4 sc in each mesh row end. (3 + 100 × 4 = 403 sc)
– Corner: ch 2.
– Bottom: 116 sc.
– Corner: ch 2.
– Side: 403 sc.
– Corner: ch 2. Join with sl st.
Total: 1,038 sc and 4 corner ch-2 sps.
Round 2: Ch 1. Work (sc, ch 2, sc) in each corner sp.
– Top: sc in each sc. (116 + 2 corner sc = 118)
– Sides: sc in each sc. (403 + 2 = 405 per side)
– Bottom: after the corner sc, sc in next 4 sc, ch 6, sl st in last sc made. Repeat 29 times, then work the corner sc. (118 sc, 29 loops)
Total: 1,046 sc. Fasten off.
Why the math works:
– Each side count is the number of pieces along that side times one piece’s count: 4 × 29 = 116 on the top and bottom, and 1 × 403 on each side.
– No stitches are added at seams.
– At 4 sts per mesh row, 403 sts spread over 80.75 in (205.1 cm) is 4.99 per inch.
– The 116 sts across the top and bottom work out to 4.7 per inch, because the seams add width but no stitches.
– Both rates are close enough to the body gauge to lie flat after blocking.
Hanging tabs (make 8): Work on each strip’s 29 top stitches, counting from that strip’s own first stitch.
1. Join raspberry in the 3rd stitch.
2. Ch 30, then sl st in the 5th stitch to form a loop.
3. Work 1 sc in each ch of the loop. (30 sc)
4. Sl st in the 3rd stitch again and fasten off.
5. Repeat on the 25th and 27th stitches.
Each strip gets 2 tabs, for 8 on the panel. They fit a rod up to 1.5 in (3.8 cm) across.
Final Blocking
- Soak the panel in cool water for 15 minutes, then press out the water in a towel. Do not wring it.
- Lay it flat. Pin the corners out to 25.75 x 81.75 in (65.4 x 207.6 cm).
- Pin every seam straight down its full length.
- Open the mesh so the hexagons are even, pinning along the side columns every 4 in (10.2 cm).
- Shape each wing into an oval and point its tip outward.
- Pin out each bottom loop.
- Let it dry completely, at least 24 hours.
Final Quality-Control Checklist
- Each strip has 29 sts at the top and bottom and 103 row ends.
- Every strip has 100 mesh rows and 10 dragonflies.
- Every body has 2 bobble eyes and 4 wings.
- Each seam has 203 anchors per edge.
- The border counts are 118 / 405 / 118 / 405.
- There are 29 bottom loops and 8 tabs.
- The blocked size is 25.75 x 81.75 in (65.4 x 207.6 cm).
- All ends are woven in.
Troubleshooting
- Strip narrows as you go: your edge turning chains are too tight. Make them looser, or add a ch at the start of each Row A.
- Hexagons look like diamonds: you are leaving out the ch-1 in the middle of some clusters. Check the clusters, and block more firmly.
- Seam puckers: the bridges are too tight. Redo the seam with ch 3 bridges.
- Dragonfly wings curl: steam them lightly and pin them flat.
- Side border ruffles: use 3 sc in every other mesh row end. Change it the same way on both sides.
Care
Hand wash in cool water with mild soap and dry flat to the blocked size. Rehang the panel only once it is completely dry so it doesn’t stretch.
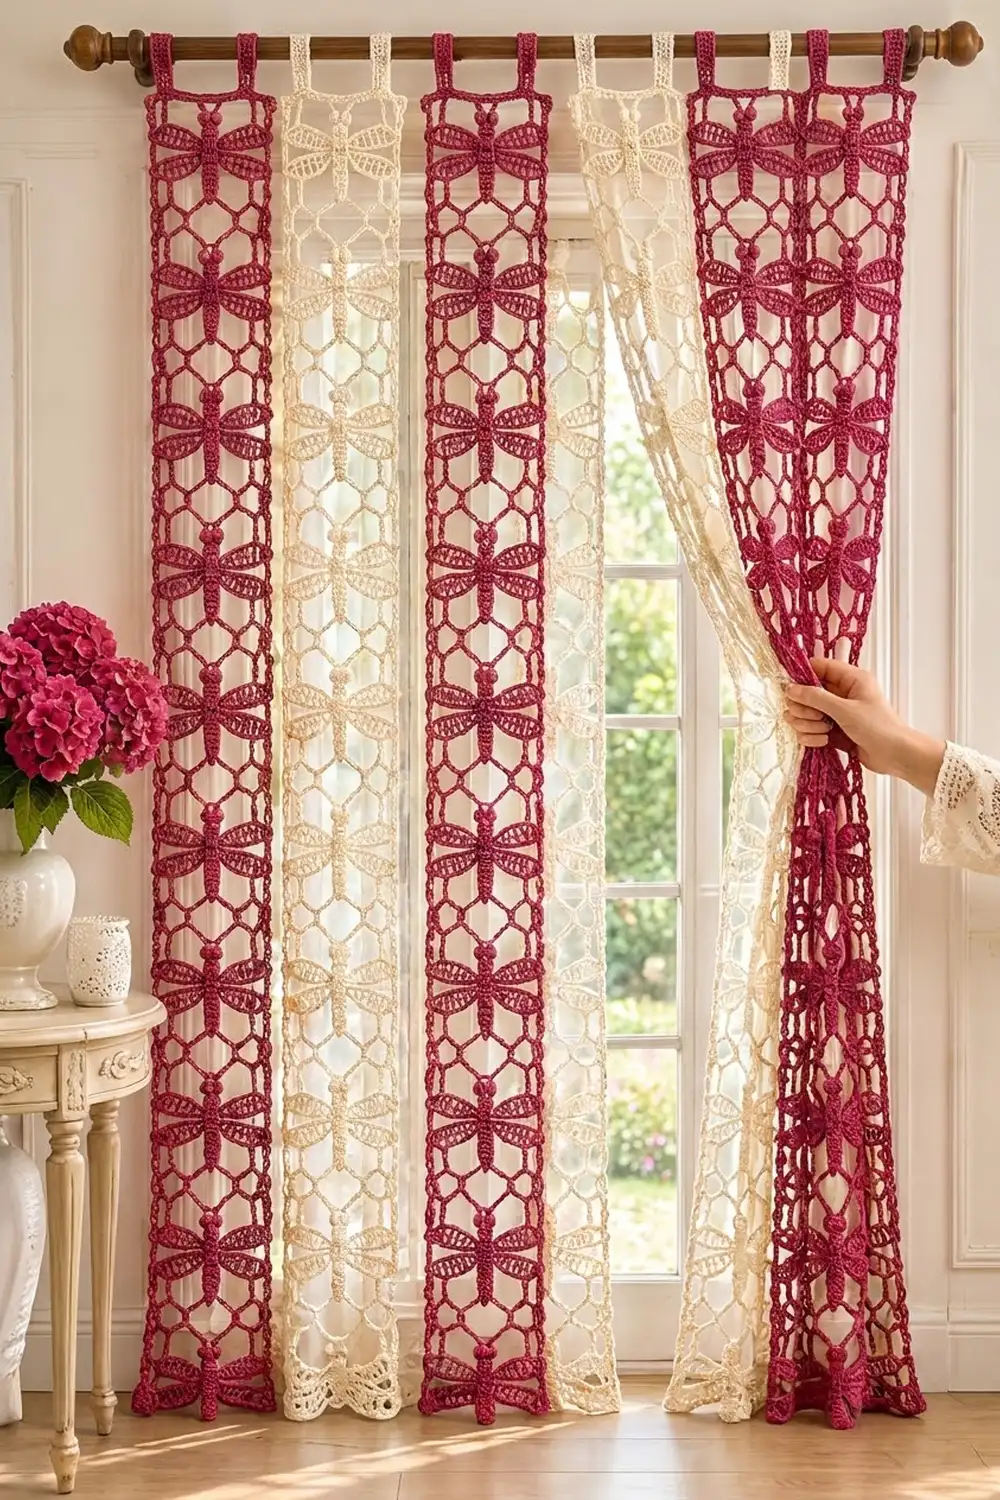
Final Notes
Here is the measurement chain from start to finish:
– 29 sts = 6 in (15.2 cm), and 10 mesh rows = 8 in (20.3 cm).
– One strip is 6 x 80.75 in (15.2 x 205.1 cm).
– Four strips with three seams make 24.75 in (62.9 cm).
– The border brings the panel to 25.75 x 81.75 in (65.4 x 207.6 cm).
Check your swatch, count at each checkpoint, and the dragonflies will line up neatly across the window.
Happy crocheting!