

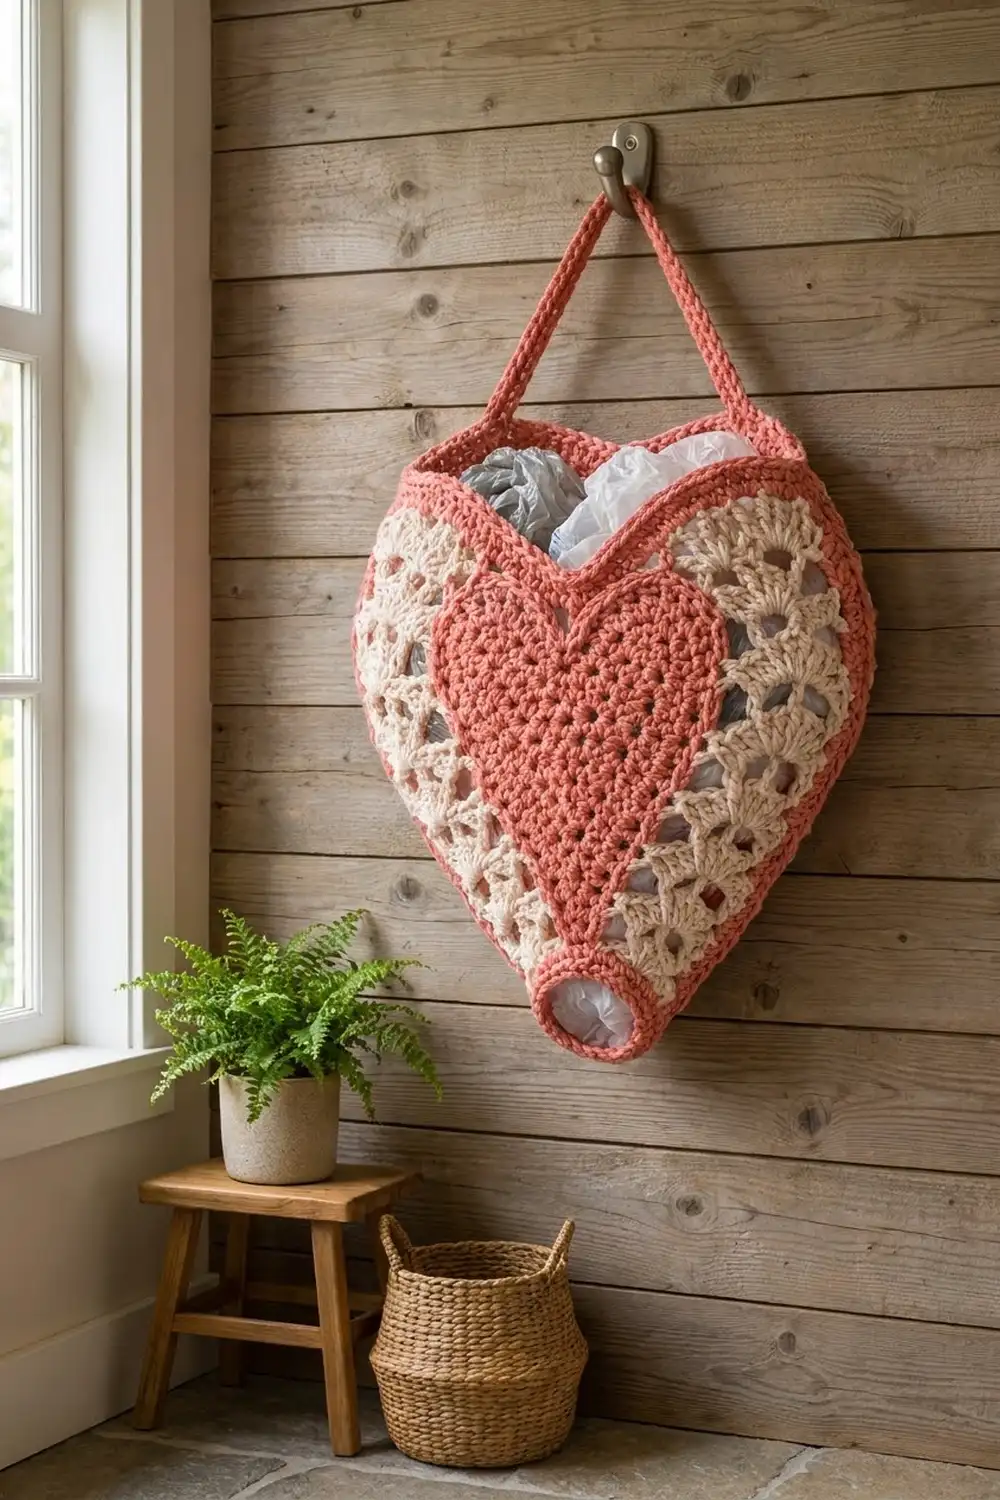
This heart-shaped bag holder turns a kitchen chore into something pretty. Stuff used plastic bags in through the wide top opening, then pull them out one at a time through the small ring at the bottom point.
The body is worked in cream fan-shell lace, which lets the bags show through softly. A solid coral heart sits on the front, and coral rounds outline the sides, the top rim, the bottom ring and the hanging strap. The style is cottage-kitchen and a little romantic, but the build is sturdy.
The pattern uses US crochet terms. The finished holder measures about 11 in (27.9 cm) wide and 13 in (33.0 cm) tall, plus a strap that rises about 6 in (15.2 cm) above the rim.
Here is how it’s built. You crochet two identical lace heart panels from the bottom up, plus one coral heart appliqué. Sew the appliqué to the front panel, then join the panels along their sides with coral single crochet. Finally, work a rim around the top opening and a ring around the bottom opening, and sew on the strap.
Finished Size and Construction
- Finished size: 11 in × 13 in (27.9 cm × 33.0 cm), not counting the strap
- Skill level: Intermediate
- Terminology: US
- Yarn weight: Worsted (#4) cotton
- Hook: 5.0 mm (H-8)
- Number of pieces: 4 (front panel, back panel, heart appliqué, strap)
- Layout: Front and back panels stacked wrong sides together and joined along both sides
- Piece size: Each lace panel is 10.5 in × 11.25 in (26.7 cm × 28.6 cm). The appliqué is 7 in × 7 in (17.8 cm × 17.8 cm).
- Size before border: 11 in × 11.25 in (27.9 cm × 28.6 cm) after the side seams
- Border depth: The top rim is 1 in (2.5 cm) deep and the bottom ring is 0.75 in (1.9 cm) deep.
Materials
Use a smooth worsted-weight cotton or cotton blend. Cotton holds its shape, shows the lace clearly and can be washed. Avoid splitty yarns, because shells worked into single crochet stitches need clean stitch tops.
- Cream (lace panels): 80 g, about 136 m
- Coral (appliqué, seams, rim, ring, strap): 70 g, about 119 m
These quantities include a margin of about 20%.
Tools:
– 5.0 mm (H-8) crochet hook
– Tapestry needle
– 6 stitch markers
– Rust-proof pins
– Tape measure
– Blocking mat and spray bottle
– Scissors
Abbreviations (US Terms)
- ch: chain
- sl st: slip stitch
- sc: single crochet
- hdc: half double crochet
- dc: double crochet
- sc2tog: single crochet 2 together
- hdc2tog: half double crochet 2 together
- sp: space
- st(s): stitch(es)
- tch: turning chain
- RS / WS: right side / wrong side
Special stitches
- Shell: (3 dc, ch 2, 3 dc) in the same stitch.
- Half shell: 3 dc at the edge of a row.
- At the start of a row: ch 3 (counts as dc), then 2 dc in the first stitch.
- At the end of a row: 3 dc in the last stitch.
Gauge and Checkpoints
Lace gauge: 1 repeat (a shell plus “ch 2, sc, ch 2”) = 1.5 in (3.8 cm) wide, and 4 rows = 3 in (7.6 cm) tall.
Appliqué gauge: 13 hdc × 10 rows = 4 in × 4 in (10.2 cm × 10.2 cm).
Edging gauge: 4 sc = 1 in (2.5 cm).
Work Rows 1–3 of the lace panel first and use them as your swatch. They should measure 6 in (15.2 cm) wide across Row 3 and 2.25 in (5.7 cm) tall.
Checkpoints:
– After Row 3: 6 in (15.2 cm) wide, 2.25 in (5.7 cm) tall
– After Row 7: 9 in (22.9 cm) wide, 5.25 in (13.3 cm) tall
– After Row 12: 10.5 in (26.7 cm) wide, 9 in (22.9 cm) tall
– After Row 15: 11.25 in (28.6 cm) tall at the lobes
– After appliqué Row 10: 6.5 in (16.5 cm) wide
If your swatch is too big, go down 0.5 mm. If it’s too small, go up 0.5 mm. Lace grows with blocking, so measure after a light mist and dry.
Lace Panel (Make 2, Cream)
How the row types work
Each row is worked across and then turned. Every row starts and ends in one of two ways:
- H-edged rows have a half shell at each end.
- Sc-edged rows have a single sc at each end.
The lace panel uses three row types. Each count below is that row’s complete total.
INC row (work it on an H-edged row; it adds 1 repeat): Ch 3 (counts as dc), 2 dc in the first st. Ch 2, sc in the 3rd (innermost) dc of the same half shell. Then work ch 2, shell in the next sc, ch 2, sc in the ch-2 sp of the next shell. Repeat from * to the last sc. Ch 2, shell in the last sc, ch 2, sc in the innermost dc of the end half shell, ch 2, 3 dc in the top of the tch. Turn.
Straight row A (work it on an H-edged row; the result is sc-edged): Ch 1, sc in the first st. Then work ch 2, shell in the next sc, ch 2, sc in the ch-2 sp of the next shell. Repeat from * to the last sc. Ch 2, shell in the last sc, ch 2, sc in the top of the tch. Turn.
Straight row B (work it on a sc-edged row; the result is H-edged): Ch 3 (counts as dc), 2 dc in the first sc. Then work ch 2, sc in the ch-2 sp of the next shell, ch 2, shell in the next sc. Repeat from * until 1 shell remains. Ch 2, sc in the ch-2 sp of the last shell, ch 2, 3 dc in the last sc. Turn.
If a row has s shells and s + 1 sc:
– An INC row gives s + 1 shells and s + 2 sc.
– Straight row A gives s + 1 shells and s + 2 sc, counting both edge sc.
– Straight row B brings it back to s shells and s + 1 sc.
Body rows
Foundation: Ch 16.
Row 1 (RS): 2 dc in the 4th ch from the hook (the skipped ch count as the first dc). Skip 2 ch, sc in the next ch. Skip 2 ch, shell in the next ch. Skip 2 ch, sc in the next ch. Skip 2 ch, 3 dc in the last ch. Turn. [1 shell, 2 sc, 2 half shells]
The panel is 3 in (7.6 cm) wide here.
Row 2 (INC): [2 shells, 3 sc]
Row 3 (INC): [3 shells, 4 sc]
Row 4 (Straight A): [4 shells, 5 sc]
Row 5 (Straight B): [3 shells, 4 sc]
Row 6 (INC): [4 shells, 5 sc]
Row 7 (INC): [5 shells, 6 sc]. Width check: 9 in (22.9 cm).
Row 8 (Straight A): [6 shells, 7 sc]
Row 9 (Straight B): [5 shells, 6 sc]
Row 10 (INC): [6 shells, 7 sc]. Width check: 10.5 in (26.7 cm).
Row 11 (Straight A): [7 shells, 8 sc]
Row 12 (Straight B): [6 shells, 7 sc]
Place a marker in the 4th sc. This is the center sc, with 3 shells on each side of it.
First lobe
Row 13 (RS): Ch 1, sc in the first st. Work [ch 2, shell in the next sc, ch 2, sc in the ch-2 sp of the next shell] 3 times. Ch 2, dc in the marked center sc. Turn. [3 shells]
Row 14: Ch 4 (counts as dc + ch 1), sc in the ch-2 sp of the next shell. Work [ch 2, shell in the next sc, ch 2, sc in the ch-2 sp of the next shell] 2 times. Ch 1, dc in the last st. Turn. [2 shells, 3 sc]
Row 15: Ch 4, sc in the ch-2 sp of the next shell, ch 2, shell in the next sc, ch 2, sc in the ch-2 sp of the next shell, ch 1, dc in the 3rd ch of the tch. Fasten off. [1 shell, 2 sc]
Second lobe
Row 13 (RS): Join the yarn in the marked center sc. Ch 3 (counts as dc). Work [ch 2, sc in the ch-2 sp of the next shell, ch 2, shell in the next sc] 3 times. Ch 2, sc in the top of the tch. Turn. [3 shells]
Rows 14–15: Work them as for the first lobe. Fasten off.
The center V forms between the lobes on its own. The panel is now 10.5 in × 11.25 in (26.7 cm × 28.6 cm).
Spray-block both panels to this size before you continue.
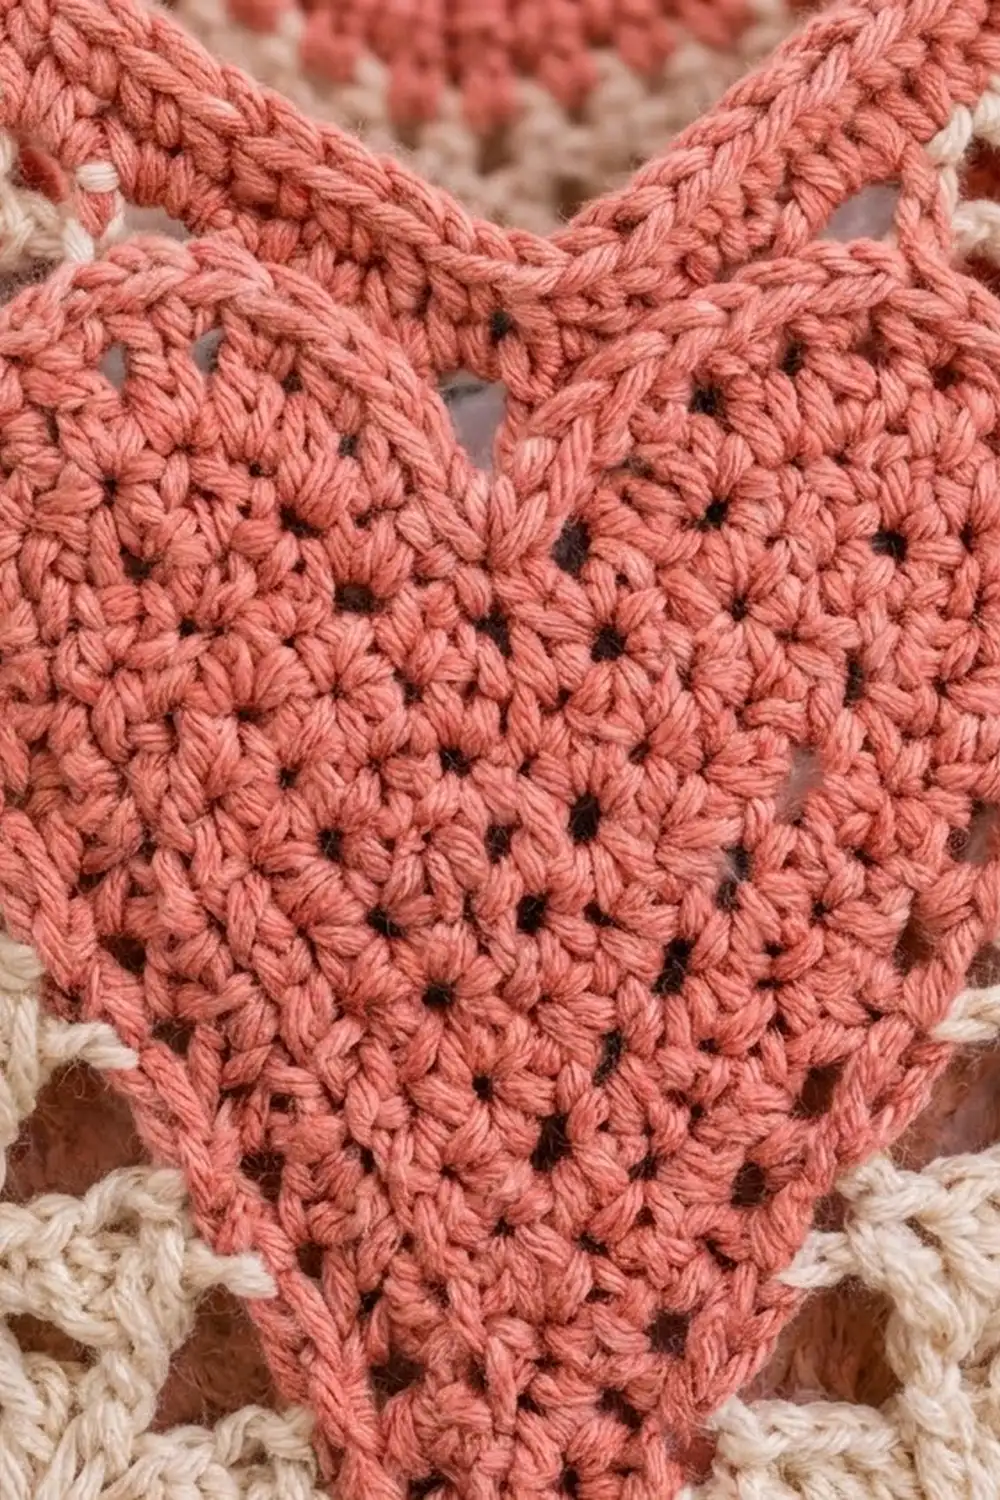
Heart Appliqué (Make 1, Coral)
The ch 1 at the beginning of each row doesn’t count as a stitch.
Row 1: Ch 2, 3 hdc in the 2nd ch from the hook. Turn. (3)
Row 2: Ch 1, 2 hdc in the first st, hdc in the next st, 2 hdc in the last st. Turn. (5)
Rows 3–10: Ch 1, 2 hdc in the first st, hdc in each st across to the last st, 2 hdc in the last st. Turn. Each row adds 2 stitches, so Row 10 has (21). The heart is 6.5 in (16.5 cm) wide and 4 in (10.2 cm) tall here.
Rows 11–12: Ch 1, hdc in each st. Turn. (21)
First lobe:
– Row 13: Ch 1, hdc in the first 10 sts. Turn. (10)
– Row 14: Ch 1, hdc2tog, hdc in the next 6 sts, hdc2tog. Turn. (8)
– Row 15: Ch 1, hdc2tog, hdc in the next 4 sts, hdc2tog. Turn. (6)
– Row 16: Ch 1, hdc2tog, hdc in the next 2 sts, hdc2tog. (4) Fasten off.
Second lobe: On Row 12, skip the 11th stitch (the center) and join the yarn in the 12th stitch. Work Rows 13–16 across the remaining 10 stitches. The heart now measures 6.4 in (16.3 cm) tall.
Edging: Join the yarn at the bottom point and work 3 sc in the point. Work up the outer side, alternating 1 sc and 2 sc in each row end, for 24 sc. Work 4 sc across the lobe top and 4 sc down the inner side. Sl st in the skipped center st. Then work 4 sc up the next inner side, 4 sc across the lobe top and 24 sc down the outer side. Join. (67 sc + 1 sl st)
The appliqué now measures about 7 in × 7 in (17.8 cm × 17.8 cm).
Make All Pieces
- Cream: 2 lace panels
- Coral: 1 heart appliqué and 1 strap
Strap: Ch 73.
– Row 1: Sc in the 2nd ch from the hook and in each ch across. Turn. (72)
– Row 2: Ch 1, sc in each st. (72)
Fasten off and leave a long tail. The strap measures 18 in (45.7 cm).
Front view layout:
          /  strap  \
 [ coral rim, 4 rounds, V at center ]
 [ lace lobe ]   V   [ lace lobe ]
 [ lace ][  coral heart  ][ lace ]
 [ lace ][  heart point  ][ lace ]
         [ lace point ]
         ( coral ring )
Place the appliqué centered side to side on the RS of one panel. It should leave 1.75 in (4.4 cm) of lace on each side. Put its point 2.75 in (7.0 cm) above the foundation edge. Pin it, then whipstitch it on with coral yarn through the back loops of the edging, working about 4 stitches per 1 in (2.5 cm). This panel is now the front.
Joining
Hold the panels wrong sides together, with the front facing you. Join the coral yarn at the bottom right corner. Work sc through both layers, 3 sc in each row end, for Rows 1–12. That’s 36 sc, or 9 in (22.9 cm), which matches the panel height at Row 12. Fasten off, then repeat on the left side.
Leave the foundation edges open for the ring. Leave the lobe Rows 13–15 open for the top opening.
Insert the hook under the full edge stitch of both layers every time. Keep the sc relaxed so the seam lies flat and doesn’t pucker. The joined body should measure 11 in (27.9 cm) wide.
Border: Top Rim and Bottom Ring
The border uses the edging gauge: 4 sc = 1 in (2.5 cm).
Top rim
Round 1: Join the coral yarn at the top of the right side seam. Work the front first:
1. First lobe: 9 sc down the outer row ends of Rows 13–15 (3 per row), 8 sc across the top of Row 15, then 9 sc along the inner row ends.
2. Center V: sc2tog, using the last inner stitch of the first lobe and the first inner stitch of the second lobe.
3. Second lobe: 8 more inner sc, 8 sc across the top and 9 sc along the outer row ends.
That gives 26 + 26 − 1 = 51 sc on the front. Repeat across the back for 51 sc. Join. (102 sc)
Round 2: Sc in each st, working an sc2tog at each center V. That’s 50 sc per panel. (100)
Round 3: Repeat Round 2. That’s 49 sc per panel. (98)
Round 4: Sc in each st. (98) Fasten off.
Why the math works: Each lobe edge is 3 rows × 0.75 in (1.9 cm) = 2.25 in (5.7 cm). At 4 sc per 1 in, that’s 9 sc. The lobe top is 2 in (5.1 cm), which is 8 sc. The rim starts exactly at the seam top, so no extra stitches are added at the seams. The total is 2 panels × 51 = 102 sc, or 25.5 in (64.8 cm), which matches the opening. The V decreases keep the center dip crisp.
Bottom ring
Round 1: Join the coral yarn at a bottom seam corner. Work 12 sc evenly across the front foundation edge, then 12 sc across the back foundation edge. Join. (24)
Each foundation edge is 3 in (7.6 cm), and 3 × 4 = 12 sc.
Rounds 2–3: Sc in each st. (24)
Round 4: Sl st in each st. (24) Fasten off.
The opening is 6 in (15.2 cm) around, or about 1.9 in (4.8 cm) across.
Strap
Overlap each strap end 1 in (2.5 cm) inside the rim at a side seam and sew it securely. That leaves 16 in (40.6 cm) showing, which peaks about 6 in (15.2 cm) above the rim.
Final Blocking
- Weave in all ends along the coral seams.
- Stuff the holder firmly with a towel so the heart shape fills out.
- Mist it evenly until it’s damp.
- Shape the lobes so they’re round and pinch the center V into a sharp dip.
- Pin the bottom ring so it’s round.
- Check the size: 11 in (27.9 cm) wide and 13 in (33.0 cm) tall.
- Let it dry completely before you remove the towel.
Final Quality-Control Checklist
- Both panels have the same counts: 6 shells at Row 12 and 1 shell at each lobe top.
- The appliqué is centered, with 1.75 in (4.4 cm) of lace showing on each side.
- Each side seam has 36 sc.
- The rim has 98 sc in its last round, with a clear V on both the front and the back.
- The ring has 24 sts and opens easily.
- The strap is sewn on firmly at both seams.
- All ends are woven in.
Troubleshooting
- The panel is wider than the checkpoint: Go down a hook size, or chain more tightly between shells.
- The shells are crowding: Check that each shell sits in an sc, not in a ch-2 sp.
- The edges are wavy: You may have worked an INC row where a Straight row belongs. Check the row list.
- The seam puckers: Loosen your tension or move up to a 5.5 mm hook just for the seam.
- The rim flares: Work Round 4 in sl st instead of sc.
- The ring is too loose for the bags: Add a round of sc2tog every 6th stitch. That gives 20 sts.
- The appliqué ripples: Re-block it flat before you sew it on.
Care
Hand wash in cool water and lay flat over a stuffed towel to dry. Don’t wring the lace panels.
Final Notes
The measurements build on each other:
– Each 1.5 in (3.8 cm) shell repeat builds a panel 10.5 in (26.7 cm) wide.
– At 0.75 in (1.9 cm) per row, 15 rows give the panel’s 11.25 in (28.6 cm) height.
– The side seams of 36 sc match the 9 in (22.9 cm) body.
– The 102-stitch rim matches the 25.5 in (64.8 cm) opening.
– The 24-stitch ring matches the two 3 in (7.6 cm) foundation edges.
If you check your gauge at each stage, the finished heart comes out 11 in × 13 in (27.9 cm × 33.0 cm).
Happy crocheting!