

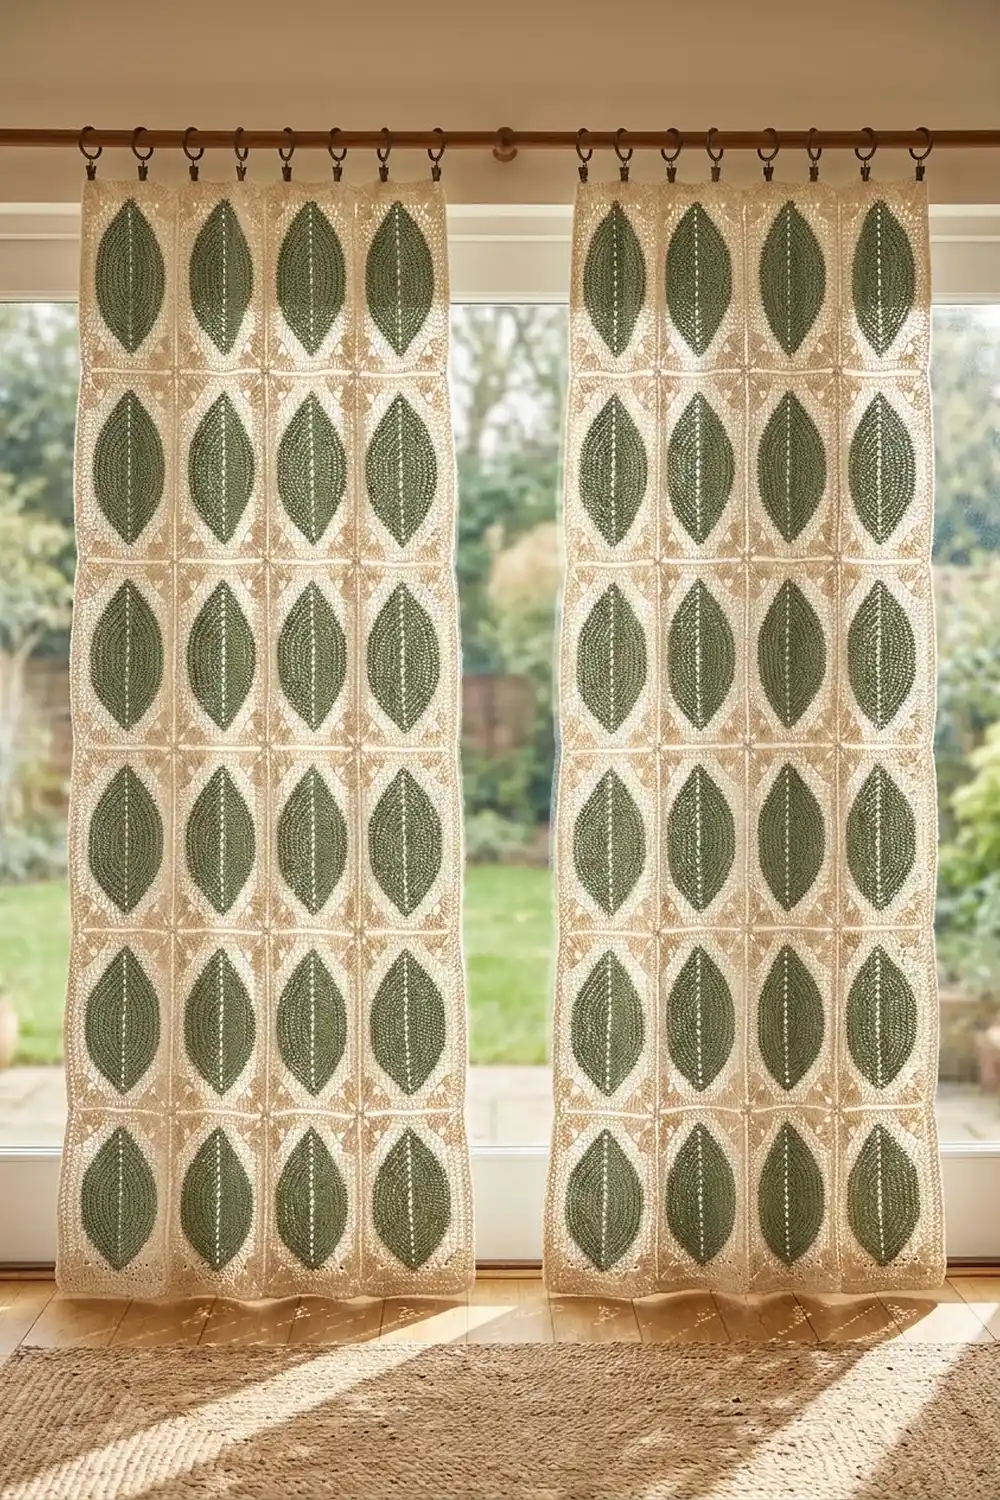
These curtain panels bring a garden feel to any window. Each panel is a grid of tiles, and every tile holds one solid sage-green leaf framed by an open cream lattice of fans and chain bars. Light shines through the lace, and the leaves stay crisp and graphic.
The palette has just two colors: soft sage green for the leaves and warm cream for the framework. The style is botanical and calm. The panels suit a cottage kitchen, a sunroom, or a boho bedroom.
The pattern uses US crochet terms. Each finished panel measures 16.75″ x 78.5″ (42.5 x 199.4 cm), and the pattern makes a matching pair.
The construction is simple and repeatable. You work a leaf in two rounds around a foundation chain. Then you frame it in cream with two rounds that square it into a rectangle. Finally you join the tiles flat with slip stitch and add a two-round border.
Finished Size and Construction
- Finished panel size: 16.75″ x 78.5″ (42.5 x 199.4 cm), make 2
- Skill level: Intermediate
- Terminology: US crochet terms
- Yarn weight: Worsted (#4) cotton
- Hook: 5.0 mm (H-8)
- Number of pieces: 60 tiles (30 per panel)
- Layout per panel: 3 tiles wide x 10 tiles tall
- Tile size: 5.25″ x 7.75″ (13.3 x 19.7 cm)
- Panel size before border: 15.75″ x 77.5″ (40.0 x 196.9 cm)
- Border depth: 0.5″ (1.3 cm) per side, 2 rounds
Materials
Choose a smooth worsted-weight cotton, either mercerized or matte. Cotton holds the leaf shape, blocks crisply, and hangs straight. Avoid fuzzy or very stretchy yarns: they blur the lace and let long panels sag. The amounts below assume about 190 m per 100 g.
- Sage green (Color A): 420 g, about 800 m
- Cream (Color B): 600 g, about 1,140 m
These amounts include a margin of about 15 percent for gauge swatches and differences in tension.
Tools:
– 5.0 mm (H-8) crochet hook
– Tapestry needle
– Stitch markers
– Scissors
– Measuring tape
– Blocking mats and rust-proof pins
– Spray bottle
– 12–14 curtain clip rings for hanging (not crocheted)
Abbreviations (US Terms)
- ch – chain
- sl st – slip stitch
- sc – single crochet
- hdc – half double crochet
- dc – double crochet
- tr – treble crochet
- BLO – back loop only
- sp – space
- st(s) – stitch(es)
Special stitch – Fan: (dc, ch 1) 4 times, then dc, all in the same stitch. A Fan has 5 dc and 4 ch-1 spaces. The 3rd dc is the center dc.
Gauge and Checkpoints
Gauge: 16 sc and 18 rows = 4″ (10.2 cm) in cotton with a 5.0 mm hook. Chain gauge is about 4 ch per 1″ (2.5 cm).
Make one complete tile before you start the rest. Measure at each stage:
- After Leaf Rnd 2: the leaf is about 3″ x 6.75″ (7.6 x 17.1 cm).
- After Frame Rnd 4: the tile is 5.25″ x 7.75″ (13.3 x 19.7 cm), with 21 sts across the top and 31 sts down each side.
If your tile is too big, go down 0.5 mm. If it is too small, go up 0.5 mm. If only the leaf is off and the frame is correct, change the hook for the leaf only. Keep tile size within 1/8″ (0.3 cm), because 10 tiles multiply any error.
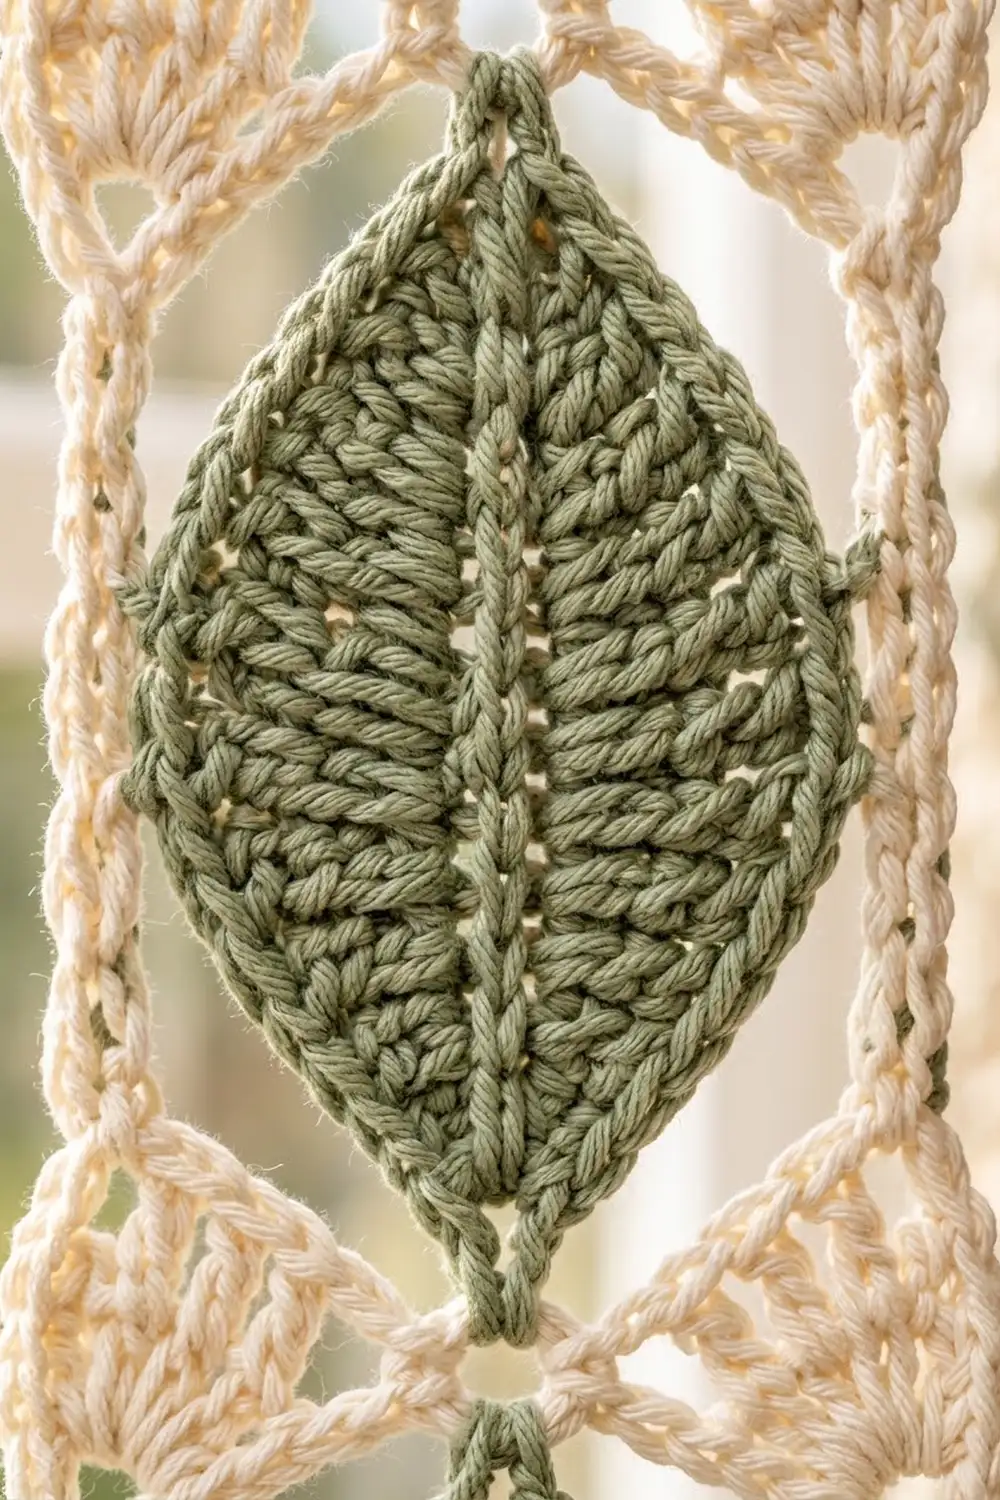
Leaf (Color A)
The leaf is worked in rounds around both sides of a foundation chain. The chain becomes the center vein.
Foundation: With A, ch 25.
Rnd 1: Sc in 2nd ch from hook, hdc in next 2 ch, dc in next 4 ch, tr in next 10 ch, dc in next 4 ch, hdc in next 2 ch, sc in last ch (24 sts). Ch 2. Rotate and work in the free loops on the opposite side of the foundation: sc in the first ch (same ch as last sc), hdc in next 2, dc in next 4, tr in next 10, dc in next 4, hdc in next 2, sc in last ch (24 sts). Ch 2, sl st to first sc. (48 sts, 2 ch-2 tip sps)
The tall tr in the middle and the short sc at the ends make the pointed oval.
Rnd 2 (work all sts in BLO): Sl st into the next ch-2 sp. Ch 1, (sc, ch 2, sc) in same sp. Sc in next sc, sc in next 2 hdc, hdc in next 4 dc, [dc in next tr, 2 dc in next tr] 5 times, hdc in next 4 dc, sc in next 2 hdc, sc in next sc (29 sts on this side). (Sc, ch 2, sc) in next ch-2 sp. Repeat from * to * once. Sl st to first sc. (62 sts: 29 per side + 2 sc at each tip; 2 ch-2 tip sps)
The unused front loops form a ridge that outlines Rnd 1. All the increases sit in the middle, so the tips stay sharp. Fasten off A.
On each side, number the 29 sts from 1 to 29, starting next to the tip where you will join. Side st 15 is the center dc.
Frame (Color B)
Rnd 3: Join B with sl st in either ch-2 tip sp (call it the top tip). Ch 1, sc in same sp. Ch 5, sk next 3 sts (tip sc and side sts 1–2), Fan in side st 3. Ch 10, sk next 11 sts, sc in side st 15. Ch 10, sk next 11 sts, Fan in side st 27. Ch 5, sk next 3 sts (side sts 28–29 and tip sc), sc in next ch-2 tip sp. Repeat from * to * once, but end with sl st to first sc instead of the final sc. (24 sts: 4 Fans of 5 dc = 20 dc, plus 4 sc; 4 ch-5 sps, 4 ch-10 sps, 16 ch-1 sps)
The Fans sit just below each leaf tip and spread toward the corners. The ch-10 bars become the long side frame lines.
Rnd 4: Ch 3 (counts as dc in the first sc). 5 hdc in ch-5 sp. Working into the Fan: sc in first dc, sc in ch-1 sp, sc in next dc, sc in ch-1 sp. (Sc, ch 2, sc) in center dc for corner. Sc in ch-1 sp, sc in next dc, sc in ch-1 sp, sc in last dc. 10 sc in ch-10 sp, sc in next sc, 10 sc in ch-10 sp. Working into next Fan: sc in first dc, sc in ch-1 sp, sc in next dc, sc in ch-1 sp. (Sc, ch 2, sc) in center dc. Sc in ch-1 sp, sc in next dc, sc in ch-1 sp, sc in last dc. 5 hdc in ch-5 sp.* Dc in next tip sc. Repeat from * to ** once. Sl st to top of beginning ch-3. Fasten off.
The dc at each tip and the hdc in the shoulder spaces bring the short edges level with the Fans.
Rnd 4 counts per side (each count includes its 2 corner sc):
– Short edges: 1 corner sc + 4 + 5 hdc + 1 dc + 5 hdc + 4 + 1 corner sc = 21 sts
– Long sides: 1 corner sc + 4 + 10 + 1 + 10 + 4 + 1 corner sc = 31 sts
– Round total: 21 + 31 + 21 + 31 = 104 sts, plus 4 ch-2 corner sps
The tip dc is st 11 of 21, so it sits exactly in the center.
Make All Pieces
Make 60 tiles in total, 30 for each panel. Each tile uses both colors.
- Color A: 60 leaves
- Color B: 60 frames
Weave in the ends on each tile as you go. If tiles curl, block them lightly before joining.
Layout per panel (3 columns x 10 rows; every tile is vertical, with leaf tips pointing up and down):
Row 1:  [T] [T] [T]
Row 2:  [T] [T] [T]
Row 3:  [T] [T] [T]
Row 4:  [T] [T] [T]
Row 5:  [T] [T] [T]
Row 6:  [T] [T] [T]
Row 7:  [T] [T] [T]
Row 8:  [T] [T] [T]
Row 9:  [T] [T] [T]
Row 10: [T] [T] [T]
Joining
Use B and a flat slip-stitch join through the back loops of both tiles. Hold the tiles right side up, edge to edge.
Step 1 – Columns: Join tiles end to end to make 3 columns of 10. Place the short edge of one tile against the short edge of the next. Sl st through both ch-2 corner sps together, then through 21 matching pairs of sts, then through the opposite corner sps. Stitch 11 meets stitch 11, so the two leaf tips touch and form the small knotted point at the center of each cream X. Each column measures 77.5″ (196.9 cm), or 10 x 7.75″.
Step 2 – Panel: Lay the 3 columns side by side. Join each long seam stitch to stitch: 31 pairs per tile and 310 pairs per seam. At each horizontal seam, sl st through the stacked corner sps together. Do not add any extra stitches.
Keep the slip stitches as loose as the tile fabric. Tight joins pucker the panel and make it shorter. If needed, go up 0.5 mm for joining only.
Checkpoint: Lay the joined panel flat. It should measure 15.75″ x 77.5″ (40.0 x 196.9 cm).
Border
The border gauge matches the tile edges: 4 sc per 1″ (2.5 cm). Each border round adds about 0.25″ (0.6 cm) per side.
Starting counts:
– Short sides: 3 tiles x 21 sts = 63 sts
– Long sides: 10 tiles x 31 sts = 310 sts
At seams, skip the joined ch-2 corner spaces. Work the last st of one tile and then the first st of the next tile.
Border Rnd 1 (B): Join B in any outer corner ch-2 sp. Ch 1, (sc, ch 2, sc) in same sp. Sc in each st across to the next corner, then (sc, ch 2, sc) in the corner sp. Repeat around and sl st to first sc.
– Short sides: 63 sts worked 1 per st + 2 corner sc = 65 sts
– Long sides: 310 sts worked 1 per st + 2 corner sc = 312 sts
– Round total: 754 sts
Border Rnd 2 (B): Sl st into corner sp. Ch 1, (sc, ch 2, sc) in same sp. Sc in each st around, with (sc, ch 2, sc) in each corner sp. Sl st to first sc. Fasten off.
– Short sides: 65 sts worked 1 per st + 2 corner sc = 67 sts
– Long sides: 312 sts worked 1 per st + 2 corner sc = 314 sts
– Round total: 762 sts
Why the math works: The tile edges are already sc at 4 sts per 1″. So 63 sts / 4 = 15.75″ and 310 sts / 4 = 77.5″, which matches the joined panel exactly. The only added stitches are the corner sc, which turn the corners without pulling. The two rounds add 0.5″ (1.3 cm) per side, for a finished size of 16.75″ x 78.5″ (42.5 x 199.4 cm).
Final Blocking
- Weave in all remaining ends along the seams.
- Lay the panel flat on blocking mats, right side up.
- Pin the four corners to 16.75″ x 78.5″ (42.5 x 199.4 cm).
- Pin along every horizontal seam so each row of tiles is 7.75″ (19.7 cm) tall.
- Open each corner Fan with a pin so the spokes spread evenly.
- Spray until damp but not soaking.
- Shape each leaf tip to a clean point.
- Let the panel dry completely before unpinning. Repeat for the second panel.
Final Quality-Control Checklist
- Each tile has 21 sts on the short edges and 31 sts on the long sides.
- All 60 leaves point up and down, and the tips meet at every junction.
- Every cream X is centered on a leaf-tip knot.
- Border Rnd 2 has 67 sts on the short sides and 314 sts on the long sides.
- Both panels measure 16.75″ x 78.5″ (42.5 x 199.4 cm).
- No tails show on the front.
- Seams lie flat with no puckering.
Troubleshooting
Leaf cups or ruffles: Check the 5 increases in Rnd 2. Too many increases cause ruffling, and tight tension causes cupping. Go up a hook size for Rnd 2.
Leaf tips are blunt: Work the tip (sc, ch 2, sc) firmly and keep the end sts as sc.
Fans bunch up: Make sure each Fan sits in side st 3 or 27, not closer to the tip.
Side bars sag: Your ch-10 is too loose. Chain more firmly, or use a smaller hook for the chains only.
Tile is too tall: Recheck Rnd 4. Each ch-10 sp should hold exactly 10 sc.
Panel is shorter than expected: The join is too tight. Rejoin with a larger hook.
Border ripples: You worked into the seam corner spaces. Remove the extra sts.
Care
Hand wash in cool water with mild soap, roll in a towel, and dry flat. If the panels lengthen after washing, pin them back to size.
Final Notes
The whole panel depends on one chain of measurements. A 3″ x 6.75″ (7.6 x 17.1 cm) leaf becomes a 5.25″ x 7.75″ (13.3 x 19.7 cm) tile with 21 and 31 sts per side. Three tiles across give 63 sts and 15.75″ (40.0 cm). Ten tiles tall give 310 sts and 77.5″ (196.9 cm). Two border rounds bring each panel to 16.75″ x 78.5″ (42.5 x 199.4 cm). Check your first tile carefully and the rest will follow.
Happy crocheting!