
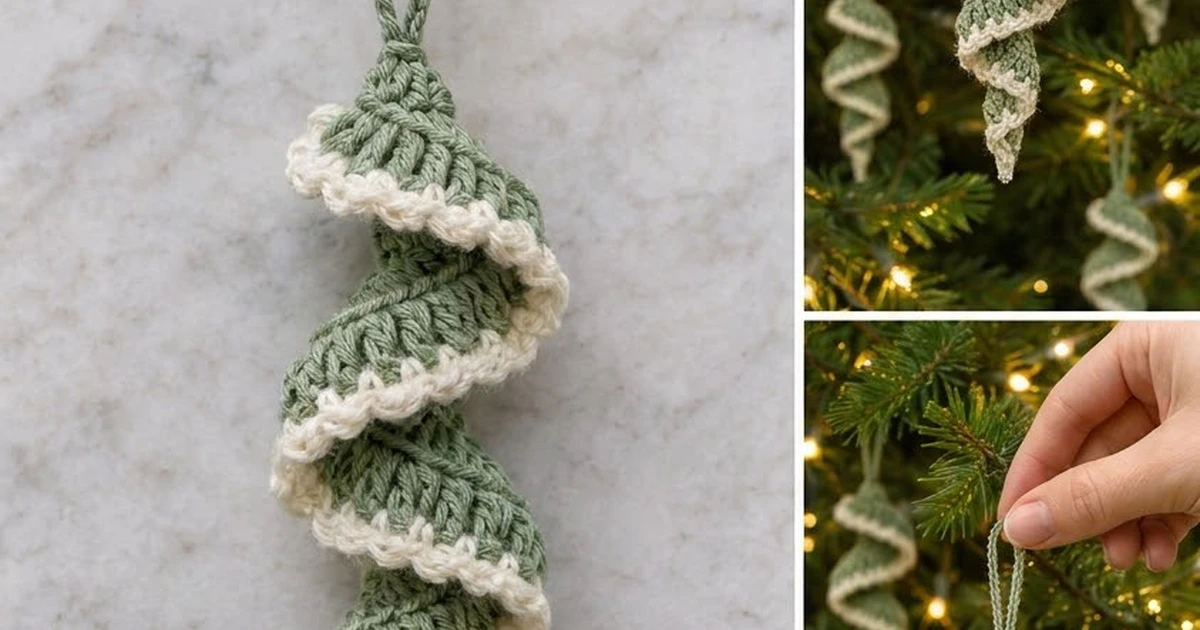
The Sage Swirl Spiral Ornament is a small corkscrew decoration. One strip of crochet twists itself into a tight spiral, and a crisp cream edge follows every turn. It looks a bit like a ribbon icicle and catches tree lights well.
The palette is soft sage green with warm cream trim. Together they suit a calm, natural holiday look, and they work well with wood, linen, and greenery. The tall stitches form vertical ridges in the green, so the ornament has texture without any extra stitch work.
The finished ornament measures about 6 in (15.2 cm) long without the loop and 2 in (5.1 cm) wide at its widest. With the loop it is about 7.5 in (19.1 cm) long. The pattern uses US crochet terms throughout.
You make it in one piece. First you chain a foundation. Then you work increasing stitches into it, from short at the tip to tall in the middle and short again at the top, and the extra stitches force the strip to coil. You chain the hanging loop at the top, add one cream edging row, then twist and block the spiral so it keeps its shape.
Finished Size and Construction
- Finished size: about 6 in (15.2 cm) long × 2 in (5.1 cm) wide, without the loop
- Length with loop: about 7.5 in (19.1 cm)
- Skill level: Easy
- Terminology: US crochet terms
- Yarn weight: DK (light worsted, #3), cotton or cotton blend
- Hook: 3.5 mm (E/4)
- Number of pieces: 1
- Layout: one strip that coils into about five spiral turns
- Foundation length: 45 working chains, about 6.5 in (16.5 cm) long when relaxed
- Size before edging: about 5.75 in (14.6 cm) long × 1.75 in (4.4 cm) wide once coiled
- Edging depth: one row of sc, adding about 0.25 in (0.6 cm) to the outer edge
Materials
Yarn: Use a smooth DK cotton or cotton blend. Cotton keeps sharp stitch ridges and holds a twisted shape after blocking. Fuzzy or very stretchy yarns blur the ridges and let the spiral relax.
- Sage green (Color A): 8 g / about 18 m (20 yd)
- Cream (Color B): 3 g / about 7 m (8 yd)
These amounts include a safety margin of about 25 percent for your gauge swatch and weaving in ends. A 50 g ball of each color makes several ornaments.
Tools:
- 3.5 mm (E/4) crochet hook
- Tapestry needle
- Scissors
- 2 stitch markers
- Spray starch or a 1:1 mix of white craft glue and water (optional, for a firm hold)
- A pencil or a 0.25 in (0.6 cm) wooden dowel, for shaping
- Rust-proof pins and a blocking mat or folded towel
Abbreviations (US Terms)
- ch – chain
- sl st – slip stitch
- sc – single crochet
- hdc – half double crochet
- dc – double crochet
- st(s) – stitch(es)
- 2 sc in next ch – work 2 sc into the same chain
- 3 dc in next ch – work 3 dc into the same chain
Special technique, working into the back bump: Turn the chain over and insert the hook under the small horizontal bar on the back of each chain. This leaves a neat, even edge along the bottom of the strip and keeps the inner spiral edge tidy.
Gauge and Checkpoints
Gauge is not critical for an ornament, but it controls both the length and how tightly the spiral coils. Make one full ornament first and measure it at each checkpoint below before you make a set.
Chain gauge: 14 ch = 2 in (5.1 cm), relaxed and not stretched.
Stitch height: A dc made into a chain stands about 0.5 in (1.3 cm) tall.
Checkpoint 1, foundation: 46 ch measures about 6.5 in (16.5 cm) relaxed.
Checkpoint 2, after the dc section: The strip should already be ruffling hard and trying to twist. If it lies flat, your stitches are too loose for the chain.
Checkpoint 3, after Row 1: Let the strip hang from the top end. It should coil by itself to about 5.75 in (14.6 cm) long.
Checkpoint 4, after the edging and blocking: about 6 in (15.2 cm) long × 2 in (5.1 cm) wide.
If it is too big: Go down to a 3.25 mm (D/3) hook, or chain more tightly.
If it is too small or coils too tightly: Go up to a 3.75 mm (F/5) hook for Row 1 only.
Do not change the stitch counts to fix the size. The ratio of stitches to chains is what makes the spiral.
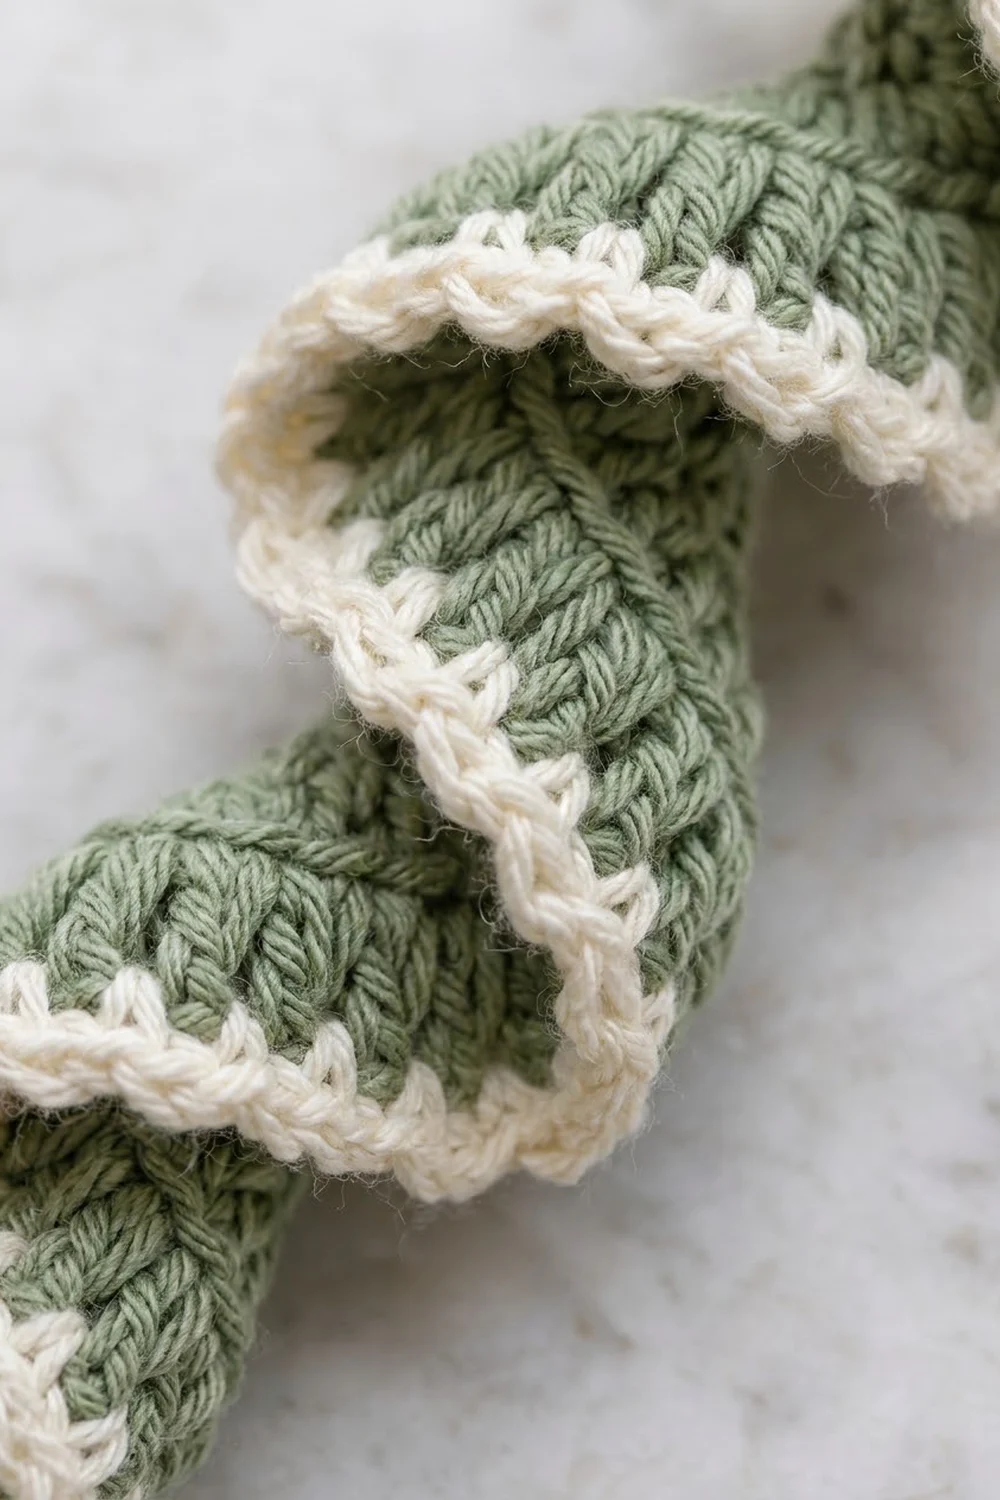
Row 1: Spiral Body (Color A)
With sage green, leave a 6 in (15.2 cm) tail and ch 46.
The first chain from the hook is the turning chain and is not worked. That leaves 45 working chains. You start at the bottom tip and work toward the top.
Row 1 has five sections. Place a stitch marker at the end of each section if that helps you keep count.
Tip section (sc): Starting in the 2nd ch from the hook, work 2 sc in each of the next 6 ch.
Section count: 12 sc. Running total: 12 sts.
Lower section (hdc): Work 2 hdc in each of the next 8 ch.
Section count: 16 hdc. Running total: 28 sts.
Main section (dc): Work 3 dc in each of the next 25 ch.
Section count: 75 dc. Running total: 103 sts.
This is the part that forms the full spiral turns. As you work, the strip will ripple and start to turn around itself. That is correct, so don’t flatten it.
Upper section (hdc): Work 2 hdc in each of the next 4 ch.
Section count: 8 hdc. Running total: 111 sts.
Top section (sc): Work 2 sc in each of the last 2 ch.
Section count: 4 sc. Running total: 115 sts.
Row 1 total: 115 sts across 45 chains (6 + 8 + 25 + 4 + 2 = 45 ch).
Check: 12 + 16 + 75 + 8 + 4 = 115 sts. If your count is different, find the section that is off before you continue. The cream edging depends on this exact number.
Hanging Loop (Color A)
Keep working with sage green. Do not turn or fasten off.
Loop: Ch 22. Sl st into the last sc of Row 1 to close the loop. You now have a closed loop at the top of the ornament.
Secure: Sl st into the next stitch along the foundation side of the top to anchor the loop at its base.
Fasten off, leaving a 6 in (15.2 cm) tail.
Checkpoint: When hanging, the loop measures about 1.5 in (3.8 cm). For a longer loop, add 2 ch for each extra 0.25 in (0.6 cm) of hanging length.
Edging: Cream Trim Row (Color B)
This single row creates the raised cream line that follows the spiral.
Edging gauge: 1 sc into each stitch of Row 1, with no skips and no increases.
Set up: With the strip right side facing, find the top of the last stitch of Row 1, next to the loop base. Join cream with a sl st in this stitch.
Row 2 (trim row): Ch 1 (does not count as a stitch). Work 1 sc in the top of each stitch of Row 1, from the top of the ornament down to the bottom tip.
Count it by section, in the order you meet them:
- Top section: 4 sc, worked 1 per existing stitch, plus 0 extra
- Upper section: 8 sc, worked 1 per existing stitch, plus 0 extra
- Main section: 75 sc, worked 1 per existing stitch, plus 0 extra
- Lower section: 16 sc, worked 1 per existing stitch, plus 0 extra
- Tip section: 12 sc, worked 1 per existing stitch, plus 0 extra
Row 2 total: 115 sc (115 worked 1 per existing stitch, plus 0 added).
Finish the tip: Sl st into the side of the first sc of Row 1 at the very tip so the cream covers the point. Fasten off, leaving a 6 in (15.2 cm) tail.
Why the math works: Row 1 already has the extra stitches, at 2 or 3 per chain, that create the ruffle and the twist. If the edging added more stitches, the outer edge would flare and the turns would loosen. Matching the edging 1:1 keeps the outer edge exactly as long as Row 1’s outer edge. The cream then lies flat along the rim as a firm, beaded line, and the spiral keeps the tight coil you made in the body.
Checkpoint: When hanging, the ornament measures about 6 in (15.2 cm) long and 2 in (5.1 cm) wide, with the cream edge facing outward on every turn.
Weaving in Ends
- Tip tail (green foundation tail): Weave it up along the inner foundation edge for about 1 in (2.5 cm), then back down.
- Cream tail at the tip: Weave it into the cream sc for about 1 in (2.5 cm). Keep it out of the very tip so the point stays slim.
- Top tails (green and cream): Weave both into the top cone. Pass the green tail once through the base of the loop to reinforce it.
Trim all tails close to the fabric.
Final Blocking
Blocking sets the corkscrew so it doesn’t relax over time.
- Dampen: Mist the ornament with water until it is evenly damp, not dripping.
- Twist: Hold the loop and gently twist the strip in the direction it already wants to coil. Aim for about five even turns between the top cone and the tip.
- Shape on a dowel (optional): For a very even spiral, wind the strip loosely around a pencil or a 0.25 in (0.6 cm) dowel, with the foundation edge against the dowel and the cream edge facing out.
- Even the turns: Space the turns evenly. The gaps between the cream edges should look about the same all the way down.
- Stiffen (optional): Spray it lightly with starch, or brush on the 1:1 glue-and-water mix. Blot off any extra so it doesn’t dry shiny.
- Dry: Hang it by the loop, or leave it on the dowel, until it is completely dry, usually 6 to 12 hours.
- Release and check: Slide it off the dowel and measure. It should be about 6 in (15.2 cm) × 2 in (5.1 cm).
Final Quality-Control Checklist
- Row 1 has exactly 115 stitches (12 + 16 + 75 + 8 + 4).
- Row 2 has exactly 115 sc, one in each stitch of Row 1.
- The cream edge shows on the outer rim of every turn.
- There are about five turns, evenly spaced.
- The top forms a short, neat cone that leads into the loop.
- The bottom ends in a slim point with no loose cream gap.
- The loop is about 1.5 in (3.8 cm) and firmly anchored.
- All ends are woven in and nothing pokes out of the spiral.
- The ornament measures about 6 in (15.2 cm) long × 2 in (5.1 cm) wide without the loop.
Troubleshooting
The strip lies flat and won’t twist.
The chains are too tight compared with the stitches, or the dc section was skipped. Check for 3 dc in every one of the 25 main chains. Loosen your chain slightly.
The spiral is too loose and floppy.
The yarn may be too soft. Switch to a firmer cotton, block with starch, and dry it on a dowel.
The ornament is much longer than 6 in (15.2 cm).
Your chain is loose. Chain with the 3.25 mm (D/3) hook and work Row 1 with the 3.5 mm (E/4) hook.
The cream edge ripples or flares.
You added stitches in Row 2. Count again: there should be exactly 115 sc, one per stitch.
The cream edge pulls in and puckers the turns.
The edging tension is too tight. Work Row 2 more loosely, or use a hook half a size larger for that row only.
The tip looks blunt.
Pull the foundation tail snug through the first few chains before weaving it in.
The loop twists or flips sideways.
Anchor it with the extra sl st described above, and steam it lightly so it hangs straight.
Care
Spot clean with cool water and mild soap, then re-twist and let it dry while hanging. If you used starch, refresh it after washing and store the ornament hanging or loosely wrapped so the spiral isn’t crushed.

Final Notes
Here is the measurement chain in short. A foundation of 46 ch is about 6.5 in (16.5 cm). Row 1 adds 115 stitches across 45 working chains and coils the strip to about 5.75 in (14.6 cm). The 22-ch loop adds about 1.5 in (3.8 cm). The 115-sc cream edging matches Row 1 stitch for stitch, and blocking sets the finished ornament at about 6 in (15.2 cm) long × 2 in (5.1 cm) wide.
Once your first ornament matches these checkpoints, the rest of your set will match too. Make a few in sage and cream, or try other pairs of colors to fill your tree.
Happy crocheting!