

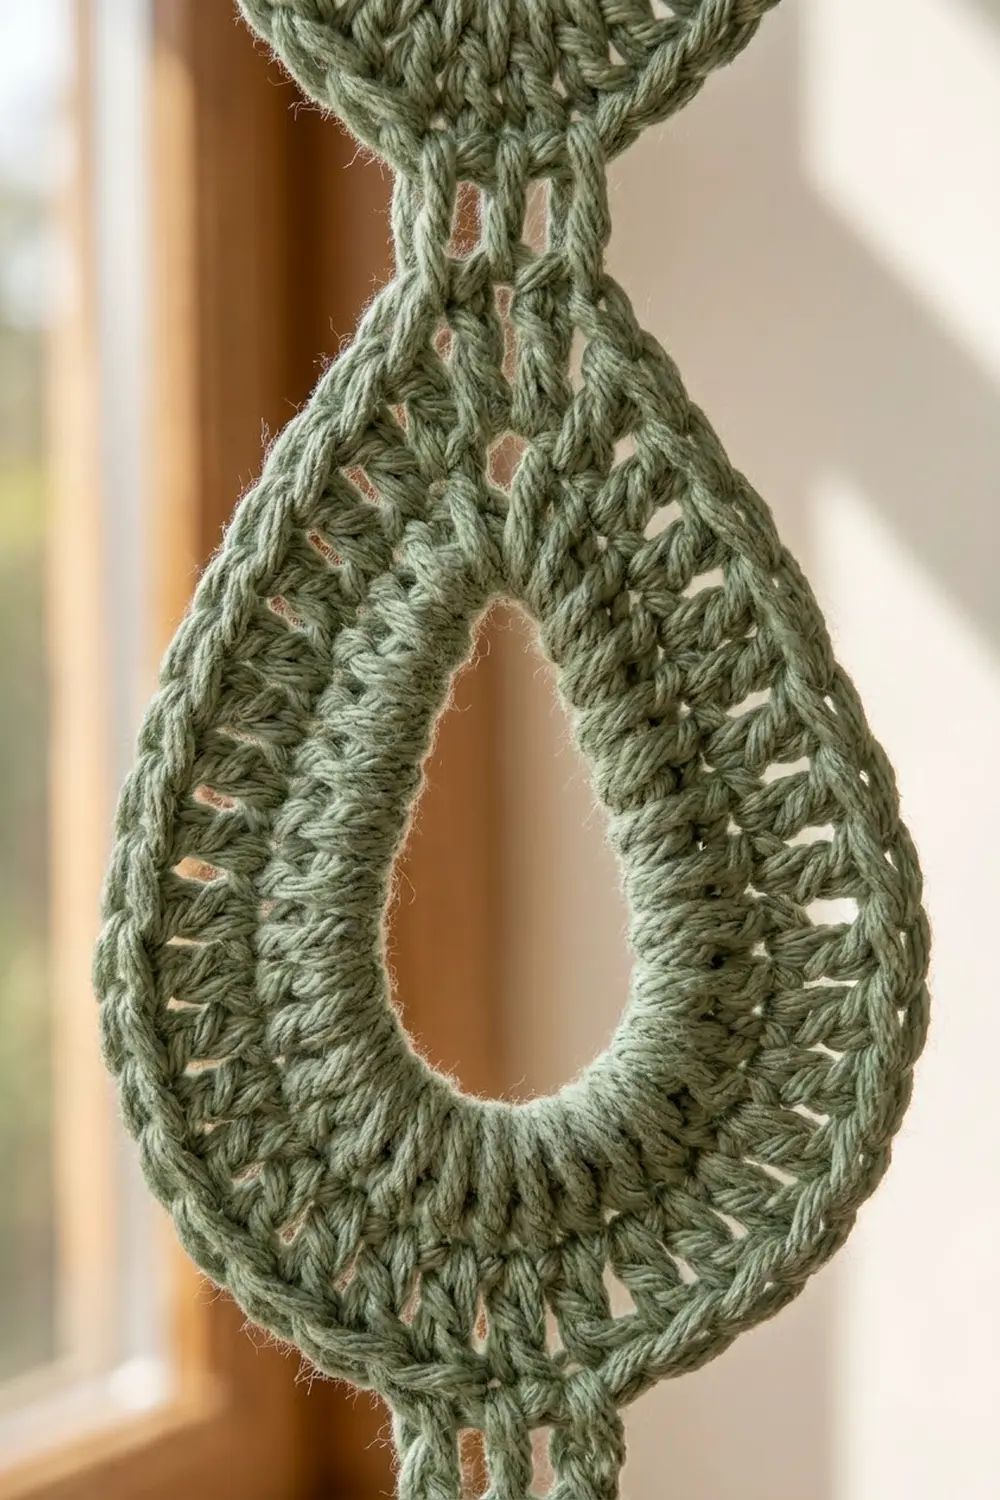
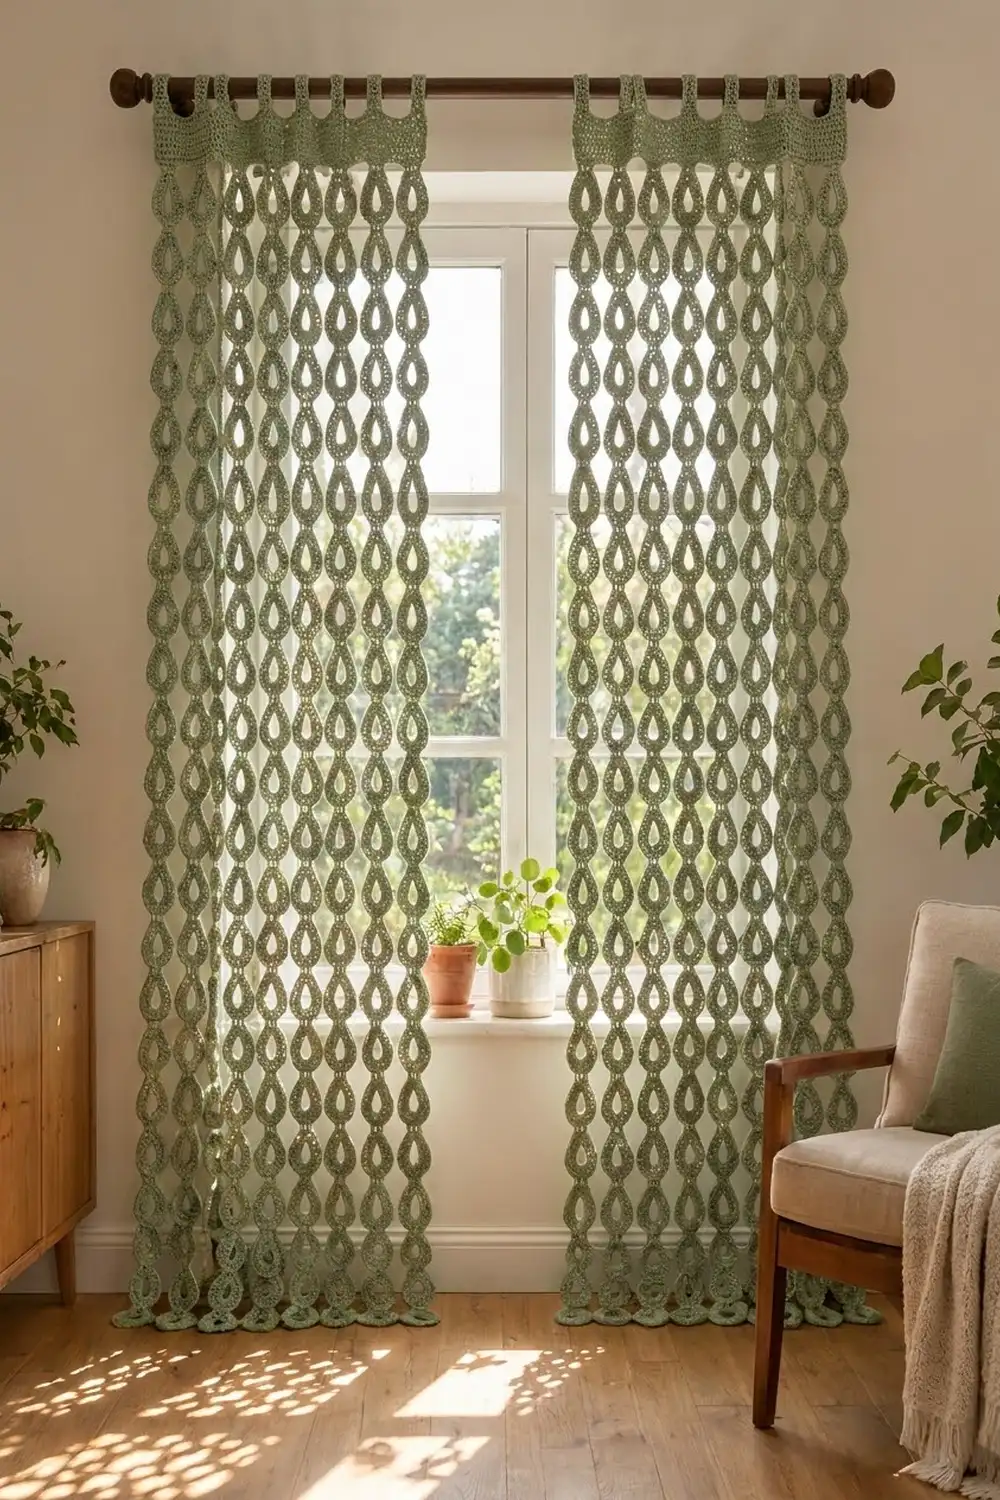
These floor-length crochet curtains are made from strands of open teardrop motifs. Each motif has a pointed top, a rounded bottom and a teardrop-shaped window in the center. When light comes through, the drops throw patterned shadows across the floor.
The curtains are worked in one soft sage green worsted-weight cotton, which keeps them calm and natural. The style is boho-meets-cottage. The panels give gentle privacy and still let plenty of daylight through. The pattern uses US crochet terms throughout.
Each finished panel measures 28 in (71.1 cm) wide by about 79.5 in (201.9 cm) long, including the tab loops. The pattern makes two panels, for a combined width of 56 in (142.2 cm).
Here’s how it’s built. You crochet the teardrop motifs in three rounds and join each one to the motif above it as you go, making 8 strands of 15 drops for each panel. Then you work a solid header band across the tops of the strands, catching each strand into the first row. Last, you add tab loops for the curtain rod.
Finished Size and Construction
- Finished panel size: 28 in × 79.5 in (71.1 × 201.9 cm), including tabs
- Skill level: Easy-intermediate (repetitive, but you need to count carefully)
- Terminology: US crochet terms
- Yarn weight: Worsted (#4) cotton
- Hook: US H-8 (5 mm)
- Number of pieces: 120 teardrop motifs and 1 header per panel (240 motifs and 2 headers for the pair)
- Layout: 8 strands across × 15 motifs down
- Single motif size: 3.5 in wide × 4.5 in tall (8.9 × 11.4 cm), or 5 in (12.7 cm) from tip to tip once joined
- Size before border (strands only): 28 in × 75 in (71.1 × 190.5 cm)
- Border (header) depth: 3 in (7.6 cm) band, plus tab loops that stand 1.5 in (3.8 cm) above it
Materials
Yarn: Use a smooth worsted-weight cotton or cotton blend. Cotton holds the teardrop shape well and doesn’t stretch out much while hanging. Avoid pure acrylic for this project, because long strands of acrylic tend to droop and lengthen over time.
- Sage green: 1,000 g / about 1,700 m (1,860 yd) for two panels. That’s 500 g / 850 m (930 yd) per panel.
Tools:
– US H-8 (5 mm) crochet hook
– Tapestry needle
– Stitch markers (at least 10)
– Scissors
– Measuring tape
– Blocking mats and rust-proof pins
– Spray bottle
The yarn quantities include a margin of about 15% for your gauge swatch, joining, weaving in ends and small differences in tension.
Abbreviations (US Terms)
- ch – chain
- sl st – slip stitch
- sc – single crochet
- hdc – half double crochet
- dc – double crochet
- st(s) – stitch(es)
- RS / WS – right side / wrong side
- [ ] – repeat the instructions in brackets the stated number of times
Special stitch – Tip Join: Ch 2, sl st in the first marked stitch of the piece you’re joining to, sl st in the second marked stitch, ch 2, then sl st in the first sc of the current round. This replaces the plain ch-4 tip loop. It connects two motifs (or a motif and the header) without adding any stitches to either piece’s round count.
Gauge and Checkpoints
Make one test motif first, using the unjoined version below. Measure it before you make any more.
- After Round 1: 2 in wide × 2.5 in tall (5.1 × 6.4 cm)
- After Round 2: 2.75 in wide × 3.5 in tall (7.0 × 8.9 cm)
- After Round 3: 3.5 in wide × 4.5 in tall (8.9 × 11.4 cm), not counting the tip loop
- Center hole: about 1 in wide × 1.75 in tall (2.5 × 4.4 cm)
Header gauge: 16 hdc = 4 in (10.2 cm). Rows 1–9 of the header measure 3 in (7.6 cm).
If your motif is too big, go down half a hook size (4.5 mm). If it’s too small, go up to 5.5 mm. Even being 0.25 in (0.6 cm) off per motif changes a panel’s width by 2 in (5.1 cm) and its length by 3.75 in (9.5 cm), so check this before you go on.
Teardrop Motif
Each motif is worked in the round into a chain ring. The short stitches gathered at the top pinch the ring into a point, and the tall stitches around the bottom round it out, which gives you the teardrop shape both inside and out.
Foundation: Ch 18, sl st in the first ch to form a ring. Don’t twist the chain.
Round 1 (RS): Ch 1 (doesn’t count as a stitch). Work into the ring: 3 sc, 3 hdc, 12 dc, 3 hdc, 3 sc. Sl st in the first sc to join. (24 sts)
Push the stitches together evenly around the ring. The gap between the first and last sc is the top point of the teardrop.
Round 2: Ch 1. Sc in each of the first 3 sts, hdc in each of the next 3 sts, 2 dc in each of the next 12 sts, hdc in each of the next 3 sts, sc in each of the last 3 sts. Sl st in the first sc to join. (36 sts: 3 sc, 3 hdc, 24 dc, 3 hdc, 3 sc)
Round 3: Ch 1. Sc in each of the first 6 sts. [Dc in the next st, 2 dc in the next st] 12 times. Sc in each of the last 6 sts. (48 sts: 6 sc, 36 dc, 6 sc)
Tip (unjoined version, for the test motif and the bottom-row checks): Ch 4, sl st in the first sc of Round 3. Fasten off.
Mark the joining stitches. On Round 3, count from the first sc: sts 1–6 are sc, sts 7–42 are dc, and sts 43–48 are sc. The bottom center of the motif is st 24 and st 25. Place a marker in each one on every motif. The next motif joins to these two stitches.
The ch-4 tip (or Tip Join) sits right at the point, between st 48 and st 1. It forms the short connector you see between drops in the photo.
Make All Pieces
Per panel: 120 sage green motifs.
For the pair: 240 sage green motifs.
Motifs are joined as you go, so you build each strand from the top down.
Layout grid for one panel (S = strand, numbers = motif position from the top):
        S1   S2   S3   S4   S5   S6   S7   S8
Row 1   [1]  [1]  [1]  [1]  [1]  [1]  [1]  [1]   <- plain ch-4 tips (to header)
Row 2   [2]  [2]  [2]  [2]  [2]  [2]  [2]  [2]
Row 3   [3]  [3]  [3]  [3]  [3]  [3]  [3]  [3]
 ...    ...  ...  ...  ...  ...  ...  ...  ...
Row 15  [15] [15] [15] [15] [15] [15] [15] [15]  <- bottom drops
That’s 8 strands × 15 motifs = 120 motifs per panel.
Weave in each motif’s tails as soon as you finish it. With 240 motifs, leaving the ends until the end turns into an exhausting job.
Joining
Method: Join as you go, with the Tip Join.
- Motif 1 of each strand: Work Rounds 1–3 and finish with a plain ch-4 tip. Mark sts 24 and 25. This top tip gets caught into the header later.
- Motifs 2–15: Work Rounds 1–3. In place of the ch-4 tip, work the Tip Join into the marked sts 24 and 25 of the motif above. Make sure both motifs have the RS facing you. Fasten off.
Stitch-to-stitch logic: Each new motif’s point (between its st 48 and st 1) connects to the exact bottom center of the motif above (between sts 24 and 25). That keeps each strand hanging straight down. If you join even one stitch off-center, the strand will tilt.
Tension: Keep the two ch-2 sections the same length as your regular chains. If they’re tight, the drops pucker together. If they’re loose, the strands sag and the panel gets longer.
Size checkpoint: After you join 3 motifs, the strand should measure 14.5 in (36.8 cm) from the tip of motif 1 to the bottom of motif 3, which is two 5 in (12.7 cm) steps plus one 4.5 in (11.4 cm) body. A finished 15-motif strand measures about 75 in (190.5 cm). Lay all 8 strands side by side. They should line up within 0.5 in (1.3 cm) of each other.
Border: Header Band and Tabs
The header is the border for this design. It’s a firm band that holds the strands evenly spaced and carries the weight of the panel.
Border gauge: 16 sts = 4 in (10.2 cm), so 4 sts = 1 in (2.5 cm).
Why the math works: Each motif is 3.5 in (8.9 cm) wide, and 3.5 in × 4 sts/in = 14 sts. So each strand gets a 14-stitch section of the header. 8 strands × 14 sts = 112 sts, which is 28 in (71.1 cm). No extra stitches are added between strands, so the header is exactly as wide as the strands lying edge to edge.
Foundation: Ch 113.
Row 1 (RS, attaching row): Sc in the 2nd ch from the hook and in each of the next 5 ch. (6 sc)
– Catch strand: For each of the next 2 ch, insert the hook through the ch and through the ch-4 tip loop of a strand’s motif 1, then complete the sc. (2 sc)
– Sc in each of the next 6 ch. (6 sc, finishing the 14-st section)
[Sc in each of the next 6 ch, catch the next strand in the next 2 ch, sc in each of the next 6 ch] 7 more times. (112 sc)
The strands are now centered at header sts 7–8, 21–22, 35–36, 49–50, 63–64, 77–78, 91–92 and 105–106.
Rows 2–8: Ch 2 (doesn’t count as a stitch), turn. Hdc in each st across. (112 hdc per row)
Row 9: Ch 1, turn. Sc in each st across. (112 sc) Fasten off.
Checkpoint: The header measures 28 in × 3 in (71.1 × 7.6 cm).
Side edges: The two short ends are only 9 rows tall, so they don’t need their own edging. Just weave the tails along each end to firm them up.
Tab placement (on Row 9, 112 sts): Skip 4 sts, [tab over 8 sts, skip 8 sts] 6 times, tab over 8 sts, skip 4 sts. Check the total: 4 + (8 + 8) × 6 + 8 + 4 = 112 ✓. That gives you 7 tabs, over sts 5–12, 21–28, 37–44, 53–60, 69–76, 85–92 and 101–108.
Each tab:
– Row 1: With the RS facing, join the yarn in the first tab st. Ch 1, sc in the same st and in each of the next 7 sts. (8 sc)
– Rows 2–16: Ch 1, turn, sc across. (8 sc)
The tab measures 4 in (10.2 cm). Fold it toward the WS and whipstitch the last row to the back of header Row 6, about 1 in (2.5 cm) below the top edge. This makes a loop that stands 1.5 in (3.8 cm) tall and fits a rod up to 1 in (2.5 cm) in diameter.
Repeat everything for the second panel.
Final Blocking
- Spray the whole panel lightly with water until it’s damp, but not soaking.
- Lay the header flat on mats and pin it to 28 in × 3 in (71.1 × 7.6 cm).
- Working down each strand, shape every motif into a teardrop. Pin the point and the widest part of the curve so the motif is 3.5 in (8.9 cm) wide.
- Use a fingertip to open each center hole into a clear teardrop shape.
- Check that each joined motif is 5 in (12.7 cm) from tip to tip.
- Let the panel dry completely. Most cotton needs 24 hours.
- Hang the panel for a day before you judge its final length. Cotton relaxes a little, by up to 1 in (2.5 cm).
Final Quality-Control Checklist
- [ ] Every motif has 48 sts in Round 3, and its point sits at the top
- [ ] Each panel has 8 strands of 15 motifs
- [ ] Every join goes into sts 24 and 25, and all strands hang straight
- [ ] Header Rows 1–9 each have 112 sts
- [ ] The strands are caught at the correct 14-st section centers
- [ ] There are 7 tabs of 8 sts each, with 4 sts left free at each end
- [ ] Each panel measures 28 in × 79.5 in (71.1 × 201.9 cm)
- [ ] All ends are woven in securely on the WS
Troubleshooting
The motif looks round, not like a teardrop. Your stitches are spread evenly around the ring. Push the Round 1 sc and hdc tightly together at the top so the point pinches.
The motif cups or ruffles. Round 3 is too tight or too loose. Recount the [dc, 2 dc] repeat, and go up or down a hook size if needed.
A strand twists. One motif was joined with its WS facing. Undo that Tip Join and rework it with the RS facing.
The header is wider than the strands. Your hdc gauge is too loose. Rework the header with a smaller hook. Don’t remove stitches, or the strand spacing will change.
The panel keeps getting longer. Your yarn has too much drape or stretch. Block it again and dry it flat, or switch to a firmer cotton.
Care
Hand wash in cool water with mild soap, then press out the water in a towel. Dry the panels flat and reshape the drops before hanging them back up.
Final Notes
The measurement chain is simple. One motif is 3.5 in × 4.5 in (8.9 × 11.4 cm) and 5 in (12.7 cm) from tip to tip once joined. Fifteen motifs make a 75 in (190.5 cm) strand. Eight strands of 14 header stitches each make a 112-stitch header that is 28 in (71.1 cm) wide and 3 in (7.6 cm) deep. The tab loops add 1.5 in (3.8 cm), for a finished length of 79.5 in (201.9 cm). If your test motif matches the gauge, every other measurement will match too.
Happy crocheting!