

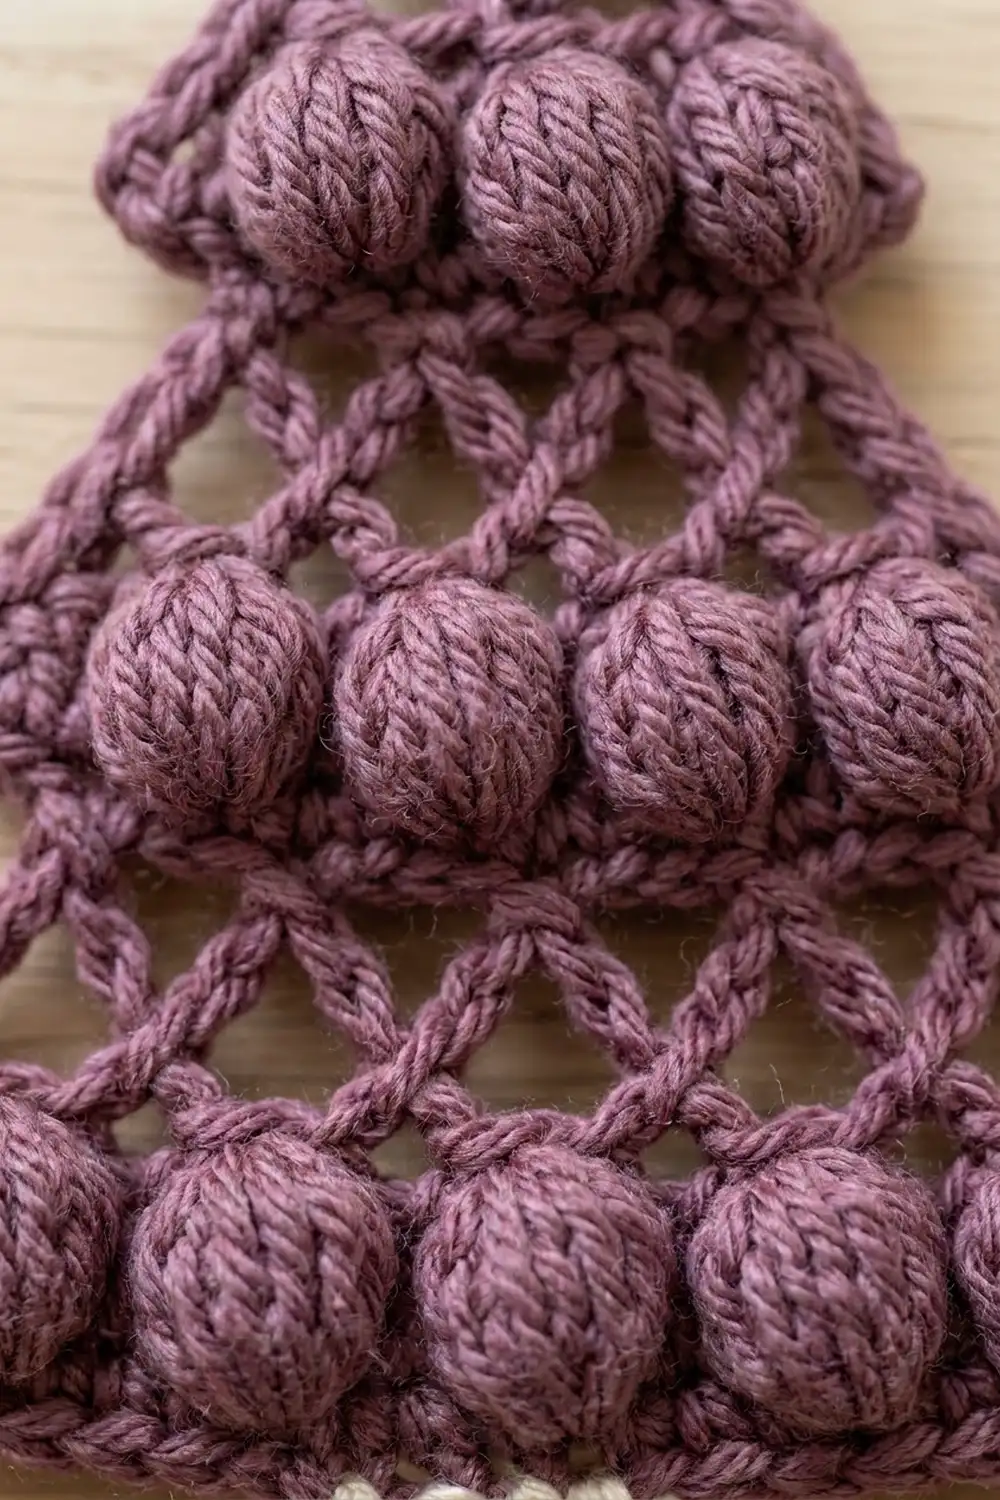
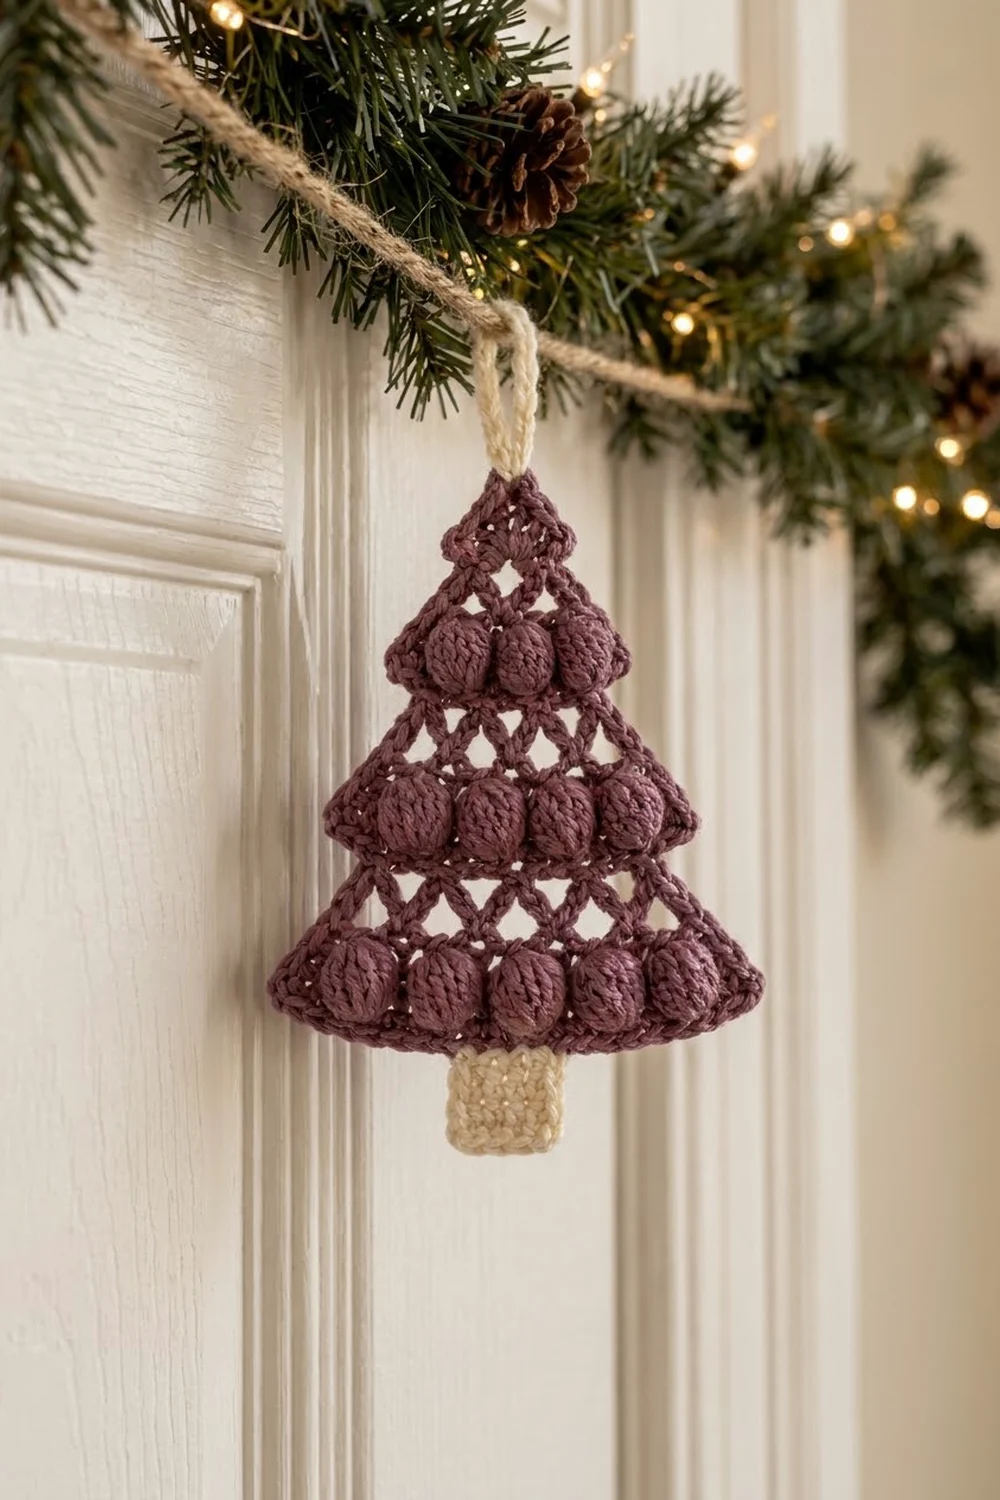
This little tree is one of my favorite quick holiday makes. It is a flat Christmas tree ornament with three tiers, worked in a soft plum yarn. A row of puffy bobbles marks the bottom of each tier, with an open crossed-stitch lattice in between. A small cream trunk and a sturdy cream hanging loop finish it off.
The look is cozy and a little vintage: deep, muted plum against warm cream. It has lots of texture and just enough openwork to let light through when it hangs on a door, a window or a tree branch.
The pattern uses US crochet terms. The finished ornament is about 4.2 in (10.7 cm) wide and 5.8 in (14.7 cm) tall including the trunk, not counting the loop.
Construction is simple:
– The tree body is worked flat in rows from the top point down, growing two stitches at a time.
– A short step-in row starts each new tier.
– One round of single crochet border tidies the edges and sharpens the tier points.
– The trunk is a tiny single crochet rectangle sewn on behind the bottom edge.
– The loop is crocheted directly onto the top point.
Finished Size and Construction
- Finished size: 4.2 in (10.7 cm) wide x 5.8 in (14.7 cm) tall with trunk. The loop adds about 1.5 in (3.8 cm).
- Skill level: Intermediate (bobbles, crossed stitches, edge shaping)
- Terminology: US crochet terms
- Yarn weight: DK (light worsted, category 3)
- Hook: 3.5 mm (E-4)
- Number of pieces: 1 tree body + 1 small trunk, plus a loop worked in place
- Layout: single ornament, nothing to join
- Tree body before border: 3.8 in (9.7 cm) wide x 4.4 in (11.2 cm) tall
- Border depth: 0.2 in (0.5 cm) on every edge
- Tree body after border: 4.2 in (10.7 cm) wide x 4.8 in (12.2 cm) tall
- Trunk: 0.8 in (2.0 cm) wide x 1.2 in (3.0 cm) tall, with 1.0 in (2.5 cm) showing below the tree
Materials
A smooth DK cotton or cotton blend gives the clearest bobbles and the crispest lattice. Acrylic works too, but fuzzy or brushed yarns will blur the openwork.
- Plum (Color A): 15 g, about 35 m
- Cream (Color B): 4 g, about 9 m
- 3.5 mm (E-4) crochet hook
- Tapestry needle
- Scissors
- Stitch markers (2)
- Pins and a blocking mat or folded towel
These quantities include a small extra margin for checking your gauge and weaving in ends.
Abbreviations (US Terms)
- ch – chain
- sl st – slip stitch
- sc – single crochet
- sc2tog – single crochet 2 together
- dc – double crochet
- st(s) – stitch(es)
- sp – space
- RS / WS – right side / wrong side
- [ ] – repeat the steps in brackets as directed
Special Stitches
Bobble: [Yarn over, insert hook in st, yarn over and pull up a loop, yarn over and draw through 2 loops] 5 times in the same st, then yarn over and draw through all 6 loops on hook. Counts as 1 st. Bobbles are always worked on WS rows so they pop out toward the RS.
X-st (crossed double crochet): Skip next st, dc in following st, ch 1, then, working in front of the dc just made, dc in the skipped st. Uses 2 sts and counts as 2 sts. On the next row, work into the top of each dc and skip the ch-1.
Turning chains: On sc rows, the ch 1 does not count as a st. On lattice rows, the ch 3 counts as the first dc.
Gauge and Checkpoints
Gauge: 20 sc and 20 sc rows = 4 in (10.2 cm), or 5 sc per inch. In this pattern, each sc row is about 0.2 in (0.5 cm) tall. Each lattice or bobble row is about 0.4 in (1.0 cm) tall.
Instead of a separate swatch, work Rows 1–5 (the top tier) and measure. Then keep checking as you go:
- After Row 5: 2.2 in (5.6 cm) wide across the bobble row, 1.4 in (3.6 cm) tall
- After Row 9: 3.0 in (7.6 cm) wide, 2.8 in (7.1 cm) tall
- After Row 13: 3.8 in (9.7 cm) wide, 4.2 in (10.7 cm) tall
- After Row 14: 3.8 in (9.7 cm) wide, 4.4 in (11.2 cm) tall
If your top tier is too big, go down a half or full hook size. If it is too small, go up. Check width first, because height depends more on how tall you pull up your dc loops. For an ornament, anything within 0.2 in (0.5 cm) is fine.
Tree Body
With plum, work flat in rows from the top point down. Place a marker on Row 2 to mark the RS.
Tier 1
Row 1 (WS): Ch 2, 3 sc in 2nd ch from hook, turn. (3 sc)
Row 2 (RS): Ch 1, 2 sc in first st, sc in next st, 2 sc in last st, turn. (5 sc)
Row 3 (WS): Ch 1, 2 sc in first st, sc in next 3 sts, 2 sc in last st, turn. (7 sc)
Row 4 (RS, lattice): Ch 3 (counts as dc), dc in first st, X-st over next 2 sts, dc in next st, X-st over next 2 sts, 2 dc in last st, turn. (9 sts: 5 dc + 2 X-sts)
Row 5 (WS, bobbles): Ch 1, 2 sc in first st, sc in next st, [bobble in next st, sc in next st] 3 times, 2 sc in last st (top of turning ch), turn. (11 sts: 8 sc + 3 bobbles)
This bobble row is the widest point of Tier 1. The increases at each end push its edges out into a small tier point.
Tier 2
Row 6 (RS, step-in): Ch 1, sc2tog over first 2 sts, sc in next 7 sts, sc2tog over last 2 sts, turn. (9 sc)
The step-in row pulls the edge back in by 1 st on each side, so Tier 1 overhangs Tier 2. This creates the stepped outline.
Row 7 (WS, lattice): Ch 3, dc in first st, dc in next st, X-st, dc in next st, X-st, dc in next st, 2 dc in last st, turn. (11 sts: 7 dc + 2 X-sts)
Row 8 (RS, lattice): Ch 3, dc in first st, [X-st] twice, dc in next st, [X-st] twice, 2 dc in top of turning ch, turn. (13 sts: 5 dc + 4 X-sts)
Row 9 (WS, bobbles): Ch 1, 2 sc in first st, sc in next st, [bobble in next st, sc in next st] 5 times, 2 sc in last st, turn. (15 sts: 10 sc + 5 bobbles)
Tier 3
Row 10 (RS, step-in): Ch 1, sc2tog, sc in next 11 sts, sc2tog, turn. (13 sc)
Row 11 (WS, lattice): Ch 3, dc in first st, dc in next st, [X-st] twice, dc in next st, [X-st] twice, dc in next st, 2 dc in last st, turn. (15 sts: 7 dc + 4 X-sts)
Row 12 (RS, lattice): Ch 3, dc in first st, [X-st] 3 times, dc in next st, [X-st] 3 times, 2 dc in top of turning ch, turn. (17 sts: 5 dc + 6 X-sts)
Row 13 (WS, bobbles): Ch 1, 2 sc in first st, sc in next st, [bobble in next st, sc in next st] 7 times, 2 sc in last st, turn. (19 sts: 12 sc + 7 bobbles)
Row 14 (RS, base): Ch 1, sc in each st across. (19 sc) Fasten off and weave in the starting tail.
Every lattice row and bobble row adds exactly 2 sts, one at each end. Every step-in row removes exactly 2. From top to bottom, the bobble rows have 3, 5 and 7 bobbles.
Border
Border gauge: 5 sc per inch, the same as the body. Along the row ends, use 1 sc for each sc row and 2 sc for each lattice row. Bobble row ends get 3 sc so the tier tips stay sharp.
Round 1 (RS): With RS facing, join plum in the first st of Row 14 (a bottom corner).
- Bottom edge: 3 sc in first st, sc in next 17 sts, 3 sc in last st. (23 sc: 17 + 3 + 3)
- First side, working into the row ends from Row 13 up to Row 1:
- 3 sc in Row 13
- 2 sc in each of Rows 12 and 11
- 1 sc in Row 10
- 3 sc in Row 9
- 2 sc in each of Rows 8 and 7
- 1 sc in Row 6
- 3 sc in Row 5
- 2 sc in Row 4
- 1 sc in each of Rows 3, 2 and 1
- (24 sc)
- Top point: (sc, ch 2, sc) in the free loop of the foundation ch at the tip. (2 sc + 1 ch-2 sp)
- Second side, working from Row 1 down to Row 13:
- 1 sc in each of Rows 1, 2 and 3
- 2 sc in Row 4
- 3 sc in Row 5
- 1 sc in Row 6
- 2 sc in each of Rows 7 and 8
- 3 sc in Row 9
- 1 sc in Row 10
- 2 sc in each of Rows 11 and 12
- 3 sc in Row 13
- (24 sc)
- Sl st to first sc. Fasten off.
Total: 23 + 24 + 2 + 24 = 73 sc, plus the ch-2 sp at the top.
Why the math works:
– Bottom edge: Row 14 has 19 sts. The 2 corner sts each become a 3-sc group, so 17 + 6 = 23.
– Each side: 5 sc rows (5 sc) + 5 lattice rows (10 sc) + 3 bobble rows (9 sc) = 24. Both sides use the same counts in mirror order, so the tree stays symmetrical.
– Size: The single sc round adds 0.2 in (0.5 cm) all around. The width grows from 3.8 in (9.7 cm) to 4.2 in (10.7 cm), and the height from 4.4 in (11.2 cm) to 4.8 in (12.2 cm).
Hanging Loop
- With RS facing, join cream with a sl st in the top ch-2 sp.
- Ch 16, then sl st in the same ch-2 sp to form the loop.
- Ch 1, work 22 sc over the chain loop so it is completely covered, then sl st in the ch-2 sp.
- Fasten off and weave in the ends.
The loop stands about 1.5 in (3.8 cm) tall.
Trunk
With cream, ch 5.
Row 1: Sc in 2nd ch from hook and in each ch across, turn. (4 sc)
Rows 2–6: Ch 1, sc in each st across, turn. (4 sc)
Fasten off, leaving a 10 in (25.4 cm) tail. The trunk measures 0.8 in (2.0 cm) wide x 1.2 in (3.0 cm) tall.
Attaching:
1. Place the trunk behind the tree so its top row overlaps the bottom border by 0.2 in (0.5 cm).
2. Center it so it sits 1.7 in (4.3 cm) in from each bottom corner.
3. Whipstitch along the top row and the two short edges of the overlap, going through back loops only so the stitches don’t show on the RS.
About 1.0 in (2.5 cm) of trunk shows below the tree.
Final Blocking
- Weave in all remaining ends along the border on the WS.
- Spritz the ornament lightly with water until it is damp, not soaked.
- Lay it RS up on a blocking mat or folded towel.
- Pin the tip, the two bottom corners and the six tier points first.
- Measure: 4.2 in (10.7 cm) across the bottom and 4.8 in (12.2 cm) from tip to bottom edge.
- Gently open each X-st so the lattice diamonds look even. Don’t flatten the bobbles; pinch them back into shape if needed.
- Pin the trunk straight and square.
- Let it dry completely before unpinning.
Final Quality-Control Checklist
- The bobble rows have 3, 5 and 7 bobbles, all popping to the RS.
- Each tier overhangs the next with a visible step.
- All the lattice crosses lean the same way.
- The border has 73 sc plus a ch-2 sp at the tip.
- The tree measures 4.2 in (10.7 cm) x 4.8 in (12.2 cm) after the border.
- The trunk is centered and hangs straight, with 1.0 in (2.5 cm) showing.
- The loop is firmly attached and fully covered with sc.
- All ends are woven in and can’t be seen from the front.
Troubleshooting
Bobbles appear on the back. You worked a bobble row on the RS. Bobble rows must be WS rows (Rows 5, 9 and 13).
Stitch count is off on a lattice row. Each X-st counts as 2 sts, and its ch-1 is skipped on the next row. The turning ch-3 counts as a st.
Steps are barely visible. Make sure you sc2tog at both ends of Rows 6 and 10, and work 3 sc into each bobble row end in the border.
Border ruffles. Your sc is looser than the body. Go down a hook size for the border only.
Border pulls and cups. Work the border with a hook a half size larger.
Tree leans to one side. Count the border sts on each side; both should total 24.
Lattice looks closed. Pull your dc loops up a little taller and block the X-sts open.
Care
Hand wash in cool water, press out the extra water in a towel and dry flat. Store it flat or hanging so the bobbles stay round.
Final Notes
The measurement chain is short and easy to check:
– Tier 1 should be 2.2 in (5.6 cm) wide.
– Tier 2 brings the width to 3.0 in (7.6 cm).
– Tier 3 and the base row finish the body at 3.8 in (9.7 cm) x 4.4 in (11.2 cm).
– One sc border round brings it to 4.2 in (10.7 cm) x 4.8 in (12.2 cm).
– The trunk adds 1.0 in (2.5 cm), for a total height of 5.8 in (14.7 cm).
Measure at each checkpoint and change your hook early if needed, and your tree will come out just the right size. Hang one from a gift, a branch or a doorknob.
Happy crocheting!