
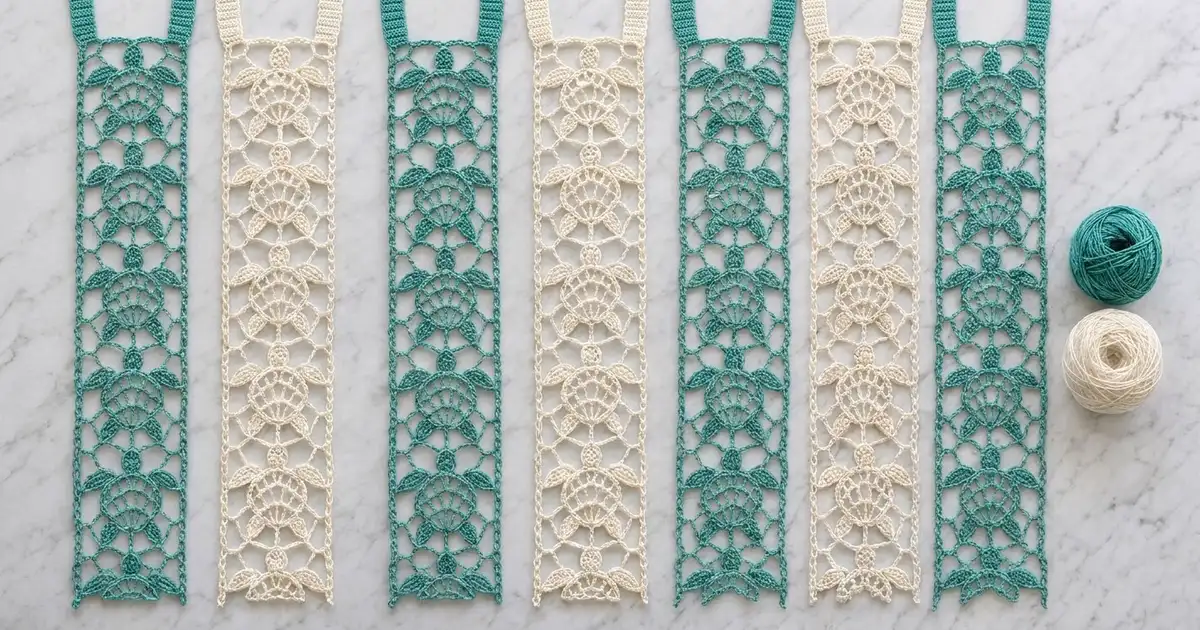
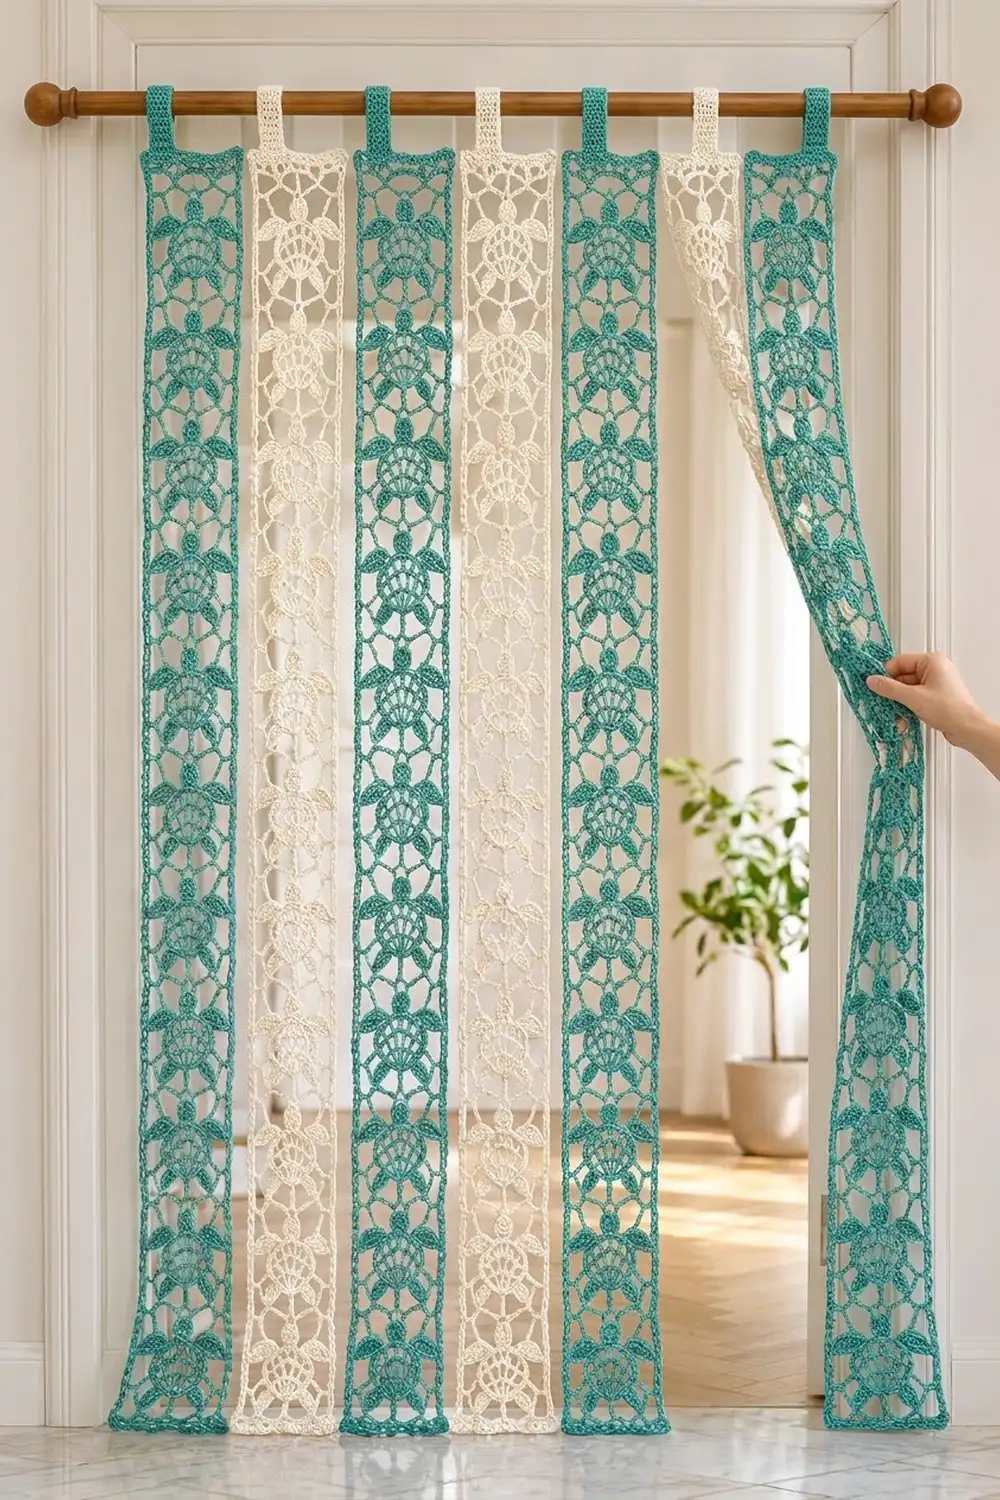
The Tidewater Turtle Strip Curtain is made of seven narrow lace panels, each one a column of sea turtles swimming upward. Each turtle has a round shell with lacy spokes, a solid head, four leaf-shaped flippers and a small pointed tail. It sits inside an airy frame of chain loops. The strips hang separately from a wooden rod, so light and air pass through and the panels part easily when you walk through.
The colorway alternates bright teal and soft cream: four teal strips and three cream strips, starting and ending with teal. The look is coastal and relaxed, and it suits a beach house, a sunroom or a laundry doorway. This pattern uses US crochet terms.
Each finished strip measures 5.3 in (13.5 cm) wide and 54.8 in (139.2 cm) long, not counting the hanging tab. Each turtle square measures 4.5 in (11.4 cm).
Construction is simple and modular. You work each turtle square in the round from the shell outward, then slip-stitch 12 squares into a column. Next you add a 2-round border around the whole strip and finish with a hanging tab at the top.
Finished Size and Construction
- Finished strip size: 5.3 in x 54.8 in (13.5 cm x 139.2 cm), plus tab
- Skill level: Intermediate
- Terminology: US crochet terms
- Yarn weight: DK (3), cotton
- Hook: 3.5 mm (E-4)
- Number of pieces: 84 squares (12 per strip), making 7 separate strips
- Layout: each strip is 1 square wide x 12 squares tall; the strips hang side by side and are not joined
- Square size: 4.5 in (11.4 cm), 25 sc per side
- Strip size before border: 4.5 in x 54 in (11.4 cm x 137.2 cm)
- Border depth: 2 rounds, 0.4 in (1.0 cm)
Materials
Use a smooth mercerized or combed cotton in DK weight. Cotton gives crisp stitch definition, holds the lace open and doesn’t stretch out of shape as the strips hang. Avoid fuzzy or very stretchy yarns: they blur the flippers and let long strips grow.
The amounts below assume 50 g balls of about 115 m (126 yd):
- Teal: 350 g, about 805 m (880 yd), or 7 balls. Covers 48 squares plus 4 borders and tabs.
- Cream: 300 g, about 690 m (755 yd), or 6 balls. Covers 36 squares plus 3 borders and tabs.
Each square uses about 5 g, and each border plus tab uses about 17 g. Both quantities include a margin of roughly 10–25% for a gauge swatch, joining and differences between dye lots.
Tools:
– 3.5 mm (E-4) crochet hook
– Tapestry needle
– Stitch markers
– Rust-proof pins and a blocking board or foam mats
– Spray bottle
– Measuring tape
– Wooden curtain rod, up to 1.25 in (3.2 cm) in diameter
Abbreviations (US Terms)
- ch – chain
- sl st – slip stitch
- sc – single crochet
- hdc – half double crochet
- dc – double crochet
- sk – skip
- sp(s) – space(s)
- st(s) – stitch(es)
- RS / WS – right side / wrong side
Special stitches (each one is worked out from the last sc you made):
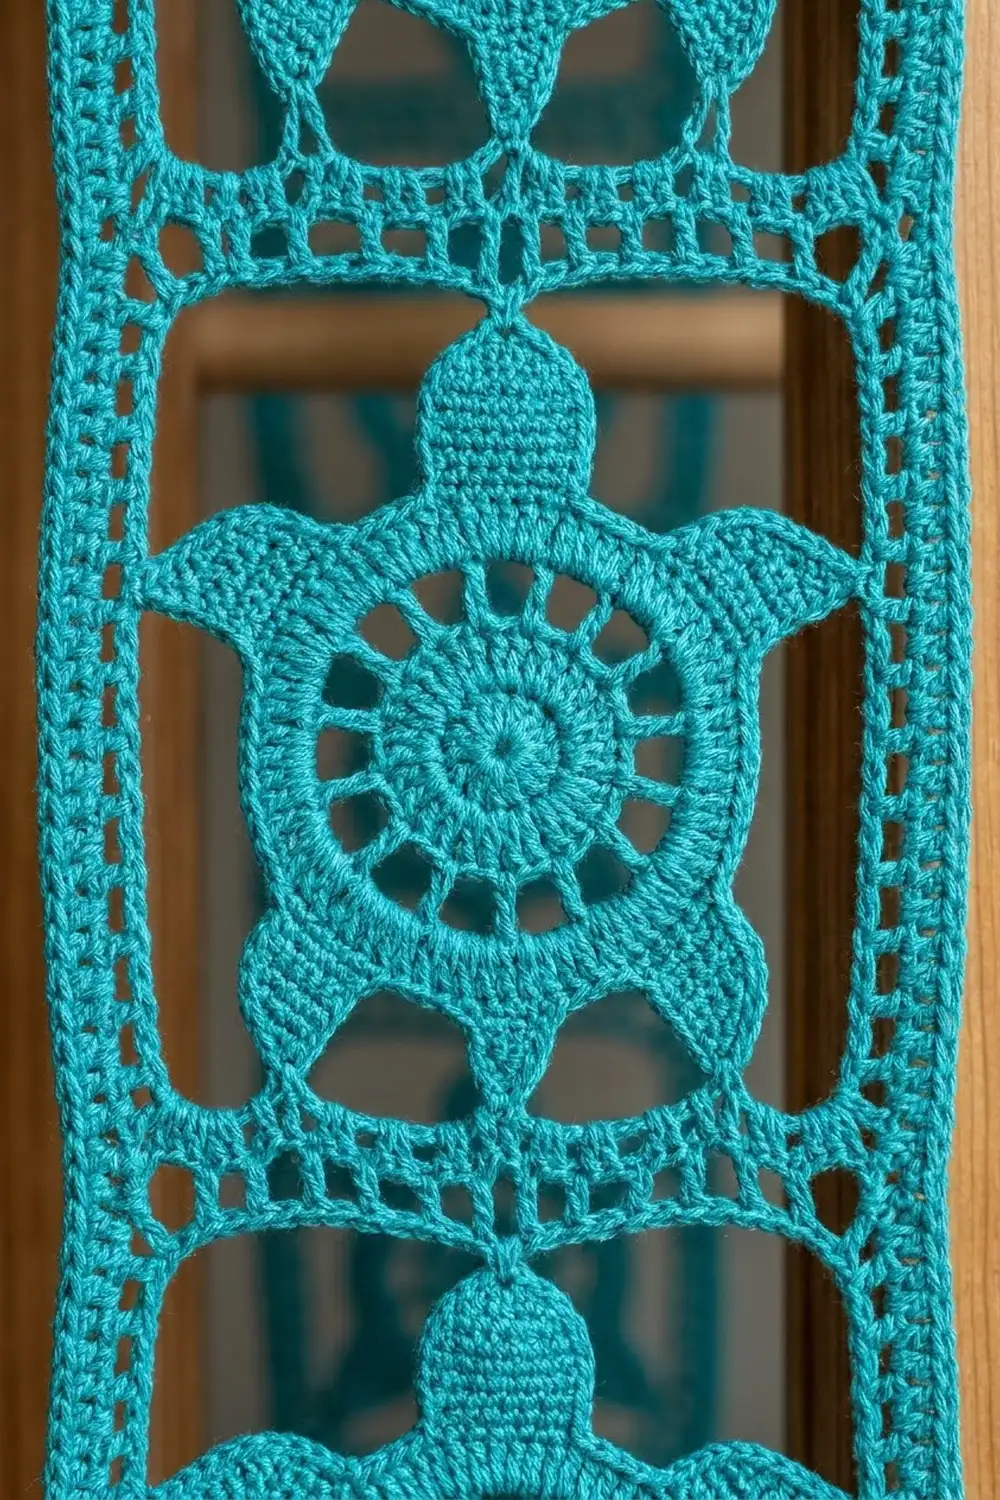
- Head: Ch 4, 8 dc in 4th ch from hook, sl st in last sc made. This gives 9 dc, counting the skipped ch-3 as 1 dc. The center stitch is the 5th dc.
- Flipper: Ch 8, sl st in 2nd ch from hook, sc in next ch, hdc in next ch, dc in next 2 ch, hdc in next ch, sc in last ch, sl st in last sc made. That’s 7 sts on the 7 chains, plus the skipped ch, which forms the tip.
- Tail: Ch 4, sl st in 2nd ch from hook, sc in next 2 ch, sl st in last sc made. The skipped ch forms the tip.
Gauge and Checkpoints
Gauge: 22 sc and 24 rows = 4 in (10.2 cm) in sc worked in rows.
Make one complete turtle square before anything else. It is your real gauge test. Measure it at each stage:
- After Rnd 3: the shell is 1.5 in (3.8 cm) across.
- After Rnd 6: the square is 3.25 in (8.3 cm) per side.
- After Rnd 7: the square is 4 in (10.2 cm) per side.
- After Rnd 8: the square is 4.5 in (11.4 cm) per side, within 1/8 in (0.3 cm).
Too big? If your square measures 4.75 in (12.1 cm) or more, change to a 3.25 mm hook. Over 12 squares, an extra 0.25 in per square adds 3 in (7.6 cm) to the strip.
Too small? If your square measures 4.25 in (10.8 cm) or less, change to a 3.75 mm hook.
Rnd 5 arches pulling? If the arches look tight but the overall size is correct, loosen only the chains and keep the sc tension the same.
Turtle Square (make 84)
Work with the RS facing you throughout, and don’t turn. Begin with the shell.
Rnd 1: Make a magic ring. Ch 3 (counts as dc), work 11 dc in the ring and sl st to the top of the ch-3. Pull the ring closed. (12 dc)
Rnd 2: Ch 1, sc in the same st, ch 3, sc in the next dc, ch 3. Repeat from * 10 more times and sl st to the first sc. (12 sc, 12 ch-3 sps) These loops form the lacy spokes inside the shell.
Rnd 3: Sl st into the first ch-3 sp. Ch 1, work 3 sc in each ch-3 sp around and sl st to the first sc. (36 sc) This makes the solid shell rim. Checkpoint: the shell is 1.5 in (3.8 cm) across.
Rnd 4 (body): Ch 1, sc in the first 3 sc, then make a Head. Work [sc in the next 6 sc, Flipper] twice, then sc in the next 6 sc and make a Tail. Work [sc in the next 6 sc, Flipper] twice, then sc in the last 3 sc. Sl st to the first sc and fasten off. (36 sc, 1 Head, 4 Flippers, 1 Tail)
The six features are spaced exactly 6 sts apart, which places them 60 degrees from each other. Turn the square so the Head points up. The Flippers then angle up-left, down-left, down-right and up-right, and the Tail points down.
Rnd 5 (arches): Join yarn with a sc in the center (5th) dc of the Head. Work [ch 7, sc in the tip of the next Flipper] twice. Then ch 7, sc in the tip of the Tail. Work [ch 7, sc in the tip of the next Flipper] twice. Finish with ch 7 and sl st to the first sc. (6 anchor sc, 6 ch-7 arches)
Arches A1 (Head to Flipper), A3 (Flipper to Tail), A4 (Tail to Flipper) and A6 (Flipper to Head) will hold the corners. Arches A2 and A5 run between two Flippers and form the middle of the side edges.
Rnd 6 (squaring): Ch 1 and sc in the same anchor sc. Then work:
– A1: 5 sc, ch 3, 1 sc in the arch
– sc in the next anchor
– A2: 7 sc in the arch
– sc in the next anchor
– A3: 1 sc, ch 3, 5 sc in the arch
– sc in the next anchor (Tail)
– A4: 5 sc, ch 3, 1 sc in the arch
– sc in the next anchor
– A5: 7 sc in the arch
– sc in the next anchor
– A6: 1 sc, ch 3, 5 sc in the arch
Sl st to the first sc. (44 sc, 4 ch-3 corner sps)
Each side now has exactly 11 sc between corner spaces:
– Top and bottom: 5 + 1 anchor + 5 = 11
– Left and right: 1 + 1 anchor + 7 + 1 anchor + 1 = 11
Checkpoint: 3.25 in (8.3 cm) per side.
Rnd 7 (mesh): Sl st in the next 5 sc and into the ch-3 corner sp. Ch 1, then (sc, ch 5, sc) in the same sp.
Work each side as follows: [ch 4, sk 2 sc, sc in the next sc] 3 times, ch 4, sk 2 sc, (sc, ch 5, sc) in the next corner sp. Repeat from * around. On the last repeat, leave out the final corner and sl st to the first sc instead.
(20 sc, 16 ch-4 sps, 4 ch-5 corner sps) Each side has 3 anchor sc and 4 ch-4 loops, and those loops cover all 11 sts (2 + 1 + 2 + 1 + 2 + 1 + 2). Checkpoint: 4 in (10.2 cm) per side.
Rnd 8 (outline): Sl st into the ch-5 corner sp. Ch 1 and work (2 sc, ch 2, 2 sc) in the same sp.
Then work: sc in the next sc, [4 sc in the next ch-4 sp, sc in the next sc] 4 times, (2 sc, ch 2, 2 sc) in the next corner sp. Repeat from * around. On the last repeat, leave out the final corner and sl st to the first sc. Fasten off and weave in the ends. (100 sc, 4 ch-2 corner sps)
Per side: 2 + 1 + (4 + 1) x 4 + 2 = 25 sc. In this pattern the ch-2 corner spaces are not counted as stitches. Each side is exactly 25 sc between corner spaces, and 4 x 25 = 100. Final checkpoint: 4.5 in (11.4 cm) per side.
Make All Pieces
- Teal: 48 squares (4 strips x 12)
- Cream: 36 squares (3 strips x 12)
Each strip uses one color only. The curtain layout from left to right, with each column showing one strip:
 1    2    3    4    5    6    7
 T    C    T    C    T    C    T
 T    C    T    C    T    C    T
 ...  (12 squares tall in every strip)
 T    C    T    C    T    C    T
T = teal, C = cream. The strips are not joined to each other; they hang separately.
Joining
Join the 12 squares of each strip into one vertical column, with every Head pointing toward the top of the strip.
Method: Slip-stitch seam on the WS.
- Hold two squares RS together, with the bottom edge of the upper square against the top edge of the lower square.
- Join yarn in the matching ch-2 corner spaces, working through both layers.
- Work 1 sl st through the outer loops of each pair of matching sc. That’s 25 sl st, joining stitch 1 to stitch 1 and stitch 25 to stitch 25.
- Sl st in the next matching corner spaces and fasten off.
This is a strict stitch-to-stitch join: 25 sts meet 25 sts, so the seam neither gathers nor ruffles.
Tension: Keep your sl sts as loose as your sc. A tight seam pinches the strip into an hourglass shape at every join. If that happens, go up one hook size (to 4.0 mm) for joining only.
Size checkpoint: The joined strip measures 4.5 in x 54 in (11.4 cm x 137.2 cm) laid flat without stretching.
Border
Border gauge: The border uses the same 22 sc to 4 in (10.2 cm) gauge as the squares. Each square edge has 25 sc over 4.5 in, which is 5.6 sc per inch, close enough to that gauge for the edge to lie flat.
Rnd 1: With the RS facing, join yarn in the top-right outer corner ch-2 sp of the strip and work 3 sc in that sp. Then work the sides:
- Top edge: sc in each of the 25 sc, then 3 sc in the next outer corner sp.
- Long side: 25 sc along each square edge, for 12 x 25 = 300 sc. Don’t work into the seam corner spaces; step over each seam. Work 3 sc in the outer corner sp.
- Bottom edge: 25 sc, then 3 sc in the corner sp.
- Second long side: 300 sc.
Sl st to the first sc. (Count: 300 + 25 + 300 + 25 = 650 side sc + 12 corner sc = 662 sc)
Rnd 2: Ch 1. Work 1 sc in each sc around, with 3 sc in the center sc of each corner group. Sl st to the first sc and fasten off.
Each side now has its own stitches plus the 2 outer stitches from the corner groups at its ends. The long sides have 302 sc and the short sides have 27 sc between corner center stitches.
(Count: 302 + 27 + 302 + 27 = 658 + 12 corner sc = 670 sc) Each of the 4 corners adds 2 sts, which makes 662 + 8 = 670.
Why the math works: Neither border round adds stitches at the seams, so each long side is exactly 12 square edges of 25 sc. Extra stitches go only into the 4 outer corners, which turn the corners without cupping. The border adds 0.4 in (1.0 cm) on every side. That gives 4.5 + 0.8 = 5.3 in (13.5 cm) of width and 54 + 0.8 = 54.8 in (139.2 cm) of length.
Hanging Tab
The tab is worked in rows across the top short edge of the strip.
Row 1: With the RS facing, sk the corner center st and the next 3 sc of the 27-st top edge. Join yarn in the 4th sc and work sc in that sc and the next 20 sc. Leave the last 3 sc unworked. (21 sc) That gives 3 + 21 + 3 = 27.
Rows 2–24: Ch 1, turn, and sc in each sc across. (21 sc)
The tab is now 3.8 in (9.7 cm) wide and 4 in (10.2 cm) long. Fold it to the WS and whipstitch Row 24 to the base of Row 1. This makes a flat 2 in (5.1 cm) loop that fits a rod up to 1.25 in (3.2 cm) in diameter.
Final Blocking
- Weave in all ends before blocking, splitting the yarn plies so the ends hold.
- Lay one strip flat on the mats, with the RS up.
- Pin it out to 5.3 in x 54.8 in (13.5 cm x 139.2 cm), measuring every 6 in.
- Pin each turtle square along its seams so that every square is 4.5 in (11.4 cm) tall.
- Open each Rnd 7 mesh loop and pin the tip of each Flipper outward.
- Spray until damp but not soaked.
- Let the strip dry completely, for about 24 hours.
- Repeat for all 7 strips. Check that all the strips match in length within 1/4 in (0.6 cm).
Final Quality-Control Checklist
- Every square has 25 sc per side and 100 sc in total.
- Every Head points toward the tab.
- All four Flippers are pinned open and the Tail points down.
- Seams are flat, with no hourglass pinching.
- Border Rnd 2 counts 302 / 27 / 302 / 27 sc plus 12 corner sc.
- Every tab is centered, with 3 sc free on each side.
- All strips measure 54.8 in (139.2 cm) and hang straight.
- The color order is teal, cream, teal, cream, teal, cream, teal.
Troubleshooting
- Shell cups after Rnd 3: Your chains in Rnd 2 are too tight. Work each ch-3 a little looser.
- Flippers curl: Steam-block them flat and pin the tips. Next time, work the Flipper chains with a looser tension.
- Square isn’t square: Recount Rnd 6. Each side should be 11 sc, and the A1, A3, A4 and A6 splits must be 5/1 or 1/5 exactly as written.
- Strip ripples at the edges: You have too many border sts. Check that you skipped the seam corner spaces.
- Strip draws in: The border is too tight. Go up 0.25 mm for the border only.
- Strips grow while hanging: Re-block them and dry them flat. Next time use mercerized cotton, which holds its length better.
Care
Hand wash in cool water with a mild detergent, press out the water in a towel and dry flat to the blocked measurements. Don’t tumble dry, because the heat can shrink the cotton unevenly between strips.
Final Notes
The whole curtain comes from one measurement chain:
- A gauge of 22 sc to 4 in (10.2 cm) gives 25 sc per side and a 4.5 in (11.4 cm) square.
- Twelve squares, joined stitch to stitch, make a 4.5 in x 54 in (11.4 cm x 137.2 cm) strip.
- A 2-round border adds 0.4 in (1.0 cm) on every side, for 5.3 in x 54.8 in (13.5 cm x 139.2 cm).
- A 21-st tab hangs each strip from the rod.
Check your first square carefully and the rest will follow.
Happy crocheting!