

The Linen Light Curtain Panel is a tall, airy window panel made from vertical hairpin lace strips. Each strip has a braided single crochet spine down the center, with long, open loops on both sides. The strips are cable-joined loop to loop, so each join becomes its own twisted column.
The panel uses one color, a soft natural cream cotton. Its relaxed, handmade look suits farmhouse, boho, and Scandinavian rooms. Make two panels for a standard window pair.
This pattern uses US crochet terms. One finished panel measures 40.5 in (102.9 cm) wide and 82.5 in (209.6 cm) long, including the border.
Construction in brief:
1. Make ten identical hairpin lace strips on a loom set to 4 in (10.2 cm).
2. Cable-join the strips side by side, in groups of two loops.
3. Work one round of single crochet around the panel.
4. Add a solid header across the top and a shell edging along the bottom.
Finished Size and Construction
- Finished size: 40.5 in x 82.5 in (102.9 cm x 209.6 cm)
- Skill level: Intermediate
- Terminology: US crochet terms
- Yarn weight: Worsted (#4) cotton
- Hook: 5 mm (US H-8)
- Number of pieces: 10 hairpin lace strips per panel
- Layout: 10 strips side by side, 1 strip tall
- Piece size: 4 in x 80 in (10.2 cm x 203.2 cm) per strip
- Size before border: 40 in x 80 in (101.6 cm x 203.2 cm)
- Border depth: 0.25 in (0.6 cm) at each side, 1.25 in (3.2 cm) at the top, 1.25 in (3.2 cm) at the bottom
Materials
Yarn: Use a smooth worsted-weight cotton or cotton blend, about 190 m per 100 g (208 yd per 100 g). Cotton keeps the loops crisp and holds a cable join well. Avoid splitty yarn, because you will pull loops through each other hundreds of times.
- Natural Cream: 500 g, approx. 950 m (1,039 yd) per panel
The quantity includes a margin of about 15% for swatching, reloading the loom, and the border. Buy all your yarn from one dye lot, and double the amount for a pair of panels.
Tools:
- 5 mm (US H-8) crochet hook
- Adjustable hairpin lace loom, set to 4 in (10.2 cm)
- About 30 locking stitch markers
- Contrasting scrap yarn
- Tapestry needle and scissors
- Measuring tape
- Rust-proof pins and a large padded blocking surface
- 10 curtain clip rings
Abbreviations (US Terms)
- ch = chain
- sc = single crochet
- dc = double crochet
- sl st = slip stitch
- sk = skip
- st(s) = stitch(es)
- sp = space
- rnd = round
Hairpin Lace Strip (special technique): Wrap the yarn around the loom prongs and work a sc spine in the center. Each turn of the loom adds 1 loop to one side and 1 sc to the spine.
To work a spine stitch:
1. Insert the hook under the front strand of the loop on the left prong.
2. Yarn over and pull up a loop.
3. Yarn over and pull through 2 loops (1 sc made).
4. Flip the hook to the back, turn the loom clockwise, and repeat.
Cable Join (special technique): Lay two strips side by side. Using only the hook, pull groups of loops through each other, alternating strips. This join uses no yarn.
Loop group: 2 neighboring loops on the same side of a strip. Keep both twisted the same way and treat them as one.
Gauge and Checkpoints
Lace gauge: 12 loops = 4 in (10.2 cm) along one side of a strip. Measure off the loom, laid flat and gently straightened. A relaxed strip is 4 in (10.2 cm) wide.
Border gauge: 12 sc = 4 in (10.2 cm).
Test one piece first. Make the first strip in full and measure it before starting the others. It works as your gauge swatch and also becomes part of the panel.
Checkpoints for Strip 1:
- 60 loops per side: 20 in (50.8 cm)
- 120 loops per side: 40 in (101.6 cm)
- 240 loops per side: 80 in (203.2 cm)
Strip too long: Your spine is loose. Work the spine only with a 4.5 mm (US 7) hook.
Strip too short: Your spine is tight. Work the spine with a 5.5 mm (US I-9) hook.
Strip too wide or too narrow: Reset the loom to exactly 4 in (10.2 cm) and keep the spine centered. Never change the loop count, because the border math depends on 240 loops per side.
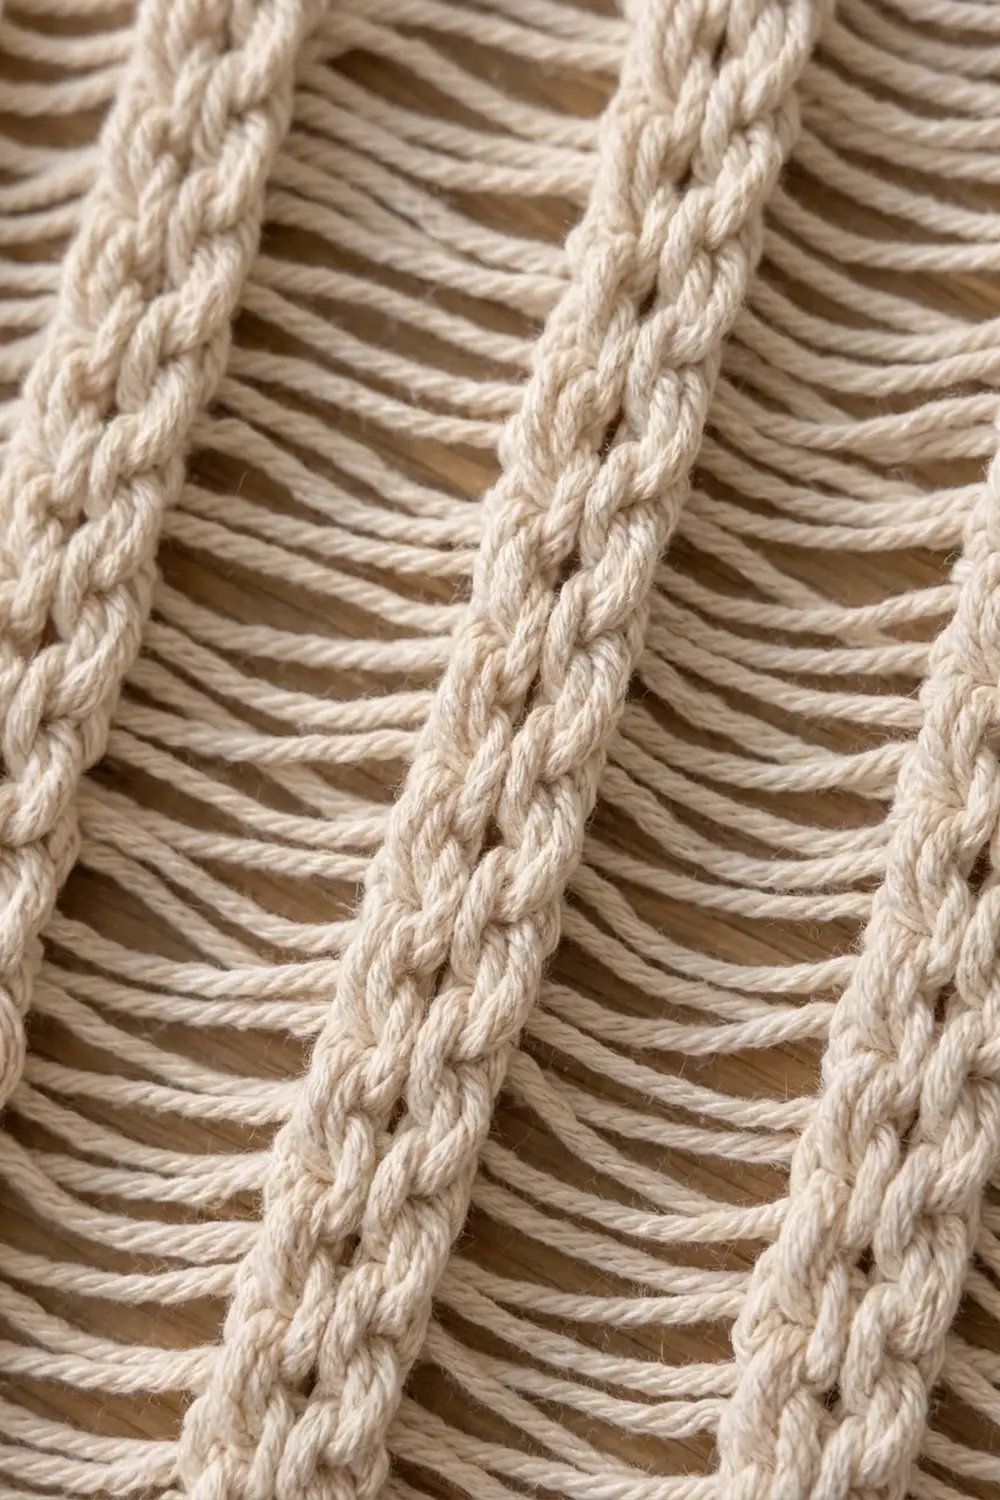
Strip (Make 10)
Setting Up
- Set the loom prongs 4 in (10.2 cm) apart.
- Place a slip knot on the left prong and slide the knot to the center.
- Wrap the yarn front to back around the right prong, with the working yarn behind the loom.
- Insert the hook through the slip knot, yarn over, and pull through. Ch 1 to secure. This starts the spine.
Working the Strip
Each turn: Turn the loom clockwise, then work 1 spine sc into the front strand of the left-prong loop. The new loops fall on alternating sides.
Reloading the loom: When the prongs are full, remove the bottom bar and slide off all but the last 10 loops on each side. Thread scrap yarn through the loops you slid off, then replace the bar. The scrap yarn holds every loop’s twist.
Stitch counts:
- After 60 turns: 30 loops per side, 60 spine sc
- After 240 turns: 120 loops per side, 240 spine sc
- After 480 turns: 240 loops per side, 480 spine sc
Finishing:
1. Cut the yarn, leaving a 6 in (15.2 cm) tail, and pull it through the last loop on the hook.
2. Slide the strip off the loom and thread scrap yarn through the remaining loops.
Grouping loops: Starting at the bottom, mark the loops on each side in pairs. Each side has 120 loop groups. Keep every loop twisted as it came off the loom.
Checkpoint: Each strip lies flat at 4 in x 80 in (10.2 cm x 203.2 cm).
Make All Pieces
Make 10 strips in Natural Cream. Each strip needs 240 loops per side (120 groups per side) and 480 spine sc.
Layout grid (S = strip, J = cable join column):
S1 | J1 | S2 | J2 | S3 | J3 | S4 | J4 | S5 | J5 | S6 | J6 | S7 | J7 | S8 | J8 | S9 | J9 | S10
That makes 9 joins. Place every strip with its starting end at the bottom so all the spines lean the same way.
Joining
Method: Cable join, in groups of 2 loops.
Stitch-to-stitch logic: Right-side group 1 of Strip 1 pairs with left-side group 1 of Strip 2. Group 2 pairs with group 2, and so on through group 120. The join is exactly 1 to 1, with nothing added or skipped.
- Lay Strip 1 and Strip 2 side by side, with the bottom ends aligned.
- Insert the hook through right-side group 1 of Strip 1.
- Pick up left-side group 1 of Strip 2 and pull it through the group on the hook.
- Pick up right-side group 2 of Strip 1 and pull it through the group on the hook.
- Keep alternating strips. Always pull the new group through the one on the hook.
- When group 120 of Strip 2 is on the hook, lock it with a marker. The top border will secure it.
Join Strip 3 to Strip 2 the same way, and continue until all 10 strips are joined.
Tension advice: Pull each group just until it lies flat against the one before it. If you pull too tight, the column puckers and the panel narrows. If it’s too loose, the loops sag. Every 30 groups, or 20 in (50.8 cm), check that the strips still line up group for group.
Size checkpoint: Two joined strips are 8 in (20.3 cm) wide. All ten measure 40 in x 80 in (101.6 cm x 203.2 cm).
Border
Border gauge: 12 sc = 4 in (10.2 cm), or 3 sts per inch. The corners are ch-2 spaces and are not part of the side counts below.
Rnd 1 (sc foundation)
Work with the right side facing. Join the yarn at the top right corner, at the top of Strip 10.
Top edge: Work across each strip from right to left:
– 5 sc encasing the topmost right-side loop group along its length
– 2 sc around the end of the spine
– 5 sc encasing the topmost left-side loop group
That makes 12 sc per strip. At each join, catch the marked join group in the first sc of the next strip, then remove the marker.
Top total: 10 strips x 12 sc = 120 sc. Ch 2 for the corner.
Left side: Work down Strip 1’s outer edge. Sc into the tip of the next loop group, ch 1; repeat from * 118 more times, then sc into the tip of the last group. That gives 120 sc + 119 ch = 239 sts. Ch 2 for the corner.
Bottom edge: Work as for the top edge, removing the scrap yarn as you go. That gives 120 sc. Ch 2 for the corner.
Right side: Work up Strip 10 as for the left side, for 239 sts. Ch 2, then sl st to the first sc.
Rnd 1 total: 120 + 239 + 120 + 239 = 718 sts, plus 4 ch-2 corner spaces.
Rows 2–5 (top header)
Row 2: Sl st into the top right corner ch-2 sp, ch 1, sc in each of the 120 top sc, turn. (120 sc)
Rows 3–5: Ch 1, sc in each sc across, turn. (120 sc each row)
Fasten off. With Rnd 1, the header is 5 sc rows deep, 1.25 in (3.2 cm).
Row 6 (bottom shells)
With the right side facing, join the yarn in the bottom left corner ch-2 sp.
Row 6: Ch 1, sc in the corner sp. Sk 2 sc, 5 dc in next sc, sk 2 sc, sc in next sc; repeat from * 19 more times. The last sc lands in the last bottom sc. Fasten off.
Each repeat uses 6 sts, and 20 repeats x 6 = 120 sts. That gives 20 shells and 21 sc.
Why the Math Works
- Top and bottom: Each 4 in (10.2 cm) strip gets 12 sc, which is exactly 3 sc per inch.
- Sides: Each side has 240 loops at 3 loops per inch, and the side edge places 239 sts along 80 in (203.2 cm). That’s 3 sts per inch again.
- Result: The border gauge matches the lace gauge on every edge, so the panel neither ruffles nor draws in.
- Shells: The 120 bottom sts divide evenly into 20 shell repeats, so the shells end square at both corners.
Rings: Clip 1 ring to the header above each strip’s spine, for 10 rings spaced 4 in (10.2 cm) apart.
Final Blocking
- Weave in the ends along the spines or into the header.
- Soak the panel in cool water with mild soap for 15 minutes.
- Press the water out gently, without wringing, then roll the panel in towels.
- Lay it flat on a padded floor or on mats covered with towels.
- Pin the header straight at 40.5 in (102.9 cm).
- Pin each spine in a straight vertical line, using a tape measure as a guide.
- Ease the length to 82.5 in (209.6 cm), and level the loops so they sit perpendicular to the spines.
- Pin each shell into a rounded scallop.
- Let it dry completely, 24–48 hours, then unpin and hang.
Final Quality-Control Checklist
- [ ] Each strip has 240 loops per side and 480 spine sc.
- [ ] All 9 joins have 120 groups per side, with none skipped.
- [ ] The top and bottom edges each have 120 sc.
- [ ] Each side has 239 sts.
- [ ] The header is 5 sc rows and 1.25 in (3.2 cm) deep.
- [ ] The bottom has 20 shells.
- [ ] The blocked panel measures 40.5 in x 82.5 in (102.9 cm x 209.6 cm).
- [ ] All top and bottom join groups are locked by the border.
- [ ] All ends are secured.
Troubleshooting
Loops twist in different directions. Keep scrap yarn threaded through the loops at all times, and retwist any loose loops by hand before joining.
The spine drifts to one side. You turned the loom the wrong way. Always turn it clockwise.
The join puckers. Unpick back to the pucker and rework it with gentler pulls.
The strips end unevenly. Recount the groups. Add or remove loops at the top of the strip before joining.
The side edge ruffles. Make sure you worked ch 1 between the side sc, not extra sc.
The shells flare. Skip exactly 2 sts on each side of every shell.
The panel stretches when hung. Cotton lace relaxes over time. Block it slightly short and steam it lightly once it’s hanging.
Care
Hand wash cool, or machine wash on a gentle cycle inside a mesh bag, then dry flat. Don’t tumble dry, because heat can felt the loops and lengthen the panel.

Final Notes
The measurement chain:
– 12 loops = 4 in (10.2 cm), so 240 loops per side make an 80 in (203.2 cm) strip.
– Ten 4 in (10.2 cm) strips, cable-joined 1 to 1, make a 40 in x 80 in (101.6 cm x 203.2 cm) panel.
– A border at a matching 3 sts per inch adds 0.25 in (0.6 cm) to each side and 1.25 in (3.2 cm) to the top and the bottom.
– The finished panel is 40.5 in x 82.5 in (102.9 cm x 209.6 cm).
Check gauge on your first strip and count your groups before every join, and the panel will hang straight and even.
Happy crocheting!