

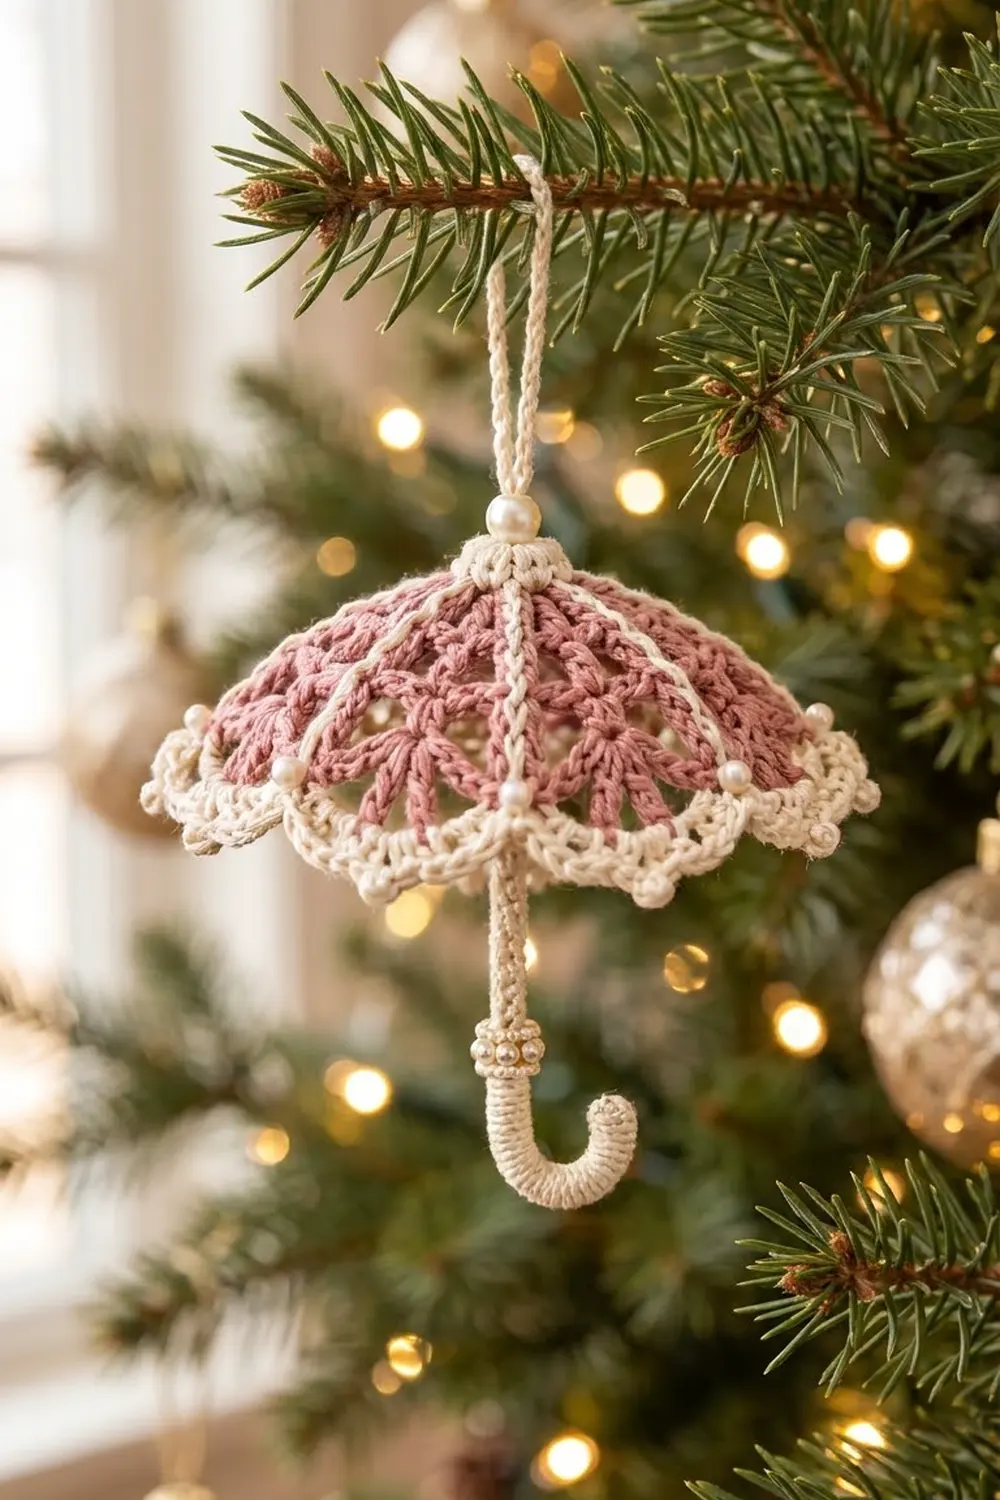
This small lace umbrella hangs from the tree like a tiny Victorian parasol. The canopy is dusty rose pink lace, and six cream ribs divide it into panels. A cream scalloped hem, small pearl accents and a cream handle with a J-shaped hook finish the look.
The style is romantic and vintage, and it suits a pink-and-gold tree or a gift-topper. It’s made in only two colors, so it works well for using up thread.
The pattern uses US crochet terms. The finished canopy is about 3.75 in (9.5 cm) across the scallop tips. The whole ornament is about 4.5 in (11.4 cm) tall, not counting the hanging loop.
Here is how it’s built. You crochet six small wedge panels flat, from the tip down to the hem. Then you join them with cream single crochet seams that form raised ribs, add a two-round cream border around the hem, and attach a cap, a covered wire handle and pearls.
Finished Size and Construction
- Finished size: canopy 3.75 in (9.5 cm) across; canopy height 1.25 in (3.2 cm); ornament 4.5 in (11.4 cm) tall without the loop; loop 1.5 in (3.8 cm)
- Skill level: Intermediate
- Terminology: US
- Yarn weight: Size 3 mercerized cotton crochet thread (Super Fine, category 1)
- Hook: 2.25 mm (B-1)
- Number of pieces: 6 panels, 1 top cap, 1 hanging cord, 1 handle cover (worked over wire)
- Layout: 6 panels in a ring, joined side to side into a dome
- Panel size: 1.75 in (4.4 cm) from tip to hem; 1.5 in (3.8 cm) along the hem
- Size before border: hem circumference 9 in (22.9 cm), about 2.9 in (7.4 cm) across
- Border depth: 0.4 in (1.0 cm)
Materials
Use a mercerized cotton thread. It gives crisp stitch definition, takes starch well and has a soft sheen that suits the pearls. Size 3 thread runs about 3.4 m per gram.
- Dusty rose pink: 8 g, about 27 m (panels)
- Cream: 7 g, about 24 m (seams, border, cap, cord, handle)
Both quantities include a margin of about 25 percent.
Tools and notions:
– 2.25 mm (B-1) crochet hook
– Tapestry needle and fine beading needle
– 5.5 in (14.0 cm) of 18-gauge craft wire
– Round-nose pliers and wire cutters
– One 6 mm pearl bead with a hole wide enough for the wire
– Six 4 mm pearls (hem accents)
– Five 3 mm pearls (handle ring)
– Fabric stiffener or starch
– A 2.75 in (7.0 cm) foam or plastic ball, plastic wrap and rustproof pins
– Stitch markers
Abbreviations (US Terms)
- ch – chain
- sl st – slip stitch
- sc – single crochet
- dc – double crochet
- sk – skip
- sp – space
- st(s) – stitch(es)
- tch – turning chain
- RS / WS – right side / wrong side
Special stitch:
– V-st: (dc, ch 1, dc) in the stitch or space indicated.
Gauge and Checkpoints
Gauge: 13 sc = 1.5 in (3.8 cm) along the panel hem (Row 5). Rows 1–4 together measure 1.6 in (4.1 cm) tall.
Make one panel first and measure it before you make the rest.
Checkpoints for one panel:
– After Row 2: 0.75 in (1.9 cm) from the ring to the top of the row
– After Row 4: 1.6 in (4.1 cm) tall
– After Row 5: 1.75 in (4.4 cm) tall, and 1.5 in (3.8 cm) along the curved hem
If your panel is too big, go down to a 2.0 mm hook. If it’s too small, go up to a 2.5 mm hook. Small differences matter here: an extra 0.125 in (0.3 cm) on each panel adds 0.75 in (1.9 cm) around the hem.
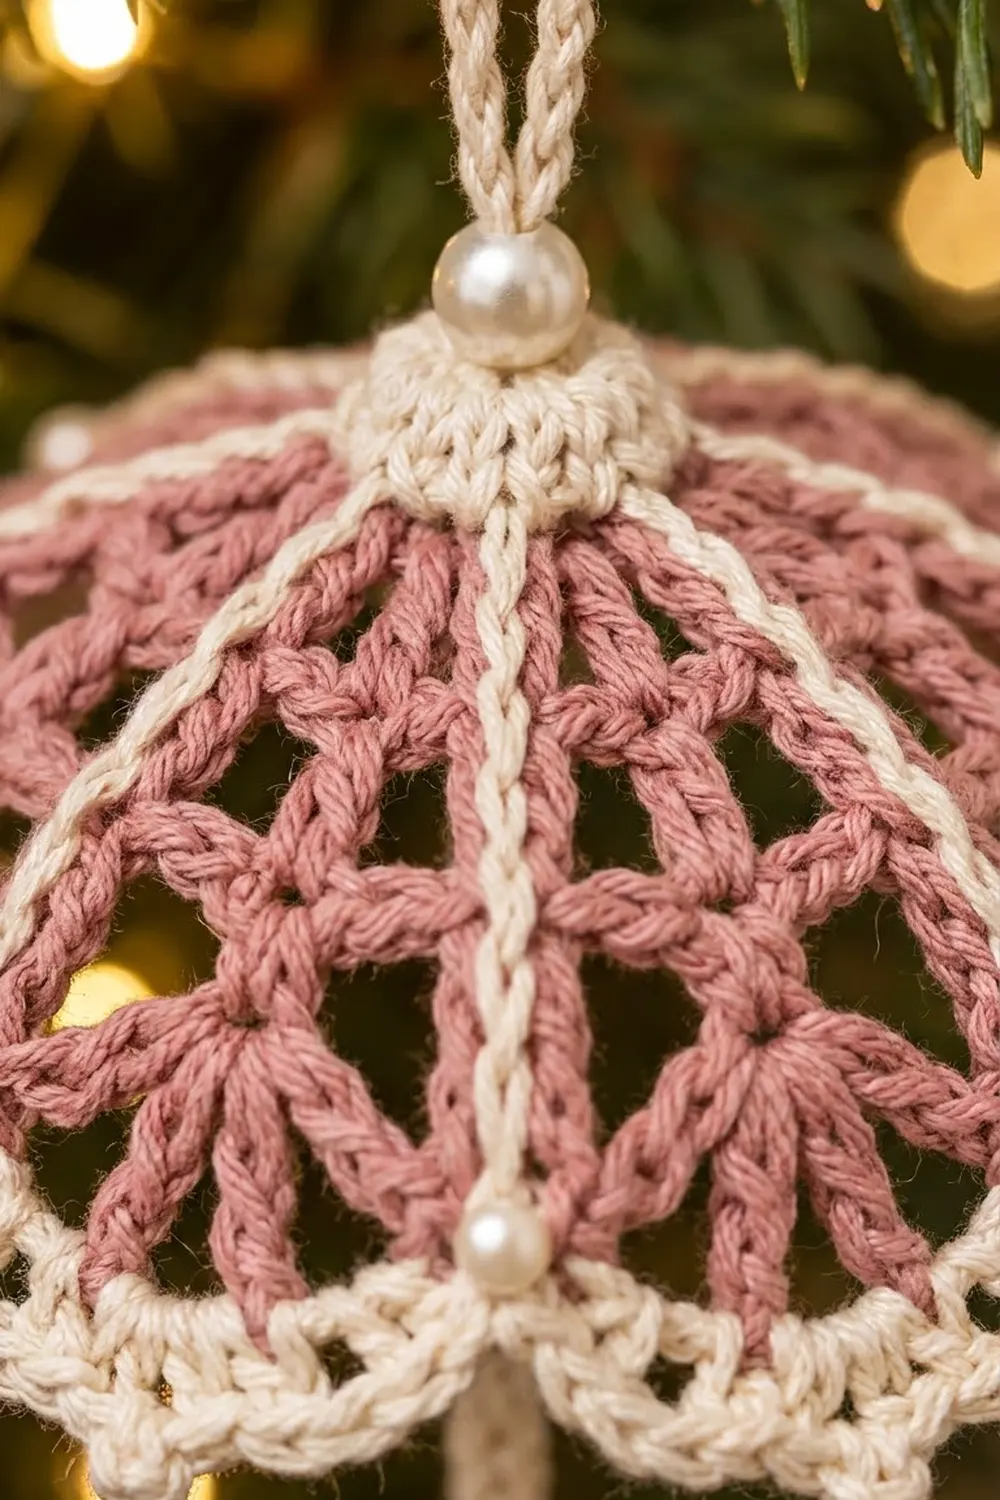
Panel (Make 6)
Use pink. Work in rows, starting at the tip. The turning chain counts as a stitch throughout.
Row 1 (RS): Make an adjustable ring. Ch 3 (counts as dc), then 2 dc in the ring. Pull the ring closed firmly and turn. (3 dc)
Row 2: Ch 4 (counts as dc + ch 1). Dc in the next dc (the center st), ch 1, then dc in the top of the tch. Turn. (3 dc, 2 ch-1 sps)
This row sets up three spokes: two edges and one center line.
Row 3: Ch 3 (counts as dc). V-st in the next ch-1 sp, dc in the center dc, V-st in the next ch-1 sp, then dc in the 3rd ch of the tch. Turn. (7 dc, 2 ch-1 sps)
Row 4: Ch 3 (counts as dc). Dc in the next dc, V-st in the next ch-1 sp, and dc in each of the next 3 dc. Then V-st in the next ch-1 sp, dc in the next dc, and dc in the top of the tch. Turn. (11 dc, 2 ch-1 sps)
The two V-st lines now spread out from the center spoke, which gives the panel its fanned lace look.
Row 5 (trim row): Ch 1. Work 1 sc in each dc and 1 sc in each ch-1 sp across. (11 sc worked 1 per dc + 2 sc worked in the ch-1 sps = 13 sc)
Fasten off, leaving a 4 in (10.2 cm) tail. The 13 sc of Row 5 are the panel’s hem edge. Sides are not counted; they’re row ends.
Panel check: 1.75 in (4.4 cm) tall, 1.5 in (3.8 cm) along the hem, with 13 sc on the hem edge.
Make All Pieces
| Piece | Color | Quantity |
|---|---|---|
| Panel | Pink | 6 |
| Top cap | Cream | 1 |
| Hanging cord | Cream | 1 |
| Handle cover | Cream (over wire) | 1 |
Top cap: With cream, make an adjustable ring.
– Rnd 1: 6 sc in the ring; join with a sl st to the first sc. (6 sc)
– Rnd 2: Ch 1, 2 sc in each st around; join. (12 sc)
– Rnd 3: Ch 1, sc in each st around; join. (12 sc)
Fasten off, leaving a 12 in (30.5 cm) tail. The cap is a shallow cup about 0.5 in (1.3 cm) across.
Hanging cord: With cream, ch 27. Sl st in the 2nd ch from the hook and in each ch across. (26 sl st)
Fasten off. The cord should measure about 3.25 in (8.3 cm).
Layout (seen from above, tips meeting at the center):
          [P1]
   [P6]  S1 | S2  [P2]
     S6 ---(+)--- S3
   [P5]  S5 | S4  [P3]
          [P4]
P1–P6 are the panels and S1–S6 are the cream seams. (+) marks the center, where all six tips meet under the cap.
Joining
You’ll join the panels with cream single crochet seams worked on the RS. Each seam stands up as a raised cream rib.
Method: Hold two panels with their WS together and the RS facing out, matching the row ends. Join cream at the hem corner, at the Row 5 end. Work through both layers at once, from the hem up to the tip:
- 1 sc in the Row 5 (sc) row end
- 2 sc in each of the Row 4, 3, 2 and 1 (dc) row ends
That’s 1 + 2 × 4 = 9 sc per seam.
Order: Join P1 to P2 (S1), then add P3, P4, P5 and P6 the same way (S2–S5). Fold the strip into a ring and join P6 to P1 (S6) to close the dome. Six seams use 54 sc in total.
Stitch logic: The seam stitches sit on the row ends only. They don’t use any of the 13 hem sc on either panel. This means the hem edge still has exactly 13 sc per panel after joining.
Tension: Keep the seam sc even and slightly firm, so the ribs stand up without puckering the lace. If a seam pulls the canopy in, use a looser loop on each sc. Don’t add stitches.
Size checkpoint: Lay the joined canopy flat without stretching it. The hem should measure 9 in (22.9 cm) around, or about 2.9 in (7.4 cm) across when the dome is gently cupped.
At the top, weave each seam tail through the six Row 1 rings and pull them closed into a small center. Knot the tails, but don’t cut them yet.
Border
Gauge for the border is the same as the panels: 13 sc = 1.5 in (3.8 cm).
Starting count: The hem is one continuous edge. It has 6 panels × 13 hem sc = 78 sts, with no stitches added at the seams.
Rnd 1 (cream band): With the RS facing, join cream in the first sc of P1’s hem, just to the left of seam S6. Ch 1, then sc in each hem sc around. Step over the end of each seam; don’t work into it. Join with a sl st to the first sc.
Count: 78 sc worked 1 per existing st + 0 extra = 78 sc. That’s 13 sc on each panel.
Rnd 2 (scallops): Ch 1.
1. Sc in the next st.
2. Work this sequence 3 times: sk 1, 5 dc in the next st, sk 1, sc in the next st.
3. Repeat Steps 1 and 2 five more times, 6 times in all (once per panel).
4. Join with a sl st to the first sc.
Fasten off.
Per panel: Step 1 uses 1 st and each sequence in Step 2 uses 4 sts, so each repeat covers 1 + 3 × 4 = 13 sts. It makes 3 scallops, with 4 sc and 15 dc.
Total: 6 × 13 = 78 sts used. That’s 18 scallops, made of 24 sc and 90 dc (114 sts).
Why the math works: Each panel repeat ends with an sc in that panel’s 13th stitch. The next repeat starts with an sc in the next panel’s 1st stitch. So two sc sit side by side at every seam, which makes the small dip at each rib. The 4 mm pearls go in these dips.
Rnd 1 adds about 0.1 in (0.3 cm) and the scallops add about 0.3 in (0.8 cm), for a 0.4 in (1.0 cm) border. The finished hem is 2.9 in (7.4 cm) plus 0.4 in (1.0 cm) on each side, about 3.7 in, which flares to 3.75 in (9.5 cm) across the scallop tips.
Handle, Cap and Pearls
Handle:
1. Fold the bottom 0.25 in (0.6 cm) of the wire back on itself so there’s no sharp end.
2. Starting at the folded end, cover 4.5 in (11.4 cm) of wire with cream sc worked over the wire: insert the hook under the wire, yarn over, pull up a loop, yarn over and pull through 2. Pack the stitches tightly, about 14 sc per 1 in (2.5 cm), so about 63 sc in total.
3. Leave the top 1 in (2.5 cm) of wire bare and secure the thread.
4. Bend the bottom 1 in (2.5 cm) of the covered wire into a J around a pencil.
5. String the five 3 mm pearls on cream thread and tie them in a ring around the shaft, 1 in (2.5 cm) above the curve.
Assembly:
1. Push the bare wire tip up through the center of the canopy and then through the center of the cap.
2. Sew the cap to the canopy top with its tail, stitching around Rnd 3.
3. Slide the 6 mm pearl onto the wire. Trim the wire to 0.25 in (0.6 cm) above the pearl and roll it into a tiny loop with the pliers.
4. Fold the cord in half and knot both ends through the wire loop.
5. Sew one 4 mm pearl into each of the six seam dips on the hem.
Final Blocking
- Mix the stiffener according to its label.
- Take off the handle beads if they won’t tolerate wetting, or keep the handle dry.
- Cover the 2.75 in (7.0 cm) ball with plastic wrap.
- Soak the canopy in stiffener and gently squeeze out the excess.
- Set the canopy over the ball, centering the top on the ball’s highest point.
- Straighten each rib so it runs straight down. The hem should sit 1.25 in (3.2 cm) below the top.
- Pin each scallop outward so the hem measures 3.75 in (9.5 cm) across the scallop tips.
- Open each V-st eyelet with a pin tip.
- Let it dry fully, at least 12 hours, then remove it from the ball.
Final Quality-Control Checklist
- 6 panels, each with 13 hem sc
- 6 seams of 9 sc each, all on the RS
- Border Rnd 1: 78 sc
- Border Rnd 2: 18 scallops, with a double-sc dip at each seam
- 6 hem pearls, 1 top pearl, 5 handle pearls
- Canopy 3.75 in (9.5 cm) across and 1.25 in (3.2 cm) tall
- Ornament 4.5 in (11.4 cm) tall, plus a 1.5 in (3.8 cm) loop
- No wire showing below the cap; all tails woven in
Troubleshooting
- Hem ruffles: Your panels are too wide. Check the Row 5 count (13 sc) and go down a hook size.
- Dome is too pointed: Your panels are too tall. Use a slightly smaller turning chain or a smaller hook.
- Ribs are wavy: The seam tension is uneven. Re-seam with 9 even sc per seam.
- Scallops don’t line up with the seams: Rnd 1 didn’t start right after a seam, or a seam stitch was worked into. Recount 13 sc per panel.
- Handle covering slides: Pack the stitches tighter and add a dot of glue at each end.
- Canopy goes soft: Starch it again over the ball.
Care
Dust it gently, or spot-clean with a damp cloth. If the starch softens, re-stiffen the canopy over the ball, then store the ornament flat in a box.
Final Notes
Here is the measurement chain:
– Each panel has 13 hem sc measuring 1.5 in (3.8 cm).
– Six panels give 78 sts, or 9 in (22.9 cm) around the hem.
– The 0.4 in (1.0 cm) border, with 18 scallops, brings the canopy to 3.75 in (9.5 cm) across.
If each checkpoint matches, the dome, ribs and seam dips will fall into place.
Happy crocheting!