

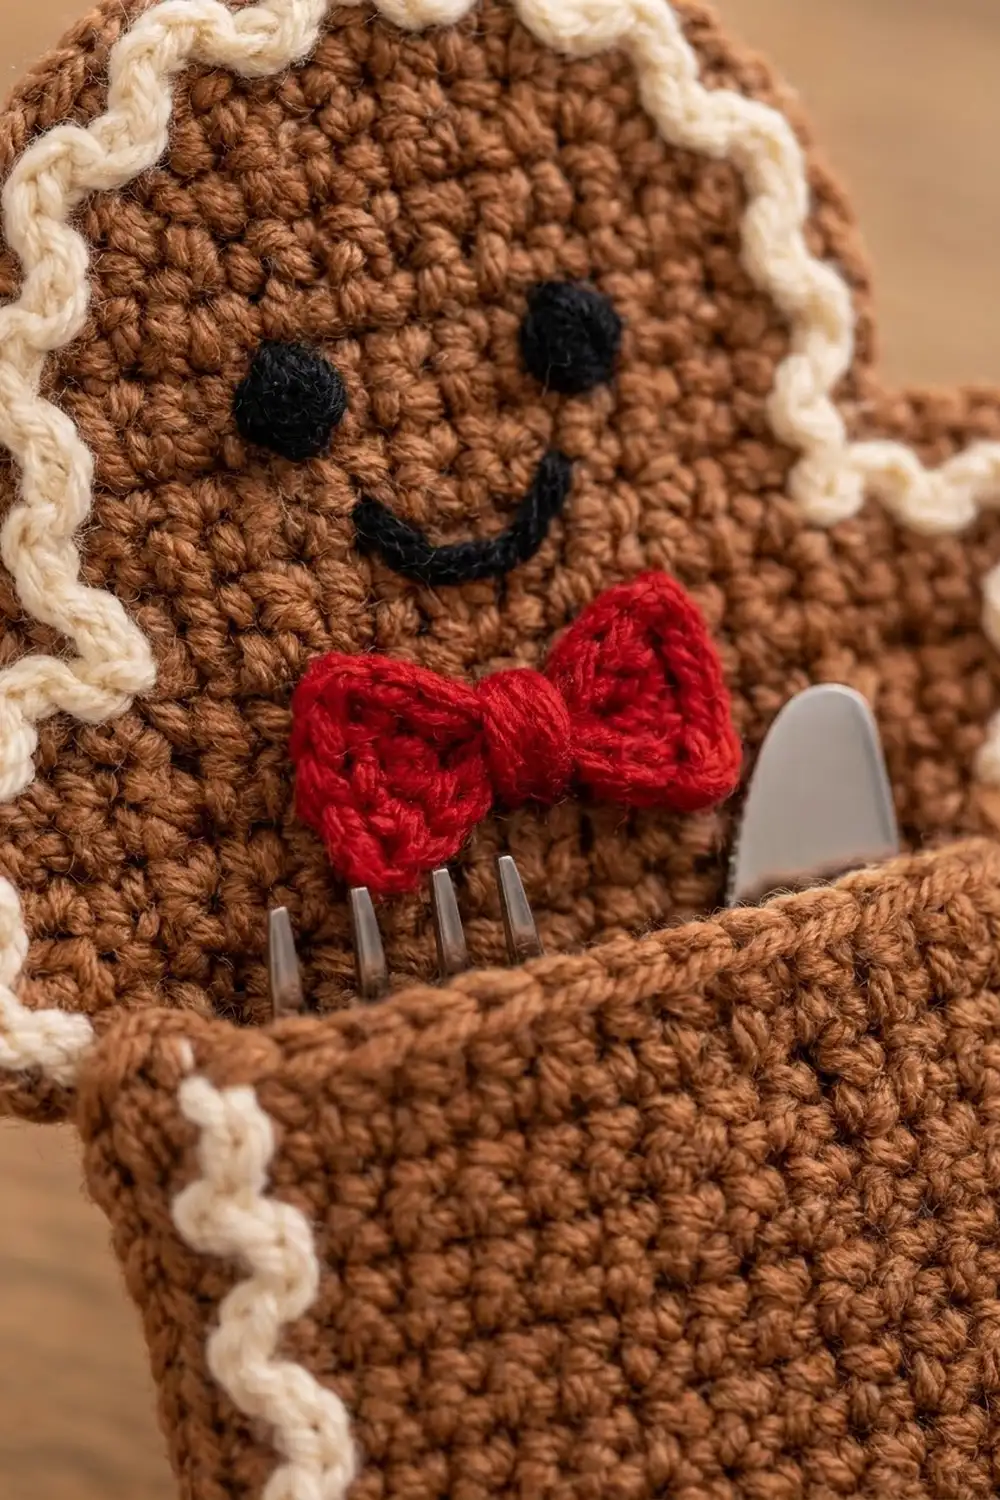
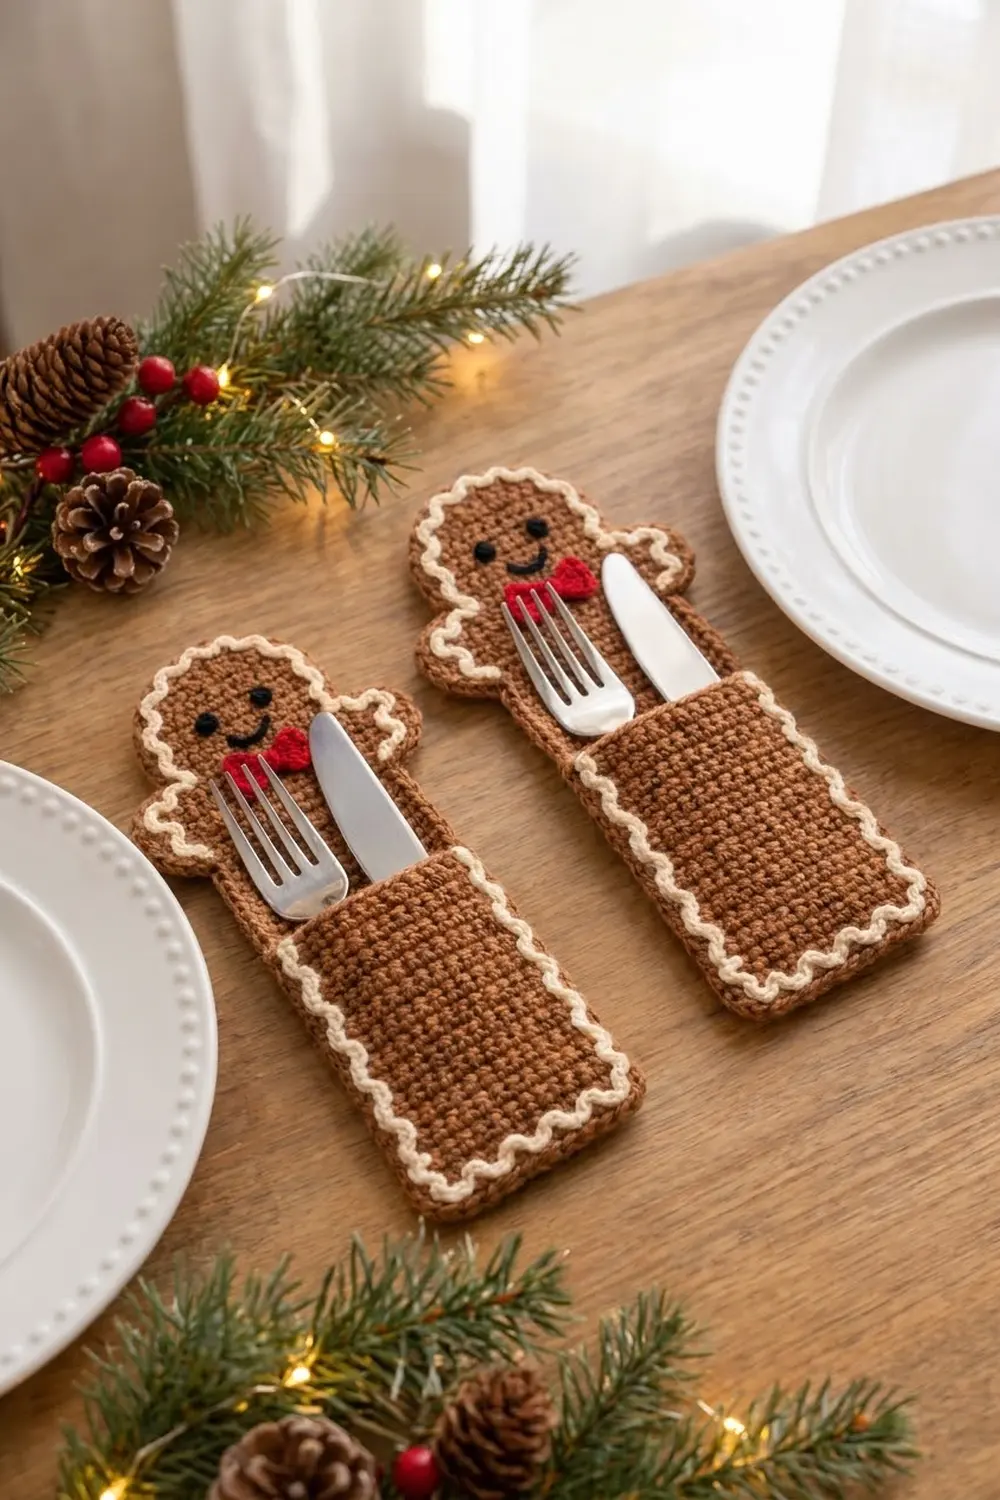
This little gingerbread man is a cutlery holder for your holiday table. He has a flat cookie-shaped back with a round head, two short stubby arms and a long body. A rectangular pocket is sewn across his tummy, so the fork and knife tuck in and stand up in front of his face.
The colors are classic cookie: caramel-brown for the dough, a wavy cream “icing” line, a red bow tie, and a black stitched face. Tight single crochet gives a dense, cookie-like texture.
All instructions use US crochet terms. One finished holder is 4.4 in (11.2 cm) wide at the body, 6.0 in (15.2 cm) across the arms and 9.6 in (24.4 cm) tall.
You crochet the back panel in rows from the bottom up, adding the arms and then shaping the neck and head. Next you make a pocket rectangle and a tiny bow, give both panels a brown edging round, and sew everything together. The cream icing goes on last. The photo shows a matching pair, so make the pattern twice for two place settings.
Finished Size and Construction
- Finished size: 4.4 in (11.2 cm) wide at the body, 6.0 in (15.2 cm) across the arms, 9.6 in (24.4 cm) tall
- Skill level: Advanced beginner
- Terminology: US
- Yarn weight: DK (light, #3) cotton
- Hook: 3.5 mm (E-4)
- Number of pieces: 3 per holder (back panel, pocket, bow tie)
- Layout: pocket sewn over the lower body of the back panel, bow at the neck
- Pocket size: 4.4 x 5.2 in (11.2 x 13.2 cm) after edging
- Back panel before edging: 4 in (10.2 cm) wide at the body, 5.6 in (14.2 cm) across the arms, 9.2 in (23.4 cm) tall
- Edging depth: 1 round of sc, about 0.2 in (0.5 cm) on every edge
Materials
Use a smooth cotton DK. Cotton keeps its shape, washes well and shows the icing line clearly. Avoid fluffy or stretchy yarn, because the pocket has to stay firm enough to hold metal cutlery upright.
Amounts for one holder:
- Brown (caramel): 30 g / 75 m (82 yd)
- Cream: 10 g / 25 m (27 yd), held double for the icing
- Red: 2 g / 5 m (5 yd)
- Black: 1 g / 2 m (2 yd)
Double every amount for the pair shown. All amounts include about 15 percent extra for swatching and tails.
Tools: 3.5 mm (E-4) hook, tapestry needle, 4 stitch markers, scissors, rustproof pins, a blocking mat or folded towel, and a spray bottle.
Abbreviations (US Terms)
- ch – chain
- sc – single crochet
- sc2tog – single crochet 2 together (1 decrease)
- sl st – slip stitch
- fsc – foundation single crochet
- st(s) – stitch(es)
- RS / WS – right side / wrong side
Fsc at the end of a row: Insert your hook into the base chain of the last stitch, yarn over and pull up a loop. Yarn over and pull through 1 loop to make the new base chain, then yarn over and pull through both loops. For each new fsc, work into the base chain of the one you just made.
Surface slip stitch (surface sl st): Hold the yarn behind the work. Insert the hook from front to back, pull up a loop and draw it through the loop on your hook.
Icing wave (4-st repeat): Make 2 surface sl sts along the edging round (outer line). Then make 2 surface sl sts in the panel stitches or row ends just inside the edging (inner line). Stepping in and out like this makes the wavy icing.
Gauge and Checkpoints
Gauge: 20 sc and 20 rows = 4 in (10.2 cm), worked flat with a 3.5 mm hook. That is 5 stitches and 5 rows per 1 in (2.5 cm).
Row gauge matters as much as stitch gauge here, because the edging uses 1 sc per row end. Make the pocket first and use it as your test piece.
Checkpoints:
- Pocket after Row 24: 4 x 4.8 in (10.2 x 12.2 cm)
- Pocket after edging: 4.4 x 5.2 in (11.2 x 13.2 cm)
- Back after Row 26: 4 x 5.2 in (10.2 x 13.2 cm)
- Back after Row 46: 9.2 in (23.4 cm) tall, 5.6 in (14.2 cm) across the arms
- Back after edging: 4.4 in (11.2 cm) wide at the body, 9.6 in (24.4 cm) tall
If it’s too big, go down to a 3.25 mm hook. If it’s too small, go up to 3.75 mm. If only the height is off, change your tension instead of adding or removing rows, because the edging counts depend on the row numbers.
With brown, ch 21.
Row 1 (RS): Sc in 2nd ch from hook and in each ch across, turn. (20 sc)
Rows 2–24: Ch 1, sc in each st across, turn. (20 sc)
Checkpoint: 4 x 4.8 in (10.2 x 12.2 cm). Don’t fasten off.
Edging Round: Ch 1 and turn the piece to work down the side.
- Side 1: Sc in each row end. (24 sc)
- Bottom: 3 sc in the first foundation ch, sc in the next 18 ch, 3 sc in the last ch. (24 sc)
- Side 2: Sc in each row end. (24 sc)
- Top: 3 sc in the first st of Row 24, sc in the next 18 sts, 3 sc in the last st. (24 sc)
Join with a sl st to the first sc. (96 sc)
The top and bottom counts include both of their 3-sc corners. The side counts are row-end stitches only. Fasten off and weave in the ends.
Back Panel
With brown, ch 21.
Row 1 (RS): Sc in 2nd ch from hook and in each ch across, turn. (20 sc)
Rows 2–25: Ch 1, sc in each st across, turn. (20 sc)
Row 26: Ch 1, sc in each st across, ch 5, turn. (20 sc + 5 ch)
Checkpoint: 4 x 5.2 in (10.2 x 13.2 cm).
Row 27 (arms): Sc in 2nd ch from hook and in the next 3 ch, sc in the next 20 sts, then make 4 fsc, turn. (4 + 20 + 4 = 28 sts)
Rows 28–31: Ch 1, sc in each st across, turn. (28 sc)
Row 32: Ch 1, sc2tog, sc in the next 24 sts, sc2tog, turn. (26 sts)
Arm checkpoint: 5.6 in (14.2 cm) across, with arms 1.2 in (3.0 cm) tall.
Row 33 (neck): Sl st in the first 6 sts, ch 1, sc in the next 14 sts, turn. Leave the last 6 sts unworked. (6 sl st + 14 sc + 6 unworked = 26; 14 working sts)
The neck is 2.8 in (7.1 cm) wide.
Row 34: Ch 1, 2 sc in the first st, sc in the next 12 sts, 2 sc in the last st, turn. (16 sc)
Row 35: Ch 1, 2 sc in the first st, sc in the next 14 sts, 2 sc in the last st, turn. (18 sc)
Row 36: Ch 1, 2 sc in the first st, sc in the next 16 sts, 2 sc in the last st, turn. (20 sc)
Rows 37–42: Ch 1, sc in each st across, turn. (20 sc)
Row 43: Ch 1, sc2tog, sc in the next 16 sts, sc2tog, turn. (18 sts)
Row 44: Ch 1, sc2tog, sc in the next 14 sts, sc2tog, turn. (16 sts)
Row 45: Ch 1, [sc2tog] twice, sc in the next 8 sts, [sc2tog] twice, turn. (12 sts)
Row 46: Ch 1, sc2tog, sc in the next 8 sts, sc2tog. (10 sts)
Head checkpoint: 4 in (10.2 cm) wide and 2.6 in (6.6 cm) tall. The whole panel is now 9.2 in (23.4 cm) tall. Don’t fasten off.
Edging Round: Ch 1. Work 1 sc in each stitch and 1 sc in each row end all the way around:
- Head top: 2 sc in the first st of Row 46, sc in the next 8 sts, 2 sc in the last st. (12 sc)
- Head side: Sc in the row ends of Rows 46–34. (13 sc)
- Neck: Sc in the row end of Row 33. (1 sc)
- Shoulder: Sc in each of the 6 shoulder sts. (6 sc)
- Arm end: 3 sc in the row end of Row 32, then sc in the row ends of Rows 31–27. (8 sc)
- Under arm: 3 sc in the outer corner st, sc in the next 3 sts. (6 sc)
- Body side: Sc in the row ends of Rows 26–1. (26 sc)
- Bottom: 3 sc in the first foundation ch, sc in the next 18 ch, 3 sc in the last ch. (24 sc)
- Body side: Sc in the row ends of Rows 1–26. (26 sc)
- Under arm: Sc in the next 3 sts, 3 sc in the outer corner st. (6 sc)
- Arm end: Sc in the row ends of Rows 27–31, 3 sc in the row end of Row 32. (8 sc)
- Shoulder: Sc in each of the 6 shoulder sts. (6 sc)
- Neck: Sc in the row end of Row 33. (1 sc)
- Head side: Sc in the row ends of Rows 34–46. (13 sc)
Join with a sl st to the first sc. (12 + 2 x [13 + 1 + 6 + 8 + 6 + 26] + 24 = 156 sc)
Fasten off and weave in the ends. Checkpoint: 4.4 in (11.2 cm) wide at the body, 6.0 in (15.2 cm) across the arms, 9.6 in (24.4 cm) tall.
Bow Tie
With red, ch 7.
Row 1: Sc in 2nd ch from hook and in each ch across, turn. (6 sc)
Rows 2–4: Ch 1, sc in each st across, turn. (6 sc)
Fasten off and leave a 12 in (30.5 cm) tail. Wrap the tail tightly around the center 5 times to cinch it into a bow, then secure it at the back. The bow is about 1.2 x 0.8 in (3.0 x 2.0 cm).
Face
Stitch the face before joining, while the back panel is still easy to handle.
- Eyes: With black, make a French knot (3 wraps) over st 7 and st 14 of Row 41.
- Smile: Backstitch a gentle curve. Start over st 8 of Row 38, dip down to sts 10–11 of Row 37, and come back up to st 13 of Row 38.
- Bow: Sew the bow tie centered over Rows 33–34 (the neck).
Make All Pieces
For each holder:
- Brown: 1 back panel (156-st edging) and 1 pocket (96-st edging)
- Red: 1 bow tie
- Black: eyes and smile
- Cream: icing, added after joining
Layout with the RS facing you:
      [  HEAD + FACE  ]
  [ARM][  BOW at neck ][ARM]
      [  POCKET top   ]
      [  POCKET body  ]
      [ POCKET bottom ]
Joining
Lay the back panel RS up. Place the pocket on top, also RS up, with the bottom edges lined up.
Method: Whipstitch with brown through both loops of the edging stitches on both layers, one stitch to one stitch.
Stitch-to-stitch logic:
- Line up the center sc of each pocket bottom corner with the center sc of each back bottom corner.
- Bottom: Join the 24 pocket bottom sc to the 24 back bottom sc, 1 to 1.
- Each side: Join the 24 pocket side sc to back body-side sc 1–24. Then join the center sc of the pocket’s top corner to back body-side sc 25. Back sc 26 stays free, just under the arm.
- Leave the pocket top open.
Tension: Pull each stitch just snug enough to close the edge, but not so tight that it puckers. The joined edge should lie as flat as the rest of the holder.
Size checkpoint: The pocket top should sit about 0.2 in (0.5 cm) below the arms. The holder should still be 4.4 in (11.2 cm) wide and 9.6 in (24.4 cm) tall.
Border: Cream Icing Wave
Border gauge: Work 1 surface sl st per edging stitch or row end, at 5 per 1 in (2.5 cm), to match the brown edging. Hold the cream double. Each 4-st wave repeat covers 0.8 in (2.0 cm).
Pocket icing: Start at the top of one pocket side, just below the top corner group.
- Side: 24 sts = 6 repeats
- Bottom: 24 sts, including both corner groups = 6 repeats
- Second side: 24 sts = 6 repeats
That’s 72 sts, or 18 repeats. Fasten off at the top of the second side. At each corner group, use the same corner panel stitch as the inner point for all 3 sc.
Back icing: Start at one under-arm, right where it meets the pocket top. Work under arm 6, arm end 8, shoulder 6, neck 1, head side 13, head top 12, head side 13, neck 1, shoulder 6, arm end 8 and under arm 6.
That’s 80 sts, or 20 repeats. Fasten off where the second under-arm meets the pocket.
Why the math works: Both icing paths divide evenly by 4: 72 sts on the pocket and 80 on the back. Each wave starts and ends on the same step, so you never need an extra “fudge” stitch. The pocket covers the sides of the back body, so they get no icing. The pocket top stays plain so the cutlery slides in easily.
Final Blocking
- Weave in any remaining ends on the WS.
- Lay the holder flat on a blocking mat, RS up.
- Pin it to 4.4 in (11.2 cm) at the body, 6.0 in (15.2 cm) across the arms and 9.6 in (24.4 cm) tall.
- Use pins to gently round the head and the arm ends.
- Mist with water until damp, not soaked.
- Slide a piece of card into the pocket so it dries open and square.
- Let it dry completely before you remove the pins.
Final Quality-Control Checklist
- The back edging has 156 sc and the pocket edging has 96 sc
- The holder is 4.4 x 9.6 in (11.2 x 24.4 cm), with arms 6.0 in (15.2 cm) across
- The pocket bottom and sides are fully closed and the top is open
- The icing is even, with 18 repeats on the pocket and 20 on the back
- The eyes are level and the smile is centered
- The bow is centered at the neck and firmly sewn on
- No ends show on the RS
Troubleshooting
- Edging ripples: Your rows are shorter than your stitches are wide. Use a hook 0.25 mm smaller for the edging.
- Edging cups: Your rows are taller than 5 per 1 in (2.5 cm). Use a hook 0.25 mm larger for the edging.
- Pocket is taller than the body side: Take out one pocket row and match the stitches again.
- Icing looks flat: Make sure the cream is held double, or switch to a 3.0 mm hook.
- Neck looks shapeless: Check that Row 33 leaves 6 sts on each side, then block the shoulders firmly.
- Cutlery tips forward: Tighten the side whipstitching and block with card inside the pocket.
Care
Hand wash in cool water with mild soap, reshape while damp and lay flat to dry. Don’t tumble dry, because it can shrink the cotton and warp the icing line.
Final Notes
Here is the measurement chain. A gauge of 5 stitches and 5 rows per 1 in (2.5 cm) gives a 4 x 4.8 in (10.2 x 12.2 cm) pocket and a 4 x 9.2 in (10.2 x 23.4 cm) back panel. One edging round adds 0.2 in (0.5 cm) to every edge. That makes the pocket 4.4 x 5.2 in (11.2 x 13.2 cm) and the back 4.4 x 9.6 in (11.2 x 24.4 cm). The pocket joins stitch to stitch, and the icing finishes in even 4-stitch waves. Make two and set a festive table.
Happy crocheting!