

This little Santa bell is a quick, cheerful ornament for the tree, a gift topper, or a mantel display. The bell is bright red with a crisp white hat band, a soft peach face, a pink button nose, and a fluffy-looking white beard and mustache. A round white pompom sits on top, and a matching white ball clapper swings inside.
The style is classic amigurumi: tight single crochet, clean joined rounds, and small appliqué pieces stacked on the front. This pattern uses US crochet terms throughout.
The finished bell measures 3.5 in (8.9 cm) tall from crown to rim and 4.5 in (11.4 cm) across the bottom opening. With the pompom and clapper, the ornament hangs about 4.75 in (12.1 cm) long, not counting the loop.
Construction is simple. You work the bell top-down in joined rounds and switch to white for the hat band and the rim. Then you make the pompom, clapper, face, beard, mustache, and nose, and sew them all in place.
Finished Size and Construction
- Finished size: 3.5 in (8.9 cm) tall; 4.5 in (11.4 cm) bottom diameter
- Skill level: Easy to Intermediate
- Terminology: US crochet terms
- Yarn weight: DK (#3, light), cotton or cotton blend
- Hook: 3.25 mm (US D/3)
- Number of pieces: 1 bell ornament (1 bell body plus 6 small attached parts and 1 chain loop)
- Layout: one standalone piece; the face is centered on the front below the hat band
- Piece size: 4.5 in (11.4 cm) rim diameter, about 14.2 in (36.1 cm) rim circumference
- Size before border: 4.2 in (10.7 cm) diameter after Rnd 22
- Border depth: 2 rounds, about 0.3 in (0.8 cm)
Materials
Choose a smooth, firm DK cotton or cotton blend. Cotton shows the stitches clearly and helps the bell hold its flared shape. Fuzzy or very soft acrylic will work, but the bell may sag.
- Red: 12 g, about 30 m (33 yd)
- White: 8 g, about 20 m (22 yd)
- Peach: 2 g, about 5 m (5.5 yd)
- Pink: 1 g, about 3 m (3.3 yd)
These amounts include extra yarn to allow for gauge differences and a gauge test circle.
Tools:
- 3.25 mm (US D/3) crochet hook
- 2 black safety eyes, 6 mm (or black yarn for embroidered eyes)
- Small amount of polyester fiberfill
- Stitch marker
- Tapestry needle
- Scissors and straight pins
- Optional: fabric stiffener or spray starch
Abbreviations (US Terms)
- ch – chain
- sl st – slip stitch
- sc – single crochet
- hdc – half double crochet
- dc – double crochet
- inc – 2 sc in the same stitch
- dec – single crochet 2 together (invisible decrease recommended)
- MR – magic ring
- st(s) – stitch(es)
- rnd(s) – round(s)
Special stitch – reverse sc (crab stitch): Work from left to right (if you are right-handed). Insert the hook into the next stitch to the right, yarn over, pull up a loop, yarn over, and pull through both loops. This makes a firm, corded edge.
Joined rounds: Unless noted, join each round with a sl st to the first sc, then ch 1. The ch 1 does not count as a stitch. Work the first sc of the next round in the same stitch as the join.
Gauge and Checkpoints
Gauge: 11 sc and 12 rnds = 2 in (5.1 cm) in sc worked in rounds. That is 5.5 sts and 6 rnds per inch.
Test with a small piece first. Work Rnds 1–5 of the bell as a flat circle. It should measure about 1.75 in (4.4 cm) across. If it is larger, go down a hook size. If it is smaller, go up a hook size. Tight stitches matter here, because loose fabric will not hold the bell shape.
Checkpoints:
- After Rnd 5: 30 sts, about 1.75 in (4.4 cm) across, slightly domed
- After Rnd 12 (hat band done): 36 sts, about 6.5 in (16.5 cm) around, 2.1 in (5.3 cm) diameter, about 1.5 in (3.8 cm) tall
- After Rnd 22: 72 sts, about 13.1 in (33.3 cm) around, 4.2 in (10.7 cm) diameter, about 3.25 in (8.3 cm) tall
- After Rnd 24: 78 sts, about 14.2 in (36.1 cm) around, 4.5 in (11.4 cm) diameter, 3.5 in (8.9 cm) tall
If you are off by more than 0.25 in (0.6 cm) at any checkpoint, change hook size and start again instead of adding or skipping increases. The appliqué pieces are sized to fit this gauge.
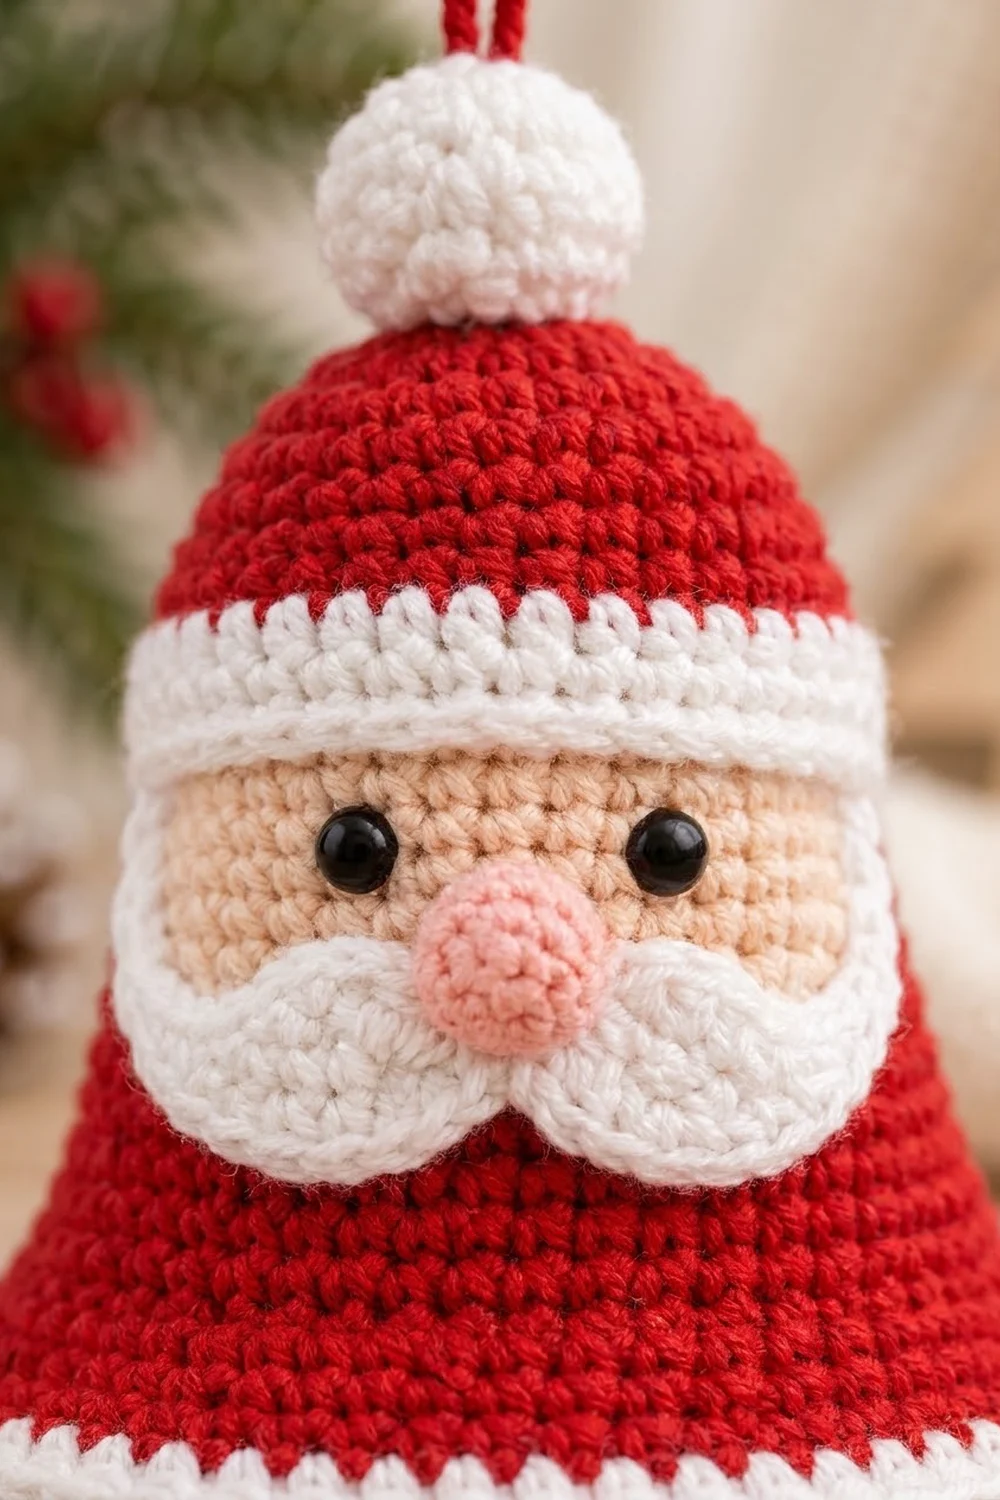
Bell Body
Start with red.
Rnd 1: MR, 6 sc in ring, join. (6)
Rnd 2: Inc in each st around, join. (12)
Rnd 3: (Sc, inc) 6 times, join. (18)
Rnd 4: (2 sc, inc) 6 times, join. (24)
Rnd 5: (3 sc, inc) 6 times, join. (30)
Rnd 6: Sc in each st around, join. (30)
Rnd 7: (4 sc, inc) 6 times, join. (36)
Rnds 8–9: Sc in each st around, join. (36)
Change to white on the final join of Rnd 9. Cut red, leaving a short tail.
Hat Band
Rnds 10–12: With white, sc in each st around, join. (36)
Change to red on the final join of Rnd 12. Weave in the white tails on the inside.
The bell should now look like a small hat with a straight white band, 2.1 in (5.3 cm) wide.
Flared Body
Rnd 13: Sc in each st around, join. (36)
Rnd 14: (5 sc, inc) 6 times, join. (42)
Rnd 15: Sc in each st around, join. (42)
Rnd 16: (6 sc, inc) 6 times, join. (48)
Rnd 17: Sc in each st around, join. (48)
Rnd 18: (7 sc, inc) 6 times, join. (54)
Rnd 19: (8 sc, inc) 6 times, join. (60)
Rnd 20: (9 sc, inc) 6 times, join. (66)
Rnd 21: (10 sc, inc) 6 times, join. (72)
Rnd 22: Sc in each st around, join. (72)
In Rnds 13–18, every other round is plain, which keeps the shoulder gentle. Rnds 19–21 increase every round, which creates the wide bell flare. Change to white on the final join of Rnd 22. Do not fasten off yet. Continue with the Border.
Border
The rim border is 2 white rounds, about 0.3 in (0.8 cm) deep. The border gauge is the same as the body: 5.5 sts per inch around. A round bell has no corners or sides, so the border is counted in 6 equal repeats instead. When the bell is pressed flat, each half (front and back) holds 39 sts.
Rnd 23 (conversion and flare round): With white, (11 sc, inc) 6 times, join. Count: 72 sts worked 1-per-existing-stitch + 6 extra sts from increases = 78 sts. That is 13 sts per repeat and 39 sts per half.
Rnd 24 (trim round): Ch 1, reverse sc in each st around, sl st to the first st. Count: 78 sts worked 1-per-existing-stitch + 0 extra = 78 sts. Still 13 sts per repeat and 39 sts per half.
Fasten off and weave in the tail.
Why the math works: At 5.5 sts per inch, 78 sts gives about 14.2 in (36.1 cm) of circumference. Divided by pi (3.14), that is a 4.5 in (11.4 cm) diameter. The 6 increases in Rnd 23 add one more stitch per repeat, the same as in Rnds 19–21, so the flare continues smoothly. The reverse sc round adds no stitches, so it firms the edge without making it ruffle.
Pompom and Clapper (make 2)
Use white. Leave an 8 in (20.3 cm) starting tail.
Rnd 1: MR, 6 sc, join. (6)
Rnd 2: Inc in each st around, join. (12)
Rnd 3: (Sc, inc) 6 times, join. (18)
Rnds 4–5: Sc in each st around, join. (18)
Rnd 6: (Sc, dec) 6 times, join. (12)
Stuff firmly.
Rnd 7: Dec 6 times, join. (6)
Fasten off, leaving a 12 in (30.5 cm) tail. Close the hole with the tail. Each ball measures about 1 in (2.5 cm) across.
Hanging Loop
With red, ch 24, which is about 3 in (7.6 cm). Fasten off, leaving both tails long. Fold the chain in half to make a 1.5 in (3.8 cm) loop.
Face
Use peach.
Ch 7.
Rnd 1: Sc in 2nd ch from hook and in the next 4 ch, 3 sc in the last ch. Working along the other side of the foundation chain, sc in the next 4 ch, 2 sc in the last ch. Join. (14)
Rnd 2: Inc in first st, sc in next 4 sts, inc in each of next 3 sts, sc in next 4 sts, inc in each of last 2 sts, join. (20)
Fasten off, leaving a 12 in (30.5 cm) tail. The oval measures about 1.8 in (4.6 cm) wide and 1 in (2.5 cm) tall.
Beard
Use white. The beard is worked flat in rows.
Ch 10.
Row 1: Sc in 2nd ch from hook and in each ch across. (9)
Row 2: Ch 1, turn. Inc in first st, sc in next 7 sts, inc in last st. (11)
Row 3: Ch 1, turn. Inc in first st, sc in next 9 sts, inc in last st. (13)
Row 4 (scallops): Ch 1, turn. Sl st in first st, skip 1 st, 5 dc in next st, skip 1 st, sl st in next st; repeat from * to * 2 more times. (3 scallops; 13 sts used: 1 + 3 × 4)
Fasten off, leaving a 12 in (30.5 cm) tail. The beard measures about 2.4 in (6.1 cm) across the scallops. Row 1 is the top edge, and the scallops form the wavy lower edge.
Mustache
Use white.
Ch 12.
Row 1: Starting in the 2nd ch from hook: sl st, sc in next ch, hdc in next ch, 2 dc in next ch, hdc in next ch, sl st in next ch (center), hdc in next ch, 2 dc in next ch, hdc in next ch, sc in next ch, sl st in last ch. (11 ch used)
Fasten off, leaving a 10 in (25.4 cm) tail. The mustache measures about 1.6 in (4.1 cm) wide, with a thicker curl on each side of the center.
Nose
Use pink.
Rnd 1: MR, 6 sc, join. (6)
Rnd 2: (Sc, inc) 3 times, join. (9)
Rnd 3: Sc in each st around, join. (9)
Rnd 4: (Sc, dec) 3 times, join. (6)
Stuff with the starting tail or a pinch of fiberfill. Fasten off, leaving a 10 in (25.4 cm) tail. The nose is about 0.5 in (1.3 cm) across.
Assembly
- Face: Pin the face oval centered on the front, with its top edge touching the white band. It covers about Rnds 13–18.
- Eyes: Push the safety eyes through the face on the foundation-chain line, with 4 sts between them. Push the posts through the bell fabric as well, and attach the washers from inside the open bell. Then whipstitch the edge of the face down with peach.
- Beard: Pin the beard below the face so Row 1 overlaps the lower third of the oval. Sew along Row 1 and the side edges. Leave the tips of the scallops loose so they lie flat.
- Mustache: Center the mustache over the top edge of the beard, just under the eyes. Sew through the center and lift each end slightly so the curls tip upward.
- Nose: Sew the nose over the center of the mustache, between and slightly below the eyes.
- Pompom and loop: Thread both loop tails through the pompom from bottom to top. Then thread them through the center of Rnd 1 of the bell, tie them securely inside, and weave in the ends.
- Clapper: Thread a 4 in (10.2 cm) strand of red through the top of the second ball, then up through the center top of the bell from inside. Adjust it until about half the ball shows below the rim, which leaves about 3 in (7.6 cm) of free strand. Knot it inside the crown and weave in the ends.
Final Blocking
- Lightly mist the bell with water.
- Slip it over a small glass or cup about 4 in (10.2 cm) across at the base.
- Shape the crown into a smooth dome and ease the rim into an even circle.
- Gently flatten the face, beard, and mustache with your fingers.
- Optional: brush a thin layer of fabric stiffener or spray starch on the inside of Rnds 19–24.
- Let it dry completely, then check that the rim measures 4.5 in (11.4 cm) across.
Final Quality-Control Checklist
- The bell is 3.5 in (8.9 cm) tall and 4.5 in (11.4 cm) across the rim.
- Stitch counts: 36 at the band, 72 after Rnd 22, 78 at the rim.
- The hat band is 3 even white rounds with no red showing.
- The joins line up in one straight column at the back.
- The face is centered and touches the band.
- The eyes are level and the washers are secure.
- The beard scallops are even and the mustache curls point up.
- The clapper hangs centered with half the ball showing.
- The loop is secure and the ornament hangs straight.
- All tails are woven in on the inside.
Troubleshooting
Bell is floppy: Your gauge is loose. Go down a hook size, or use stiffener on the flare.
Rim ruffles: Check that Rnd 23 has exactly 78 sts and that the reverse sc is neither too tight nor too loose.
Rim curls inward: The reverse sc is too tight. Work it again with looser tension.
Joins slant across the back: Make sure the first sc of each round goes into the same stitch as the join.
Face looks too small: You crocheted the face tighter than the bell. Make it again with a hook one size larger.
Ornament hangs crooked: Re-center the loop through Rnd 1, and trim the clapper strand so the ball hangs straight.
Color jog at the band: Change color during the final yarn over of the join, not after it.
Care
Spot clean with cool water and mild soap, then reshape and dry over a cup. If you used stiffener, do not soak it.

Final Notes
The whole ornament depends on one chain of measurements. At 5.5 sts per inch you get a 1.75 in (4.4 cm) crown, a 2.1 in (5.3 cm) hat band, a 4.2 in (10.7 cm) body after Rnd 22, and a 4.5 in (11.4 cm) rim after the 78-stitch border. Check each stage, and the face, beard, and mustache will sit exactly where they belong.
Happy crocheting!