

This little ornament is one smooth, solid sphere of aqua single crochet, stuffed firm and topped with a classic gold ornament cap. It looks like a glass bauble from across the room. Up close, it has the soft, dense stitch texture that makes amigurumi so satisfying to hold.
The color is a muted light turquoise from top to bottom, with no stripes or color changes. That keeps the silhouette clean and lets the gold cap and the tree lights do the decorating. Make one in an evening, or a handful for a matching set.
The pattern uses US crochet terms. The finished ornament measures about 1.75 in (4.4 cm) in diameter, within an acceptable range of 1.5–2 in (3.8–5.1 cm) depending on your yarn and stuffing.
Construction is simple. You work continuous spiral rounds from a magic ring, increase to 30 stitches, work straight to form the widest part, then decrease. You stuff before the last round, gather the top closed, and fit the gold cap over the gathered point.
Finished Size and Construction
- Finished size: about 1.75 in (4.4 cm) diameter, stuffed
- Skill level: Easy / advanced beginner
- Terminology: US crochet terms
- Yarn weight: DK (light #3), cotton or cotton blend
- Hook: 2.5 mm (US B/1 or C/2), or as needed for gauge
- Number of pieces: 1
- Layout: single seamless sphere, worked in continuous spiral rounds
- Piece size: 1.75 in (4.4 cm) diameter
- Size before border: 1.75 in (4.4 cm); no border is added
- Border depth: 0 in (0 cm). The gathered top closure replaces a border.
Materials
Yarn advice: Choose a smooth, tightly plied DK cotton or cotton blend. Cotton gives crisp stitch definition and a slight sheen like the ornament in the photo. Avoid fuzzy or brushed yarns, which blur the stitches and soften the round outline.
- Aqua / light turquoise: about 5 g (about 12 m) per ornament
Quantities include a margin for your swatch rounds and a long closing tail. A typical 50 g skein of DK cotton (about 120 m) makes roughly 9–10 ornaments.
Tools:
- 2.5 mm crochet hook
- Stitch marker
- Polyester fiberfill, about 2–3 g per ornament
- Tapestry needle
- Scissors
- Gold metal ornament cap with wire loop, about 0.6 in (1.5 cm) across
- Gold cord or thread for hanging, about 6 in (15.2 cm)
- Optional: a dab of clear craft glue to secure the cap
Abbreviations (US Terms)
- MR – magic ring
- sc – single crochet
- inc – increase: 2 sc in the same stitch
- dec – invisible decrease
- st(s) – stitch(es)
- R – round
- ( ) x6 – repeat the bracketed sequence 6 times in total
Special stitch – invisible decrease (dec): Insert the hook into the front loop only of the next stitch, then into the front loop only of the following stitch (3 loops on hook). Yarn over and pull through both front loops (2 loops on hook). Yarn over and pull through both loops. This creates a decrease that blends into the fabric and keeps the sphere smooth.
Gauge and Checkpoints
Gauge: 6 sc and 6 rounds = 1 in (2.5 cm) in tight amigurumi tension.
The ornament is one piece, so your test is simply the first five rounds. Work R1–R5, then measure before continuing.
Checkpoint 1 (after R5): The piece should be a slightly cupped disc about 1.5 in (3.8 cm) across when gently pressed flat. Its outer edge holds 30 sts.
Checkpoint 2 (after R10): The open cup should have a circumference of about 5 in (12.7 cm) at its widest point. This is 30 sts at 6 sts per inch.
Checkpoint 3 (finished): The stuffed ball should measure 1.75 in (4.4 cm) across, between 1.5 in (3.8 cm) and 2 in (5.1 cm).
If your piece is too big: Go down 0.25 mm in hook size, or tighten your tension. Large gaps between stitches will also let stuffing show through.
If your piece is too small: Go up 0.25 mm in hook size, or switch to a slightly heavier DK. Do not add rounds. Extra rounds distort the sphere into an egg shape rather than enlarging it evenly.
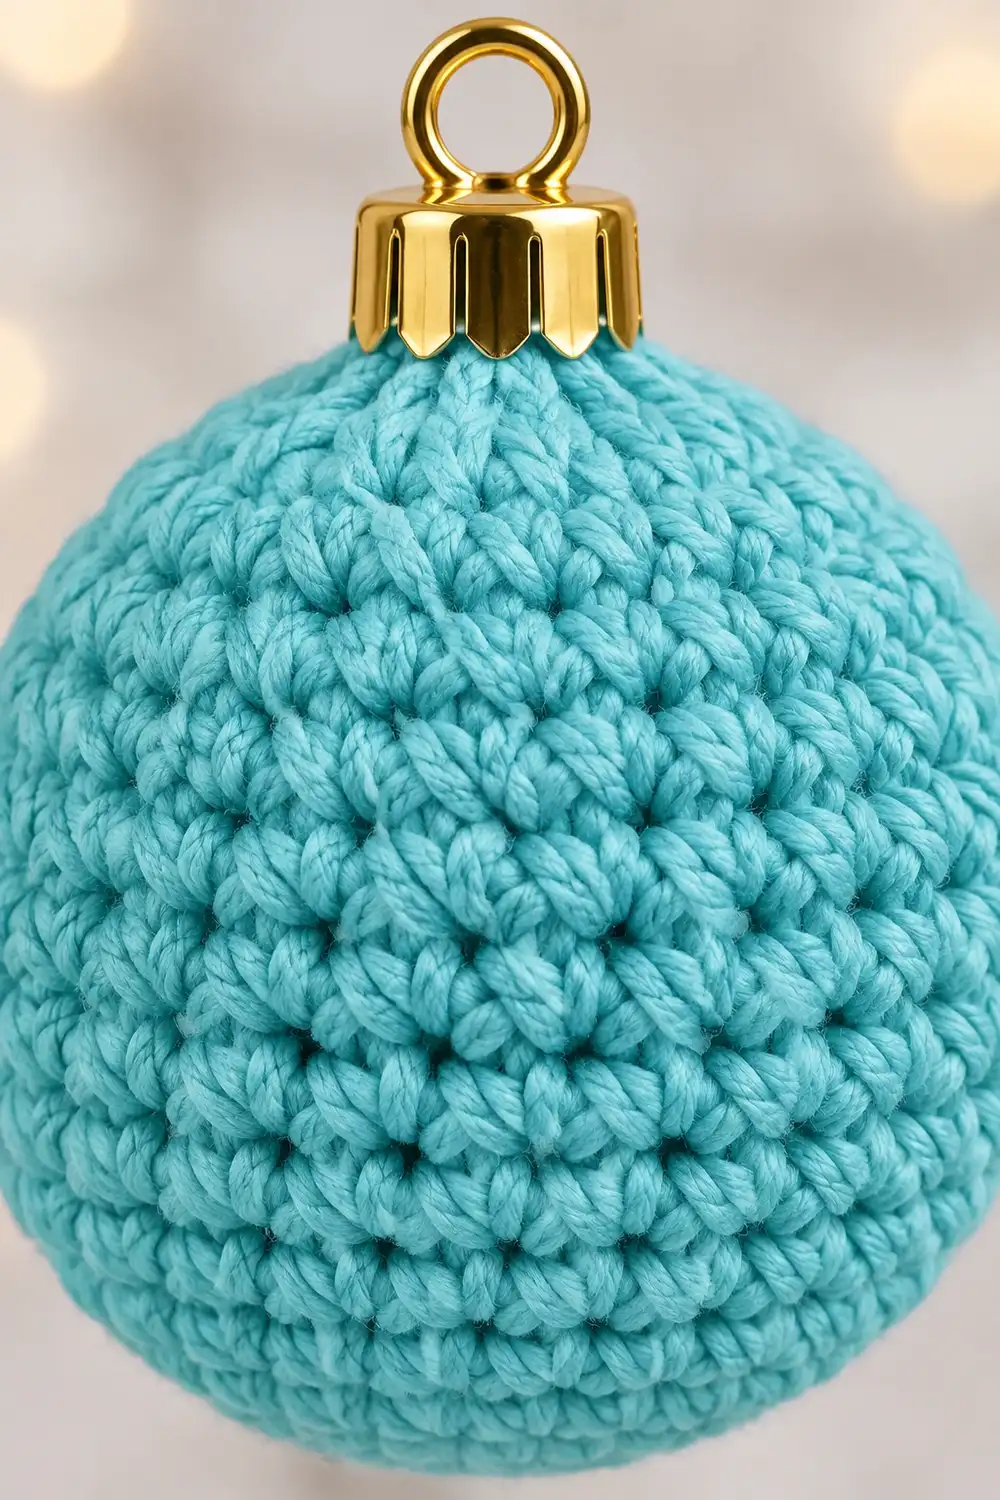
Pattern: The Ball
Work in continuous spiral rounds without joining or turning. Place a stitch marker in the first stitch of each round and move it up as you go. Work through both loops unless told otherwise.
Increase section (bottom of the ball)
R1: 6 sc in MR. Pull the ring tight. (6 sts)
R2: inc x6. (12 sts)
R3: (sc, inc) x6. (18 sts)
R4: (sc, inc, sc) x6. (24 sts)
Each repeat uses 3 sts from R3 and makes 4 sts. 3 x 6 = 18 sts used; 4 x 6 = 24 sts made.
R5: (sc, inc, 2 sc) x6. (30 sts)
Each repeat uses 4 sts from R4 and makes 5 sts. 4 x 6 = 24 sts used; 5 x 6 = 30 sts made.
Placing the increases in a staggered position in R4 and R5 prevents a hexagon shape. Hexagon corners would show through the finished ball.
Checkpoint 1: disc about 1.5 in (3.8 cm) across, 30 sts.
Straight section (widest part)
R6–R10: sc in each st around. (30 sts each round, 5 rounds)
These five even rounds form the “equator.” The piece now curves upward into a deep cup.
Checkpoint 2: circumference about 5 in (12.7 cm).
Decrease section (top of the ball)
R11: (sc, dec, 2 sc) x6. (24 sts)
Each repeat uses 5 sts from R10 and makes 4 sts. 5 x 6 = 30 sts used; 4 x 6 = 24 sts made.
R12: (sc, dec, sc) x6. (18 sts)
Each repeat uses 4 sts from R11 and makes 3 sts. 4 x 6 = 24 sts used; 3 x 6 = 18 sts made.
R13: (sc, dec) x6. (12 sts)
Each repeat uses 3 sts from R12 and makes 2 sts. 3 x 6 = 18 sts used; 2 x 6 = 12 sts made.
The decreases mirror the increase rounds: R11 matches R5, R12 matches R4, and R13 matches R3. This symmetry keeps the top and bottom the same shape.
Stuff now. Push in fiberfill a small tuft at a time. Fill the bottom first, then the sides, and the opening last. Roll the ball between your palms as you stuff to even out lumps. Aim for firm but not straining. The stitches should not gap open.
R14: dec x6. (6 sts)
Each dec uses 2 sts. 2 x 6 = 12 sts used; 6 sts made. Add a final pinch of stuffing through the small opening if the top feels soft.
Fasten off, leaving a 12 in (30.5 cm) tail.
Border: Top Closure and Cap Collar
This ornament has no added edging. A border round would break the smooth sphere. Instead, the gathered closure acts as the finishing “edge,” and the gold cap sits over it.
Closure gauge: Same as the body: 6 sc per inch (per 2.5 cm). Do not loosen your tension on the last rounds. Loose top rounds leave a visible dip under the cap.
Gathering (closing the 6 sts):
- Thread the 12 in (30.5 cm) tail onto a tapestry needle.
- Insert the needle through the front loop only of each of the 6 remaining sts, working from outside to inside. That is 6 front loops in total, one per st.
- Pull the tail firmly. The 6 loops draw together like a drawstring into a tight point.
- Insert the needle into the center of the gathered point and out through the opposite side of the ball. Pull gently to hide the tail, then trim it flush. The end will retract inside.
Why the math works: R13 has 12 sts, which is about 2 in (5.1 cm) of circumference. R14 halves that to 6 sts, about 1 in (2.5 cm). Gathering closes those 6 sts down to a point less than 0.25 in (0.6 cm) across. That is well under the 0.6 in (1.5 cm) cap, so the cap fully covers the closure.
Attaching the cap:
- Squeeze the cap’s wire prongs together and push them straight down into the center of the gathered point. Go about 0.4 in (1 cm) deep, between stitches rather than through yarn.
- Release the prongs so they spring open inside the stuffing and anchor the cap.
- Seat the cap flat against the ball so its rim sits evenly on all sides.
- Optional: for extra security, lift the cap slightly, add a small dot of clear glue around the gathered point, and press the cap back down. Let it dry for at least 1 hour.
- Thread the 6 in (15.2 cm) gold cord through the cap’s loop and knot the ends to form a hanger.
Final Blocking
Amigurumi blocking is about shape, not stretching.
- Before attaching the cap, roll the stuffed ball firmly between your palms for about 30 seconds to settle the fiberfill.
- Look at the ball from all sides. If you see flat spots, push a little stuffing toward them with a blunt tool through the stitches. A knitting needle tip or chopstick works well.
- If the stitches look uneven, hold the ball over steam from a kettle or steamer for 3–5 seconds. Keep your fingers clear, and do not touch the yarn with the iron.
- While it is still warm, roll the ball again between your palms to set the round shape.
- Let it cool and dry completely, about 15 minutes, before attaching the cap.
- Measure across the widest point. Check that it reads about 1.75 in (4.4 cm).
Final Quality-Control Checklist
- Magic ring is pulled fully closed with no hole at the bottom.
- Final round counts were correct: 6, 12, 18, 24, 30, 30 (x5), 24, 18, 12, 6.
- No hexagon corners are visible. Increases and decreases blend in.
- No stuffing shows between stitches.
- Ball is firm and evenly round, measuring 1.5–2 in (3.8–5.1 cm), ideally 1.75 in (4.4 cm).
- Gathered top is tight, and all tails are hidden inside.
- Cap sits flat and centered and does not pull out with a gentle tug.
- Color is consistent aqua throughout with no visible joins or knots.
- Hanging cord is knotted securely, and the ornament hangs straight.
Troubleshooting
The ball looks like an egg, not a sphere. You likely worked too many even rounds. Keep exactly five even rounds (R6–R10) and recount your stitches.
There are corners or flat facets. Your increases and decreases may be stacking directly on top of each other. Use the staggered repeats in R4, R5, R11, and R12 exactly as written.
Stuffing shows through. Your tension is too loose for the hook size. Go down a hook size, or wrap the yarn once more around your finger for tighter control.
There is a visible hole at the bottom. The magic ring wasn’t fully tightened. Weave the starting tail around the ring once more, pull it tight, and secure it inside.
The decreases look bumpy. Make sure you are using the invisible decrease through the front loops only, not a standard sc2tog.
Your stitch count is off. Count each round at the marker. Most errors come from skipping the stitch right after the marker or working twice into the marked stitch.
The cap wobbles or pulls out. Push the prongs deeper and closer to the center, or add a small dot of glue under the cap rim.
The ball came out too small or too large. Adjust your hook size by 0.25 mm and remake it. Do not add or remove rounds.
Care
Spot clean only with a damp cloth and mild soap. Air dry fully. Remove the metal cap first if the ornament needs a deeper clean, and store it away from crushing weight so it keeps its round shape.

Final Notes
The measurement chain is short and reliable. Six stitches per inch (per 2.5 cm) gives a disc about 1.5 in (3.8 cm) across after R5, and a 5 in (12.7 cm) circumference after the straight rounds. The stuffed sphere then finishes at about 1.75 in (4.4 cm). Symmetrical increases and decreases keep it round. The gathered 6-stitch top closes to a tiny point under the 0.6 in (1.5 cm) gold cap.
Optional: make several in the same aqua for a matching tree set. Each one is still worked exactly as written above.
Happy crocheting!