

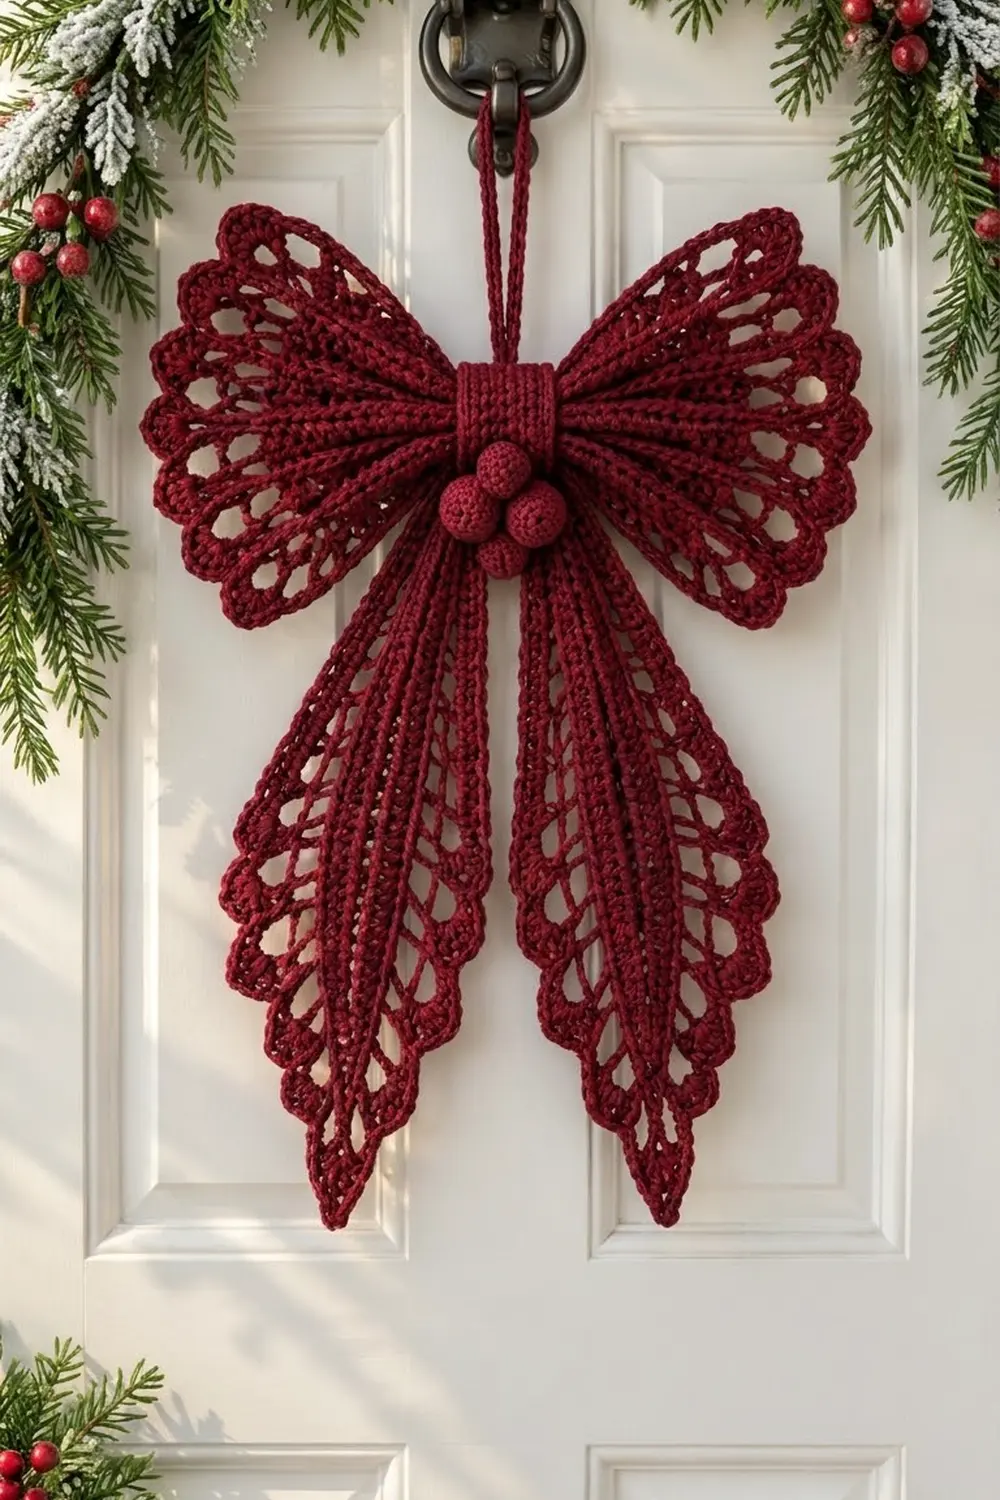
This lacy bow makes a statement on a front door. It has two fan-shaped loops, two long pointed tails, a ribbed center band, and a cluster of three round berries. Raised ribs radiate across every piece with open chain spaces between them, and a row of small arched loops gives each outer edge a soft scallop.
The sample uses a single deep cranberry burgundy. One color keeps the focus on the lace texture and suits a classic holiday look against white paint and evergreen garland. Deep red, forest green, or ivory would all work just as well.
This pattern uses US crochet terms. The finished bow measures about 12 in (30.5 cm) wide and 14 in (35.6 cm) tall, plus a hanging loop that stands 3 in (7.6 cm) above the top edge.
You’ll make nine small pieces: two fan wings worked in rows from a narrow point, two tails worked top to bottom, a center band, three stuffed berries, and a hanging cord. Each wing and tail gets a two-row scalloped border. Then you gather the pieces, wrap them with the band, and sew on the berries.
Finished Size and Construction
- Finished size: 12 in (30.5 cm) wide x 14 in (35.6 cm) tall, plus a 3 in (7.6 cm) loop
- Skill level: Intermediate
- Terminology: US crochet terms
- Yarn weight: Worsted (#4)
- Hook: 5.0 mm (H-8); 4.0 mm (G-6) for the berries
- Number of pieces: 9 (2 wings, 2 tails, 1 band, 3 berries, 1 cord)
- Layout: Wings run horizontally from the center, tails hang below in a V, berries sit on the band, and the cord rises above
- Piece size: Wing 4.8 in (12.2 cm) long; tail 10.8 in (27.4 cm) long x 5.6 in (14.2 cm) wide; band 2 x 4.5 in (5.1 x 11.4 cm); berry 1 in (2.5 cm)
- Size before border: Wing 4 in (10.2 cm) long; tail 10 in (25.4 cm) long x 4 in (10.2 cm) wide
- Border depth: 0.8 in (2.0 cm)
Materials
Yarn: Use a smooth worsted-weight cotton or cotton blend. Cotton shows the ribs and open spaces clearly and holds its shape on a door. Acrylic works too, but it needs firmer blocking. Avoid fuzzy or brushed yarns, because they hide the lace.
- Cranberry / burgundy: 100 g, about 190 m (208 yd)
This quantity includes a margin of about 20% for your gauge piece and tension differences. If your bow will hang on an outside door, a mercerized cotton holds its color better in sunlight.
Tools:
- 5.0 mm (H-8) and 4.0 mm (G-6) crochet hooks
- Tapestry needle
- A small amount of polyester fiberfill
- Stitch markers
- Rust-proof pins and a blocking board
- Spray bottle, plus optional fabric stiffener
- Scissors
Abbreviations (US Terms)
- ch – chain
- sl st – slip stitch
- sc – single crochet
- dc – double crochet
- sp – space
- st(s) – stitch(es)
- BLO – back loop only
- MR – magic ring
- inc – 2 sc in same st
- sc2tog / dec – single crochet 2 together
- RS – right side
Special stitch – Rib pair: 2 dc worked one into each of 2 consecutive dc of the row below. Stacked rib pairs form the raised spokes in every wing and tail.
Note: A beginning ch-3 counts as 1 dc. A beginning ch-1 does not count as a stitch.
Gauge and Checkpoints
Main gauge (5.0 mm hook): 13 dc and 7 rows = 4 in (10.2 cm)
Band gauge (5.0 mm hook): 16 sc and 16 rows in BLO = 4 in (10.2 cm)
Test one piece first. Make one wing as your gauge piece, because it uses every lace stitch. Check these measurements:
- Wing after Row 4: 2.3 in (5.8 cm) from point to top edge
- Wing after Row 7: 4 in (10.2 cm) long and about 7 in (17.8 cm) across the widest point
- Wing after border: 4.8 in (12.2 cm) long
- Tail after Row 13: 7.4 in (18.8 cm) long
- Tail after Row 19: 10 in (25.4 cm) long
Too big? Go down 0.5 mm in hook size. Too small? Go up 0.5 mm. Row height matters most here. If your widths match but your rows are short, pull up each dc a little taller. Don’t add or remove rows, because that changes the border counts.
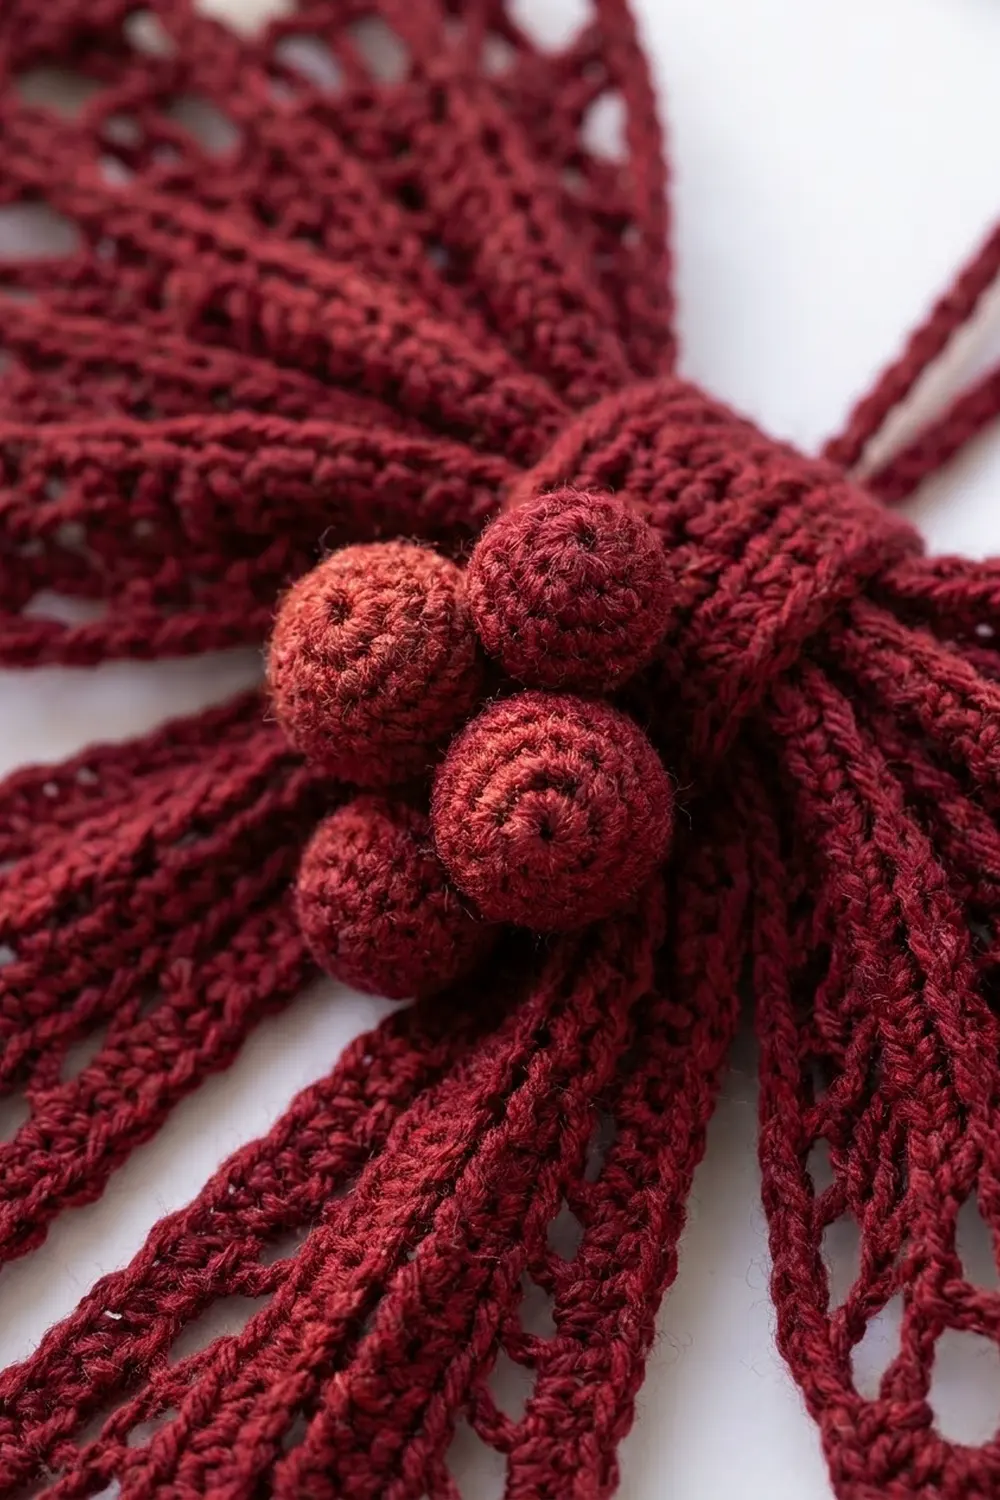
Wing (Make 2)
With the 5.0 mm hook, ch 4.
Row 1 (RS): 7 dc in 4th ch from hook (the skipped ch-3 counts as 1 dc), turn. (8 dc)
Row 2: Ch 3, dc in first st, 2 dc in each st across, turn. (16 dc)
Row 3: Ch 3, dc in next dc, ch 1, dc in next 2 dc; rep from * 7 times, turn. (16 dc in 8 rib pairs, 7 ch-1 sps)*
Row 4: Work as Row 3, but ch 2 between pairs. (16 dc, 7 ch-2 sps)
Row 5: Work as Row 3, but ch 3 between pairs. (16 dc, 7 ch-3 sps)
Row 6: Work as Row 3, but ch 4 between pairs. (16 dc, 7 ch-4 sps)
Row 7: Work as Row 3, but ch 5 between pairs. Don’t fasten off. (16 dc, 7 ch-5 sps)
From Row 2 on, the count stays at 16 dc. The fan widens only because the chain spaces get longer, so the 8 spokes stay straight and the outer edge curves into an arc.
Always work each rib pair into the 2 dc of the pair below, never into a chain space. If a spoke starts to drift sideways, you’ve probably worked into a chain by mistake. Continue straight into the Wing Border.
Tail (Make 2)
The tails are worked from the gathered top down to the point.
With the 5.0 mm hook, ch 4.
Row 1 (RS): 7 dc in 4th ch from hook, turn. (8 dc)
Row 2: Ch 3, dc in next dc, ch 1, dc in next 2 dc; rep from * 3 times, turn. (8 dc in 4 rib pairs, 3 ch-1 sps)*
Row 3: Work as Row 2, but ch 2 between pairs. (8 dc, 3 ch-2 sps)
Rows 4–13: Work as Row 2, but ch 3 between pairs. (8 dc, 3 ch-3 sps per row)
Row 14: Work as Row 2, but ch 2 between pairs. (8 dc, 3 ch-2 sps)
Row 15: Work as Row 2. (8 dc, 3 ch-1 sps)
Row 16: Ch 3, dc in each dc across, skipping the ch-1 sps, turn. (8 dc)
Row 17: Ch 1, sc2tog 4 times, turn. (4 sts)
Row 18: Ch 1, sc2tog twice, turn. (2 sts)
Row 19: Ch 1, sc2tog. Fasten off. (1 st, which forms the tip)
The widest section is about 4 in (10.2 cm) across. Rows 14 to 19 taper it to a single point. Place a marker in Row 1 so you can find the top easily when you start the border.
Center Band (Make 1)
With the 5.0 mm hook, ch 9.
Row 1: Sc in 2nd ch from hook and in each ch across, turn. (8 sc)
Rows 2–18: Ch 1, sc in BLO of each st across, turn. (8 sc)
Fasten off, leaving a 12 in (30.5 cm) tail for sewing. The band measures 2 x 4.5 in (5.1 x 11.4 cm). Working in back loops only makes the ridged texture across the wrap.
Berries (Make 3)
With the 4.0 mm hook:
Rnd 1: 6 sc in MR. (6 sc)
Rnd 2: Inc in each st around. (12 sc)
Rnd 3: Sc in next st, inc; rep from * 6 times. (18 sc)
Rnds 4–5: Sc in each st around. (18 sc)
Rnd 6: Sc in next st, dec; rep from * 6 times. (12 sc) Stuff firmly.
Rnd 7: Dec 6 times. (6 sc)
Fasten off, leaving an 8 in (20.3 cm) tail. Weave it through the front loops of the last round, pull it closed, and keep the tail for sewing. Each berry is about 1 in (2.5 cm) across.
Hanging Cord (Make 1)
With the 5.0 mm hook, ch 50. Sl st in the back bump of 2nd ch from hook and in each ch across. (49 sl st) Fasten off. The cord is about 10 in (25.4 cm) long.
Make All Pieces
Everything is worked in cranberry: 2 wings, 2 tails, 1 band, 3 berries, and 1 cord. Work the Border (below) on both wings and both tails before you join anything, then pin those pieces flat to dry. Assembly is much easier once the scallops are already open.
Layout grid (front view):
              [ Cord loop ]
[ Wing L  >][ Band + 3 Berries ][<  Wing R ]
           [ Tail L ]   [ Tail R ]
Each wing’s narrow point faces the center. The tail tops sit behind the band and splay out in a V.
Joining
Method: Gather each piece, then whipstitch the pieces together with matching yarn.
- Gather. Run yarn through the base of Row 1 on each wing and tail, pull it closed, and knot.
- Pleat. Pinch the first 1.5 in (3.8 cm) of each wing into an accordion fold and tack it with 2–3 stitches.
- Wings. Overlap the wing points by 0.5 in (1.3 cm) and whipstitch through both layers.
- Tails. Place the tail tops behind the join, 0.5 in (1.3 cm) apart and angled slightly outward. Whipstitch them in place.
- Cord. Fold the cord in half and sew both ends to the back so a 3 in (7.6 cm) loop stands above the wings.
- Band. Wrap the band vertically around the center with the ridges facing out. On the back, seam Row 1 to Row 18 stitch to stitch: 8 sts to 8 sts, one whipstitch per pair, with nothing added or skipped. This keeps the seam flat and stops the band from twisting.
- Berries. Sew the berries in a triangle (two on top, one centered below) over the lower half of the band.
Tension: Pull your stitches firm enough to close any gaps, but not so tight that the wings cup forward.
Size checkpoint: Lying flat, the bow should measure 12 in (30.5 cm) from wing tip to wing tip and 14 in (35.6 cm) from the top of the wings to the tail tips. If it’s narrower, loosen the pleats.
Border
Work this border on each wing and tail before joining (see Make All Pieces).
Border gauge: Work 1 sc per dc, 5 sc per ch-5 sp, 2 sc per dc row-end, and 1 sc per sc row-end. The loop row (sc, ch 5, skip 1 sc, sc in next sc) needs an odd starting count: 1 sc plus 2 sts per loop.
Wing Border (Row 7 edge only)
Row 1: Ch 1, turn. Sc in first 2 dc, 5 sc in next ch-5 sp, sc in next 2 dc; rep from * 7 times, turn.
Count: 16 sc in the dc + (7 x 5 = 35) sc in the sps = 51 sc.*
Row 2: Ch 1, sc in first sc, ch 5, skip 1 sc, sc in next sc; rep from * 25 times. Fasten off.
Count: 26 sc and 25 ch-5 loops.*
Why it works: 51 = 1 + (25 x 2), so the last loop ends exactly on the last stitch.
Tail Border (both long sides and the tip; the top edge stays unbordered)
Row 1: With the RS facing, join yarn at the Row 1 corner. Working in row-ends down the first side, work 2 sc in each of Rows 1–16 (32 sc), then 1 sc in each of Rows 17–18 (2 sc). Work 3 sc in the tip stitch. Up the second side, work 1 sc in each of Rows 18–17 (2 sc), then 2 sc in each of Rows 16–1 (32 sc). Turn.
Count: 34 per side + 3 at the tip + 34 = 71 sc.
Row 2: Ch 1, sc in first sc, ch 5, skip 1 sc, sc in next sc; rep from * 35 times. Fasten off.
Count: 36 sc and 35 ch-5 loops.*
Why it works: 71 = 1 + (35 x 2). Stitch 36, the middle tip sc, is the one that gets skipped. That puts one loop exactly over the point, with 17 loops on each side.
Final Blocking
- Weave in all remaining ends on the back of the bow.
- Lay the bow face up on a blocking board.
- Pin the wing spokes straight so they fan evenly from the center.
- Pin each ch-5 loop open into a round arch.
- Straighten the tails so their ribs run parallel, then pin each tip to a sharp point.
- Mist the bow evenly with water. For a door bow, brush on a light coat of diluted stiffener instead.
- Leave it to dry completely, at least 24 hours, before you unpin it.
Final Quality-Control Checklist
- Each wing has 8 spokes, 16 dc in Row 7, and 25 border loops
- Each tail has 4 spokes, ends in a single point, and has 35 border loops
- Band seam is flat, with 8 stitches matched to 8
- Berries are firm and sit in a tight triangle
- Bow measures 12 x 14 in (30.5 x 35.6 cm)
- Loop is secure and 3 in (7.6 cm) tall
- No ends show from the front
Troubleshooting
- Wing ruffles: Your chain spaces are too long or loose. Chain more tightly, or switch to the smaller hook for the chains only.
- Wing cups instead of fanning: Your chains are too tight. Loosen them, or block flatter.
- Wrong border count: Recount Row 1 before working the loops. It must be 51 on a wing and 71 on a tail.
- Tail tip is blunt: Pull the sc2tog stitches snug, and pin the tip while blocking.
- Tails are different lengths: Count the rows on both tails. Each needs exactly 19.
- Band twists: Re-seam it one stitch to one stitch.
- Berries look lumpy: Stuff with small tufts, and add a little more before Rnd 7.
Care
Spot clean with cool water and mild soap, then reshape and dry flat. Store it flat or lightly stuffed with tissue so the wings keep their shape.
Final Notes
The measurement chain is simple. The main gauge (13 dc and 7 rows = 4 in / 10.2 cm) gives you 4 in (10.2 cm) wings and 10 in (25.4 cm) tails. The 0.8 in (2.0 cm) border brings them to 4.8 in (12.2 cm) and 10.8 in (27.4 cm). After pleating and joining, you get a 12 x 14 in (30.5 x 35.6 cm) bow. Check each link as you go, and the finished bow will hang balanced and full.
Happy crocheting!