

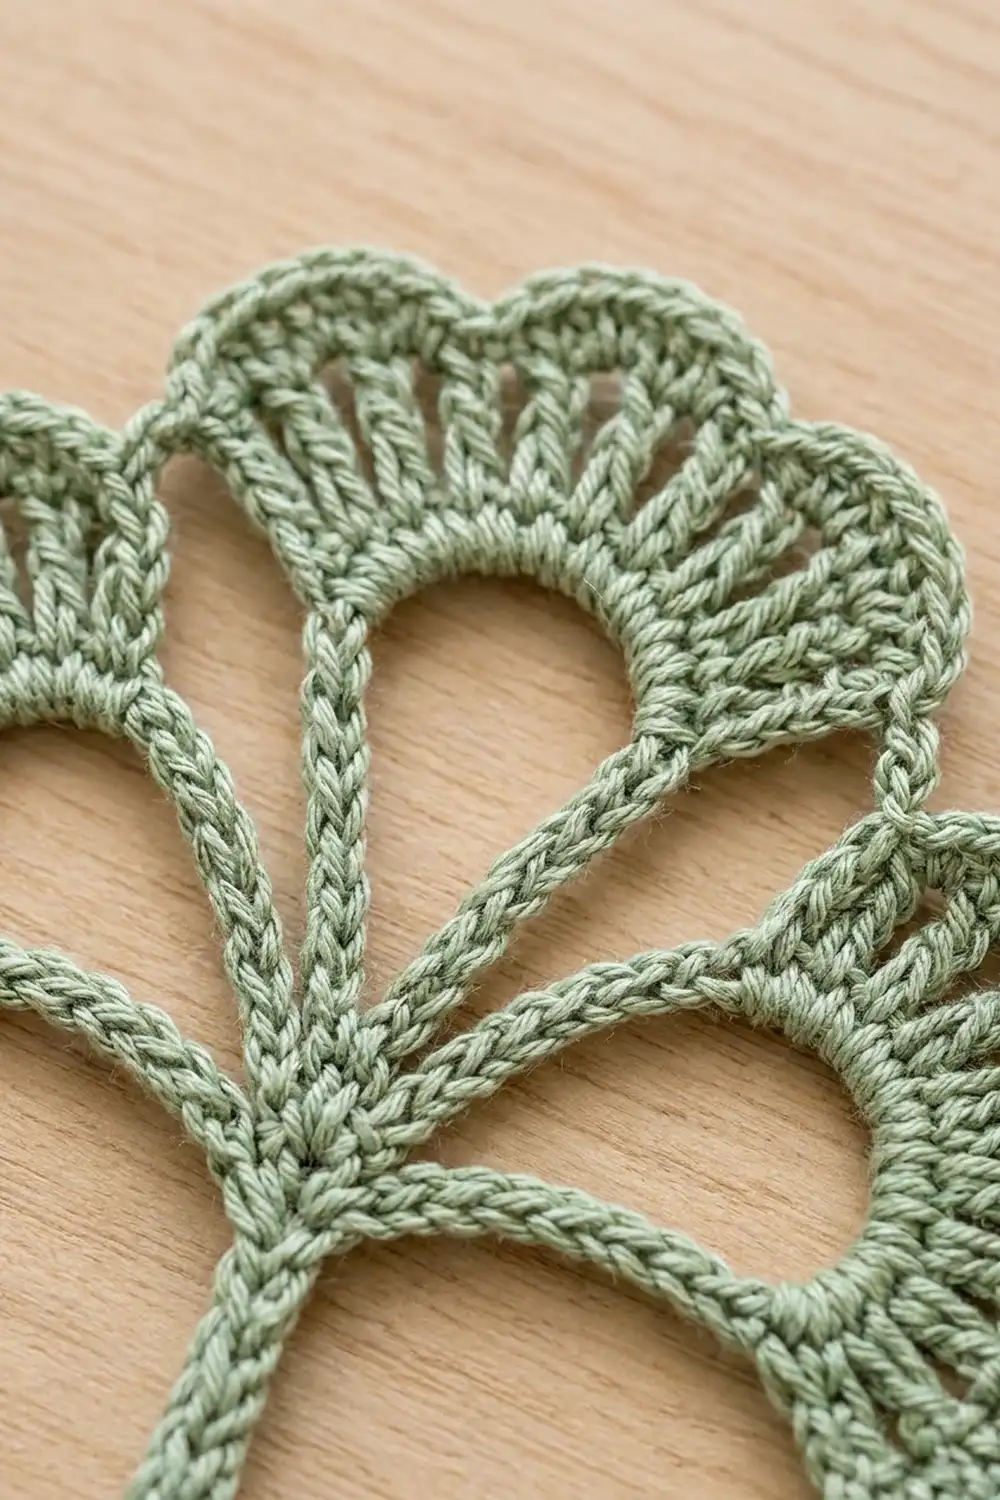
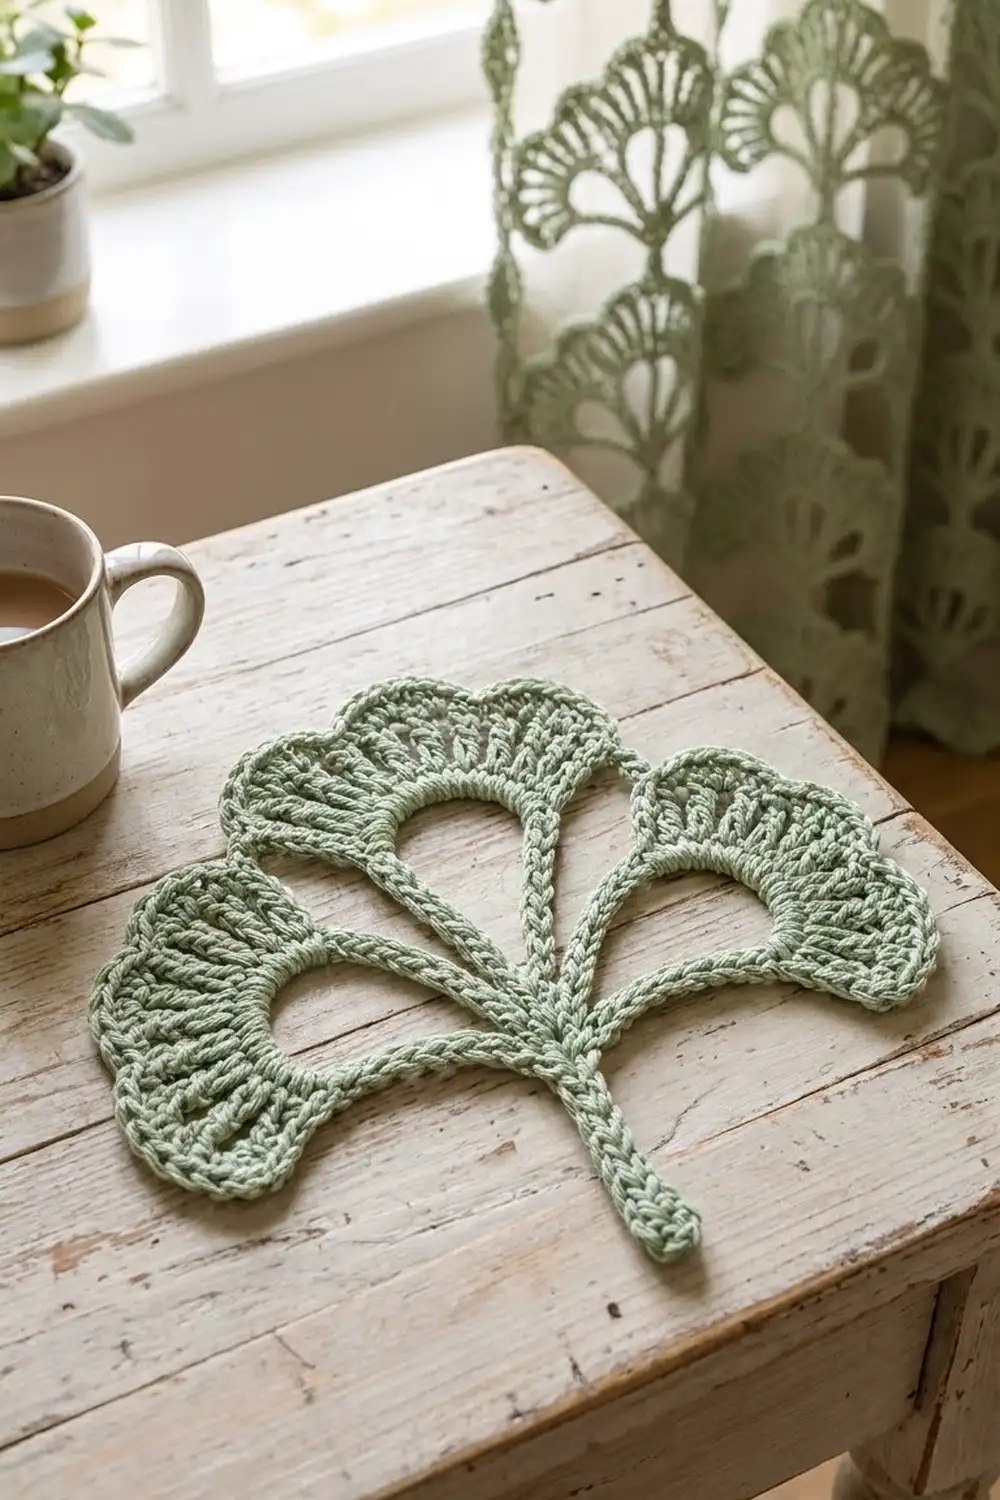
This openwork motif looks like a small ginkgo sprig. One corded stem splits into three branches, and each branch ends in a lacy fan. The center fan sits highest and is the largest, and the two side fans spread out to the left and right. Each fan has an open teardrop window, a ring of radiating spokes, a solid band and a scalloped outer edge.
The sample uses a single soft sage green cotton. With only one color, the texture does the work: the twisted look of the cords, the gaps between the spokes and the wavy edge. You can use it as an appliqué, a bookmark-style accent, a wall piece or a standalone lace motif.
The pattern uses US crochet terms. The finished motif measures 8 in wide × 8.5 in tall (20.3 cm × 21.6 cm) after blocking.
You make the whole motif in one piece and only cut the yarn when you reach the edging. First, chain a short stem. Next, chain out each branch and close a chain loop at its tip. Cover the loop with single crochet, work the fan rows over its upper part, then single crochet back down the branch so it becomes a firm cord. When all three fans are done, cord the stem and give it a rounded tip. Last, add a scalloped edge to each fan.
Finished Size and Construction
- Finished size: 8 in wide × 8.5 in tall (20.3 cm × 21.6 cm)
- Skill level: Intermediate
- Terminology: US crochet terms
- Yarn weight: DK (#3) cotton
- Hook: 3.5 mm (E-4)
- Number of pieces: 1 (a single motif)
- Layout: one stem, three branches, three fans (left, center, right)
- Piece size: 8 in × 8.5 in (20.3 cm × 21.6 cm)
- Size before border: 7 in × 8 in (17.8 cm × 20.3 cm)
- Border depth: 0.5 in (1.3 cm) of scallops along the outer edge of each fan
Materials
Yarn: Choose a smooth DK-weight cotton or cotton blend. Mercerized cotton gives the crispest spokes and the clearest cord texture. Avoid fuzzy or very splitty yarns, because they hide the openwork.
- Sage green: 15 g (about 38 m / 42 yd)
This amount includes a margin of about 20 percent for your gauge test and tails. One 50 g ball is more than enough.
Tools:
- 3.5 mm (E-4) crochet hook
- Tapestry needle
- Scissors
- 4 locking stitch markers
- Rust-proof pins
- Blocking mat or folded towel
- Spray bottle with water
- Ruler or tape measure
Abbreviations (US Terms)
- ch – chain
- sl st – slip stitch
- sc – single crochet
- dc – double crochet
- st(s) – stitch(es)
- sp – space
- sk – skip
- rep – repeat
- beg – beginning
Special stitches and techniques
- Working over the loop: Don’t work into the individual chains. Put your hook through the center of the chain loop and work each sc around the whole chain. This lets you fit more stitches than there are chains, and it gives the window a thick, rounded edge.
- Shell: 7 dc in the same stitch.
- Standing sc: Put a slip knot on your hook. Insert the hook into the stitch, yarn over and pull up a loop, then yarn over and draw through both loops.
- Branch point (BP): The last stem chain, where all three branches start. Mark it.
Gauge and Checkpoints
Gauge: 20 sc and 22 rows = 4 in (10.2 cm) in sc. For chains, 5 ch = 1 in (2.5 cm). One row of dc is about 0.5 in (1.3 cm) tall.
Test one piece first. Use the stem plus the left branch and fan as your swatch. Stop and measure before you start the center branch.
Checkpoints:
- Stem chain (10 ch): 2 in (5.1 cm).
- Side branch chain (16 ch): about 3.25 in (8.3 cm).
- Side loop after Rnd 1: about 2.5 in (6.4 cm) from base to top, measured flat.
- Side fan after Row 3: about 3 in (7.6 cm) across at its widest point. It reaches about 1 in (2.5 cm) past Rnd 1.
- Center loop after Rnd 1: about 3 in (7.6 cm) from base to top.
- Center fan after Row 3: about 3.75 in (9.5 cm) across.
- Whole motif before border: 7 in × 8 in (17.8 cm × 20.3 cm).
If your piece is too big: Switch to a 3.25 mm hook. Also check whether your chains are loose. Firm chains and relaxed sc are what you want.
If your piece is too small: Switch to a 3.75 mm hook. If only the loops are small and the spokes look crowded, chain more loosely. Don’t change the stitch counts, because the edging math depends on them.
Stem
Ch 10. This is the stem, about 2 in (5.1 cm) long. Keep the last loop on your hook. That last chain is the branch point (BP), so put a marker in it.
Leave the stem uncorded for now. You’ll finish it at the very end.
Left Branch and Fan
Branch: From the BP, ch 16.
Loop: Ch 36, then sl st in the first of those 36 ch. This closes a loop of 36 ch at the tip of the branch.
Rnd 1 (loop edge): Ch 1. Working over the loop, make 45 sc around it. Sl st in the first sc. (45 sc)
Number these sc in the order you made them, sc 1 to sc 45. Sc 1–10 and sc 36–45 form the narrow lower part of the teardrop. Sc 11–35 hold the fan.
Move into place: Sl st in each of the next 10 sc. You are now in sc 11.
Row 2 (spokes): Ch 4 (counts as dc + ch 1). Dc in next sc, ch 1; rep from * 22 more times. Dc in next sc (sc 35). Turn. (25 dc, 24 ch-1 sp)
Row 3 (solid band): Ch 1, sc in first dc. Sc in next ch-1 sp, sc in next dc; rep from * 23 more times. The last sc goes in the 3rd ch of the beg ch-4. Do not turn. (49 sc = 25 worked into dc + 24 added in spaces)
Row 3 is a conversion row. It works 1 sc into each of the 25 dc and adds 1 sc in each of the 24 spaces, so 25 + 24 = 49.
Return to the base: Sl st once into the row-end of Row 3. Make 2 sl st down the beg ch-4 of Row 2, which brings you back to sc 11. Working backward, sl st in each of sc 10 through sc 1, then sl st in the joining sl st at the base of the loop. (14 sl st)
Cord the branch: Work back toward the stem with 1 sc in the back bump of each of the 16 branch ch. Sl st in the BP. (16 sc)
Checkpoint: The fan measures about 3 in (7.6 cm) across, and the branch feels like a firm, slightly twisted cord.
Center Branch and Fan
Branch: From the BP, ch 10.
Loop: Ch 44, then sl st in the first of those 44 ch.
Rnd 1: Ch 1. Working over the loop, make 55 sc around it. Sl st in the first sc. (55 sc)
Sc 1–11 and sc 45–55 form the lower teardrop (22 sc). Sc 12–44 hold the fan (33 sc).
Move into place: Sl st in each of the next 11 sc. You are now in sc 12.
Row 2: Ch 4 (counts as dc + ch 1). Dc in next sc, ch 1; rep from * 30 more times. Dc in next sc (sc 44). Turn. (33 dc, 32 ch-1 sp)
Row 3: Ch 1, sc in first dc. Sc in next ch-1 sp, sc in next dc; rep from * 31 more times. The last sc goes in the 3rd ch of the beg ch-4. Do not turn. (65 sc = 33 worked into dc + 32 added in spaces)
Return to the base: Sl st once into the row-end of Row 3, then make 2 sl st down the beg ch-4. Working backward, sl st in each of sc 11 through sc 1, then sl st in the joining sl st. (15 sl st)
Cord the branch: Sc in the back bump of each of the 10 branch ch. Sl st in the BP. (10 sc)
Checkpoint: The center fan measures about 3.75 in (9.5 cm) across, and its top sits clearly above the side fans.
Right Branch and Fan
Starting at the BP, repeat the whole Left Branch and Fan section. Check your counts as you go:
- 16 ch for the branch
- 36 ch for the loop
- 45 sc in Rnd 1
- 25 dc in Row 2
- 49 sc in Row 3
- 14 sl st to return to the base
- 16 sc to cord the branch
Finish with a sl st in the BP.
Stem Cord and Tip
Sc in the back bump of each stem ch from ch 9 down to ch 2. In ch 1 (the slip-knot chain), work 4 sc to make the rounded knob at the tip. Sl st in the first of these 4 sc and fasten off. (8 + 4 = 12 sc)
Checkpoint before border: Lay the motif flat with the branches spread out. It should measure 7 in × 8 in (17.8 cm × 20.3 cm).
Border (Scalloped Fan Edge)
The border goes along the outer edge (Row 3) of each fan, one fan at a time. The stem and branches don’t get a border.
Border gauge: Each 8-stitch repeat (sk 3, shell, sk 3, sc) covers about 1 in (2.5 cm) along the edge and stands 0.5 in (1.3 cm) tall.
Side fans (left and right), Row 4: Join with a standing sc in the first sc of Row 3. Sk 3 sc, shell in next sc, sk 3 sc, sc in next sc; rep from * 5 more times. The last sc lands in the last sc of Row 3. Fasten off. (6 shells, 7 sc per side fan)
Center fan, Row 4: Join with a standing sc in the first sc of Row 3. Sk 3 sc, shell in next sc, sk 3 sc, sc in next sc; rep from * 7 more times. Fasten off. (8 shells, 9 sc)
Why the math works: Each repeat uses exactly 8 stitches of Row 3. On a side fan, 1 + (6 × 8) = 49, which matches its 49 sc. On the center fan, 1 + (8 × 8) = 65, which matches its 65 sc. Both ends finish on an sc, so the scallops are evenly spaced and each end has a flat stitch where the fan meets its loop.
Weave all tails into the cords, where they won’t show.
Final Blocking
- Soak the motif in cool water for 10 minutes. Press the water out in a towel; don’t wring it.
- Lay it face up on the mat and pin the stem straight down.
- Pin the center branch straight up from the BP. Pin each side branch about 45 degrees out from the center branch.
- Open each teardrop window and pin its inner edge into a smooth curve.
- Spread the spokes into an even fan, with all the gaps the same size.
- Pin the tip of each shell to make clean, rounded scallops.
- Check the size: 8 in wide × 8.5 in tall (20.3 cm × 21.6 cm).
- Let it dry completely before you remove the pins.
Final Quality-Control Checklist
- Stem has 12 sc and a rounded tip
- Each side branch has 16 sc, and the center branch has 10 sc
- Side loops have 45 sc, and the center loop has 55 sc
- Each side fan has 25 dc and 49 sc, and the center fan has 33 dc and 65 sc
- Each side fan has 6 shells, and the center fan has 8 shells
- Spoke gaps are even, and no spokes are twisted
- Finished size is 8 in × 8.5 in (20.3 cm × 21.6 cm)
- All tails are woven into the cords
Troubleshooting
The loop twisted when I closed it. Check that the chain isn’t twisted before you make the joining sl st. If it is, pull it out and join it again.
Rnd 1 ruffles. Your sc are too crowded or too tight. Push the stitches together along the chain. If it still ruffles, chain the loop a little more loosely next time.
The fan cups instead of lying flat. Your ch-1 spaces are too tight. Pull each ch-1 up a little taller, or work Row 2 only with a hook half a size larger.
The scallops come out uneven. Recount Row 3. It must have exactly 49 sc on a side fan or 65 sc on the center fan.
The cords look wavy. Your sc are tighter than your chains. Chain a little more firmly or sc a little more loosely.
A fan sits off-center. Recount the sl st you made to move into place. Side fans start at sc 11, and the center fan starts at sc 12.
Care
Hand wash in cool water with a mild soap and dry flat. If the scallops relax over time, reshape and pin them again.
Final Notes
Here is the measurement chain from stem to edge:
- 10 stem chains give 2 in (5.1 cm), and 16 branch chains give about 3.25 in (8.3 cm).
- Side loops measure 2.5 in (6.4 cm), and the center loop measures 3 in (7.6 cm).
- Side fans span 3 in (7.6 cm), and the center fan spans 3.75 in (9.5 cm).
- Before the border, the motif is 7 in × 8 in (17.8 cm × 20.3 cm).
- The 0.5 in (1.3 cm) scallops bring it to 8 in × 8.5 in (20.3 cm × 21.6 cm).
Each fan’s Row 3 count (49 or 65) divides evenly into the 8-stitch scallop repeat, so the edge comes out even every time.
Happy crocheting!