

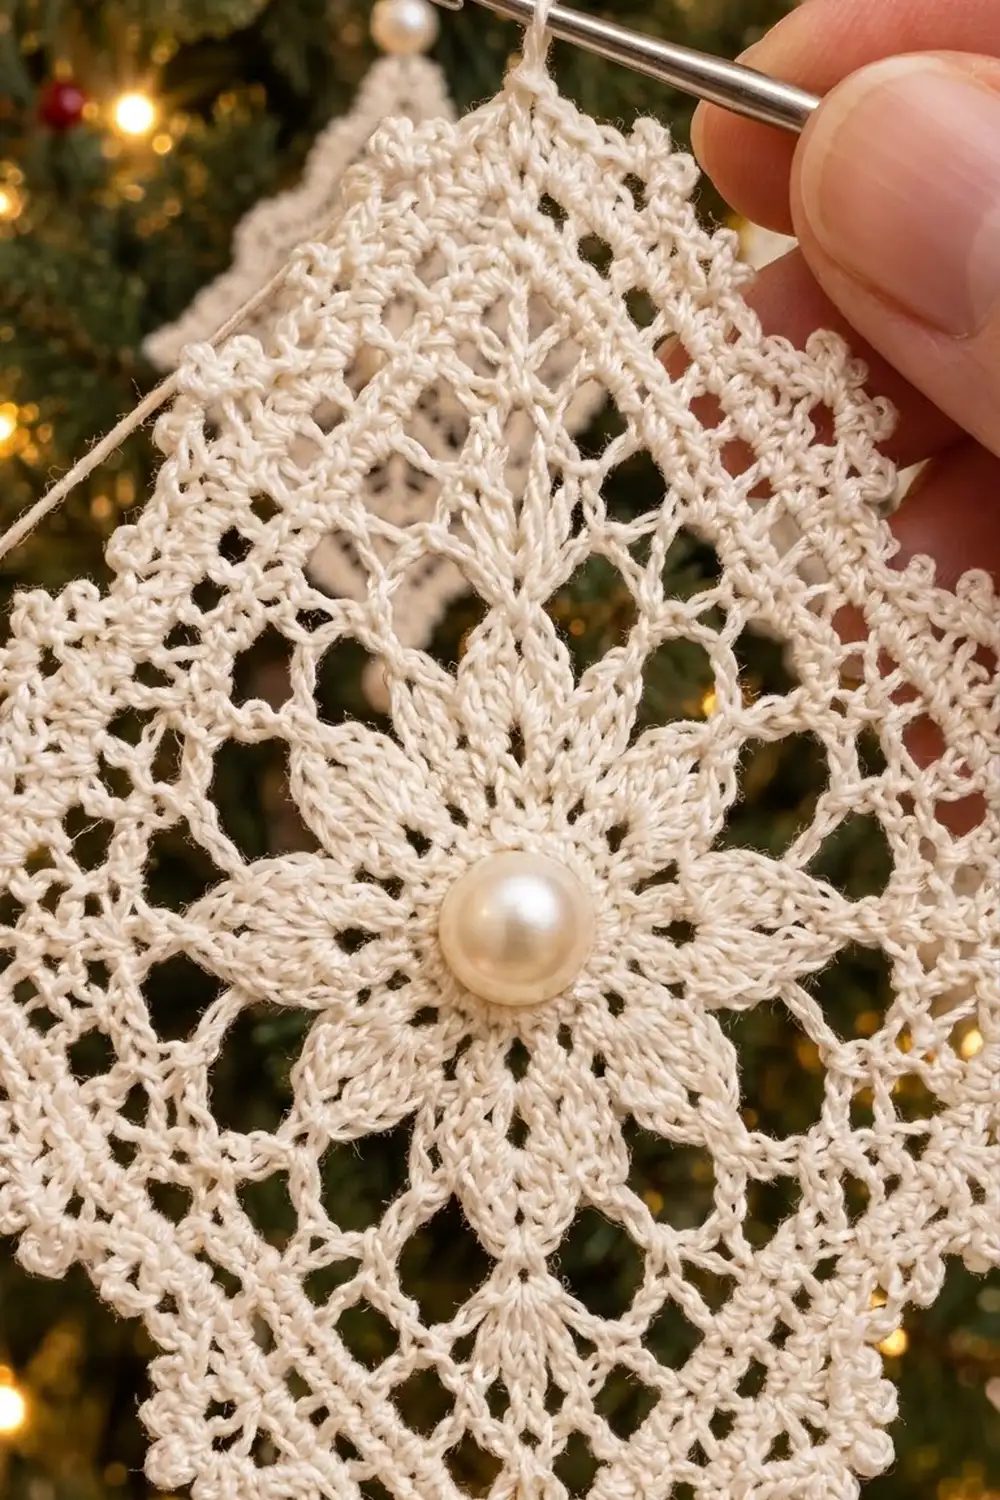
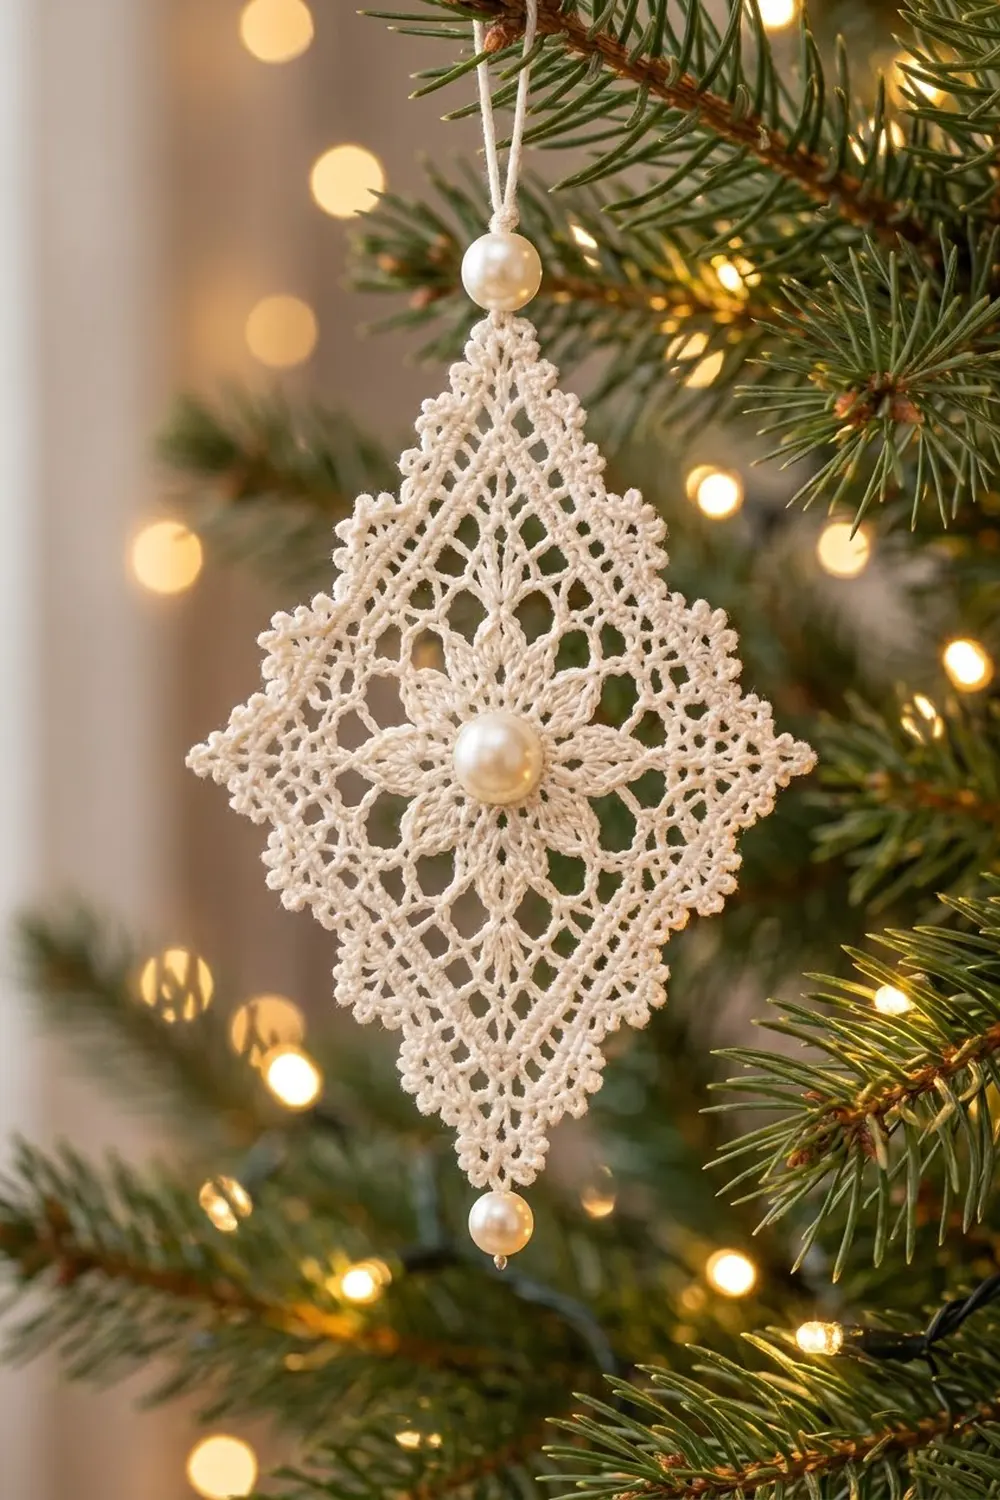
The Pearl Frost Diamond is a small lace Christmas ornament in a tall diamond shape, worked in fine ivory cotton thread. At its center is an eight-petal flower with a pearl bead. Around the flower is a band of open mesh, then a solid band, then a picot edge.
The whole ornament is one color, a soft ivory or cream, so the pearls and the lace texture provide the decoration. One pearl on the hanging cord sits just above the top point, and a second pearl dangles from the bottom point. The look is vintage and bridal white, and the ornament works on a tree, a gift tag, or in a window.
This pattern uses US crochet terms. After blocking, the ornament measures 2.75 in (7.0 cm) wide and 4 in (10.2 cm) tall. That does not include the hanging loop or the bottom pearl.
The ornament is one piece, worked in joined rounds from the center out. Rounds 1–3 make the flower. Round 4 sets up the diamond, with long chain corners at the top and bottom and short chain corners at the sides. Rounds 5–7 build a solid band, a mesh band, and a second solid band. Round 8 adds the picot border. Blocking with starch sets the final shape.
Finished Size and Construction
- Finished size: 2.75 in (7.0 cm) wide x 4 in (10.2 cm) tall
- Skill level: Intermediate (thread crochet)
- Terminology: US crochet terms
- Yarn weight: Size 10 cotton crochet thread (lace weight, category 0)
- Hook: 1.75 mm (US steel 4)
- Number of pieces: 1
- Layout: Single diamond motif, hung from its top point
- Piece size: 2.75 in x 4 in (7.0 cm x 10.2 cm)
- Size before border (after Round 7): 2.5 in x 3.75 in (6.4 cm x 9.5 cm)
- Border depth: 1/8 in (0.3 cm) on each edge
Materials
Thread: Use a mercerized size 10 cotton thread. It has a slight sheen, shows each stitch clearly, and holds starch well. Soft matte cotton looks fuzzier, and the picots won’t stand up as well.
- Ivory (only color): about 5 g, roughly 20 m (21.9 yd) per ornament
These amounts include a margin for tails, a test swatch, and the hanging loop. One standard ball of size 10 thread makes many ornaments.
Beads and tools:
- 1 ivory pearl bead, 8 mm, for the center
- 2 ivory pearl beads, 6 mm, for the hanging cord and the bottom dangle
- 1.75 mm steel crochet hook
- Fine tapestry needle or beading needle that fits through the beads
- Small sharp scissors
- Fabric stiffener or spray starch
- Foam blocking board, rustproof pins, and a ruler
Abbreviations (US Terms)
- ch – chain
- sl st – slip stitch
- sc – single crochet
- hdc – half double crochet
- dc – double crochet
- tr – treble crochet
- sp(s) – space(s)
- st(s) – stitch(es)
- Rnd – round
Special stitch – picot: Ch 3, sl st in the 3rd ch from hook. A picot does not count as a stitch.
Magic ring: Wrap the thread into an adjustable loop, work the first round into it, then pull the tail to close the center.
Gauge and Checkpoints
Gauge: 13 dc = 1 in (2.5 cm), measured along a straight side of Round 7. Gauge matters here because small differences add up over eight rounds.
Make one test ornament through Round 7 before you start a batch. Pin it flat without stretching, then measure.
- After Rnd 3: the flower is 1.25 in (3.2 cm) across, tip to tip.
- After Rnd 5: 1.75 in (4.4 cm) wide x 2.5 in (6.4 cm) tall.
- After Rnd 7: 2.5 in (6.4 cm) wide x 3.75 in (9.5 cm) tall.
- After Rnd 8 and blocking: 2.75 in (7.0 cm) wide x 4 in (10.2 cm) tall.
Being within 1/8 in (0.3 cm) either way is fine.
If your piece is too big: switch to a 1.5 mm hook, or tighten your chains, since they usually grow the most.
If your piece is too small: switch to a 2.0 mm hook. Also make sure you pull up each dc to its full height.
If it ruffles: your chain spaces are too long for your dc. Work the chains slightly tighter.
Pattern
For Rounds 5–8, stitch counts are given per side. A side runs from one corner chain space to the next. Corner chain spaces are listed separately. The dc worked into a corner space count toward the sides on either side of that corner.
The four corners are called top, right, bottom, and left. Top and bottom are the long, pointed corners. Right and left are the short, wide corners.
Center Flower
Rnd 1: Make a magic ring. Ch 3 (counts as dc), 15 dc in ring, sl st to top of beginning ch-3. Pull the tail snug. (16 dc)
Rnd 2: Ch 1, sc in same st, ch 5, skip next dc, sc in next dc; repeat from * 6 more times, ch 5, skip last dc, sl st to first sc. (8 sc, 8 ch-5 sps)
Rnd 3: Sl st into first ch-5 sp. In each ch-5 sp work (sc, hdc, 2 dc, tr, 2 dc, hdc, sc). Sl st to first sc. (8 petals of 9 sts each, 72 sts total)
Each petal comes to a point at its tr. Choose one petal to be the top petal. Going clockwise, the petals are top, top-right, right, bottom-right, bottom, bottom-left, left, and top-left.
Diamond Setup
Rnd 4: Sl st in next hdc, next 2 dc, and the tr of the top petal (4 sl sts). Ch 1.
- (Sc, ch 7, sc) in same tr (top corner)
- Ch 5, sc in tr of next petal, ch 5
- (Sc, ch 3, sc) in tr of next petal (right corner)
- Ch 5, sc in tr of next petal, ch 5
- (Sc, ch 7, sc) in tr of next petal (bottom corner)
- Ch 5, sc in tr of next petal, ch 5
- (Sc, ch 3, sc) in tr of next petal (left corner)
- Ch 5, sc in tr of next petal, ch 5
- Sl st to first sc.
(12 sc, 8 ch-5 sps, 2 ch-7 corner sps, 2 ch-3 corner sps)
The long ch-7 loops at the top and bottom start the pointed shape. The short ch-3 loops at the sides keep those corners wide.
Body Rounds
Rnd 5 (solid band): Sl st into top ch-7 sp. Ch 3 (counts as dc), 3 dc in same sp, ch 3, 4 dc in same sp.
- Side sequence: dc in next sc, 5 dc in ch-5 sp, dc in next sc, 5 dc in ch-5 sp, dc in next sc
- (2 dc, ch 2, 2 dc) in right corner ch-3 sp
- Work the side sequence
- (4 dc, ch 3, 4 dc) in bottom ch-7 sp
- Work the side sequence
- (2 dc, ch 2, 2 dc) in left corner ch-3 sp
- Work the side sequence, then sl st to top of beginning ch-3.
Each side has 4 (or 2) corner dc + 1 + 5 + 1 + 5 + 1 + 2 (or 4) corner dc. (19 dc per side, 76 dc total, plus 2 ch-3 corner sps at top and bottom and 2 ch-2 corner sps at the sides)
Total check: 16 dc in the top and bottom corners + 8 dc in the side corners + 12 dc in the sc + 40 dc in the ch-5 sps = 76.
Rnd 6 (mesh band): Sl st in next 3 dc and into top ch-3 sp. Ch 8 (counts as dc + ch 5), dc in same sp.
- Side sequence: ch 1, dc in first dc of side, (ch 2, skip 2 dc, dc in next dc) 6 times, ch 1
- (Dc, ch 3, dc) in right corner ch-2 sp
- Work the side sequence
- (Dc, ch 5, dc) in bottom ch-3 sp
- Work the side sequence
- (Dc, ch 3, dc) in left corner ch-2 sp
- Work the side sequence, then sl st to 3rd ch of beginning ch-8.
Each side uses all 19 dc from Round 5: 1 + (6 x 3) = 19. (9 dc per side, counting the corner dc at each end; 6 ch-2 sps and 2 ch-1 sps per side; 36 dc total; plus 2 ch-5 and 2 ch-3 corner sps)
This round makes the open lattice between the flower and the outer edge.
Rnd 7 (solid band): Sl st into top ch-5 sp. Ch 3 (counts as dc), 3 dc in same sp, ch 3, 4 dc in same sp.
- Side sequence: dc in next dc, dc in ch-1 sp, dc in next dc, (2 dc in ch-2 sp, dc in next dc) 6 times, dc in ch-1 sp, dc in next dc
- (2 dc, ch 2, 2 dc) in right corner ch-3 sp
- Work the side sequence
- (4 dc, ch 3, 4 dc) in bottom ch-5 sp
- Work the side sequence
- (2 dc, ch 2, 2 dc) in left corner ch-3 sp
- Work the side sequence, then sl st to top of beginning ch-3.
Each side has 4 (or 2) corner dc + 1 + 1 + 1 + 18 + 1 + 1 + 2 (or 4) corner dc. (29 dc per side, 116 dc total, plus 2 ch-3 corner sps at top and bottom and 2 ch-2 corner sps at the sides)
Total check: 36 dc in the dc + 48 dc in the ch-2 sps + 8 dc in the ch-1 sps + 16 dc in the top and bottom corners + 8 dc in the side corners = 116 = 4 x 29.
Checkpoint: Pin flat and measure. It should be 2.5 in (6.4 cm) wide x 3.75 in (9.5 cm) tall.
Border
Border gauge: One sc in each dc keeps the gauge at 13 sts per 1 in (2.5 cm), so the edge lies flat without pulling in.
Rnd 8 (picot edge): Sl st in next 3 dc and into top ch-3 sp. Ch 1, (sc, ch 5, sc) in same sp.
- Side sequence: sc in first dc of side, picot, (sc in next 3 dc, picot) 9 times, sc in last dc of side
- (Sc, picot, sc) in right corner ch-2 sp
- Work the side sequence
- (Sc, ch 5, sc) in bottom ch-3 sp
- Work the side sequence
- (Sc, picot, sc) in left corner ch-2 sp
- Work the side sequence, then sl st to first sc. Fasten off.
(29 sc and 10 picots per side; 116 side sc + 8 corner sc = 124 sc total; 40 side picots + 2 corner picots = 42 picots; 2 ch-5 corner loops)
Why the math works: Each side has 29 dc, and the border uses 1 + (9 x 3) + 1 = 29, so every dc gets exactly one sc. Each side starts and ends with a single sc, so both ends match and there is a picot near each corner. The top ch-5 loop holds the hanging cord, and the bottom ch-5 loop holds the pearl dangle.
Pearls and Hanging Loop
- Center pearl: Using a 12 in (30.5 cm) length of thread, sew the 8 mm pearl over the center ring. Pass through it twice and secure the thread on the back.
- Bottom dangle: Cut 6 in (15.2 cm) of thread. Thread on one 6 mm pearl, pass both ends through the bottom ch-5 loop, and knot so the pearl hangs about 1/4 in (0.6 cm) below the point.
- Hanging loop: Cut 8 in (20.3 cm) of thread and fold it in half. Pull the fold through the top ch-5 loop, then pass both ends through it and pull snug. Pass both ends through the second 6 mm pearl so it rests just above the point. Knot the ends together to make a loop about 3 in (7.6 cm) long.
Weave in all ends along the back of the solid bands.
Final Blocking
- Mix the fabric stiffener or heavy starch following the label.
- Soak the ornament, then press out the extra liquid in a towel. Wipe the pearls clean afterward.
- On the board, mark a diamond 2.75 in (7.0 cm) wide and 4 in (10.2 cm) tall.
- Pin the top and bottom points first, then the two side corners.
- Pin each picot outward along the straight sides.
- Open the mesh band with the tip of a pin so every space is square.
- Shape the flower petals so they point evenly outward.
- Let it dry completely, at least 12 hours, before you unpin it.
Final Quality-Control Checklist
- Width is 2.75 in (7.0 cm) and height is 4 in (10.2 cm), within 1/8 in (0.3 cm).
- The top and bottom points are sharp, and the side corners are wide and even.
- All 8 petals are the same size and line up with the corners and the middle of each side.
- Each side has 29 sc and 10 picots.
- The mesh band has 8 open spaces per side (6 ch-2 and 2 ch-1).
- The center pearl sits flat without wobbling.
- The ornament hangs straight from its top loop.
- No ends show on the front.
Troubleshooting
The diamond looks square instead of tall: Your ch-7 loops in Round 4 may be too tight. Make them looser, and pin the points farther apart when you block.
The center cups or puckers: Round 1 is too tight for 16 dc. Work Rounds 1–2 with a 2.0 mm hook, then switch back.
The sides curve inward: Your border sc are too tight. Go up one hook size for Round 8 only.
The edge is wavy: Check that every side has 29 dc after Round 7. One extra stitch on a side will make it ripple.
The picots lean over: Starch again and pin each picot point outward.
The mesh spaces close up: Pull each dc up to full height and work the ch-2 spaces loosely.
Care
Hand wash in cool water with mild soap and press dry in a towel. If it loses its shape, starch and pin it again. Store it flat in tissue paper so the points stay sharp.
Final Notes
Here is the measurement chain. The flower measures 1.25 in (3.2 cm) across after Round 3. Round 5 brings the piece to 1.75 in x 2.5 in (4.4 cm x 6.4 cm). Round 7 reaches 2.5 in x 3.75 in (6.4 cm x 9.5 cm), with 29 dc per side. The picot border adds 1/8 in (0.3 cm) on each edge, and blocking finishes the ornament at 2.75 in x 4 in (7.0 cm x 10.2 cm).
If your test ornament matches each checkpoint, you can make the rest with confidence. Once you know the rounds, each one takes about an hour.
Happy crocheting!