

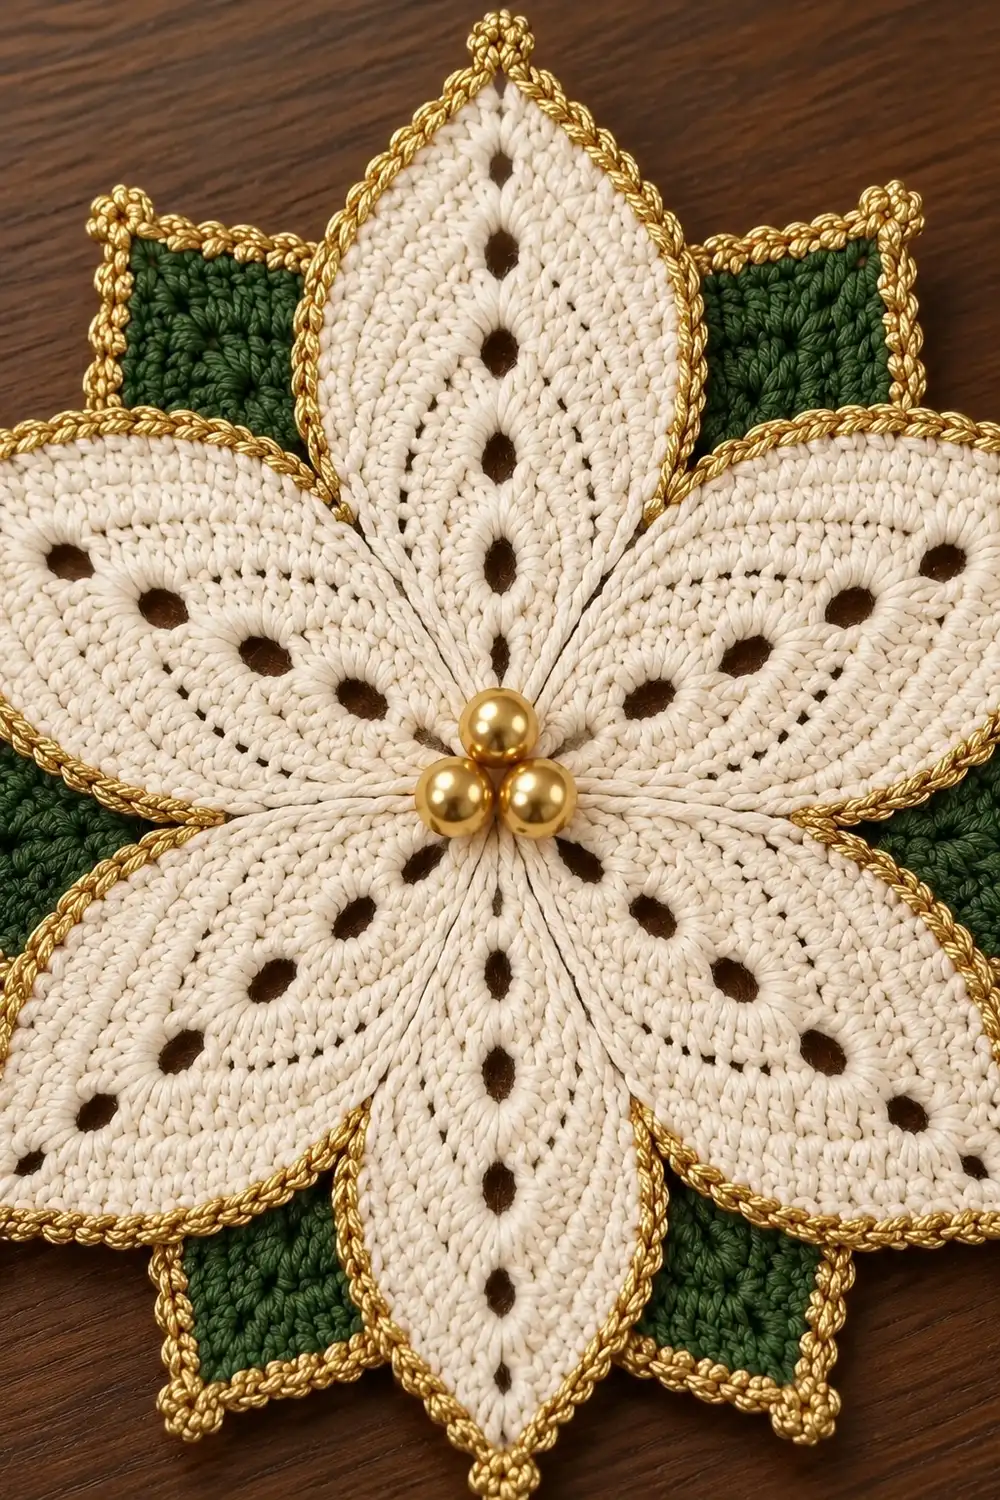
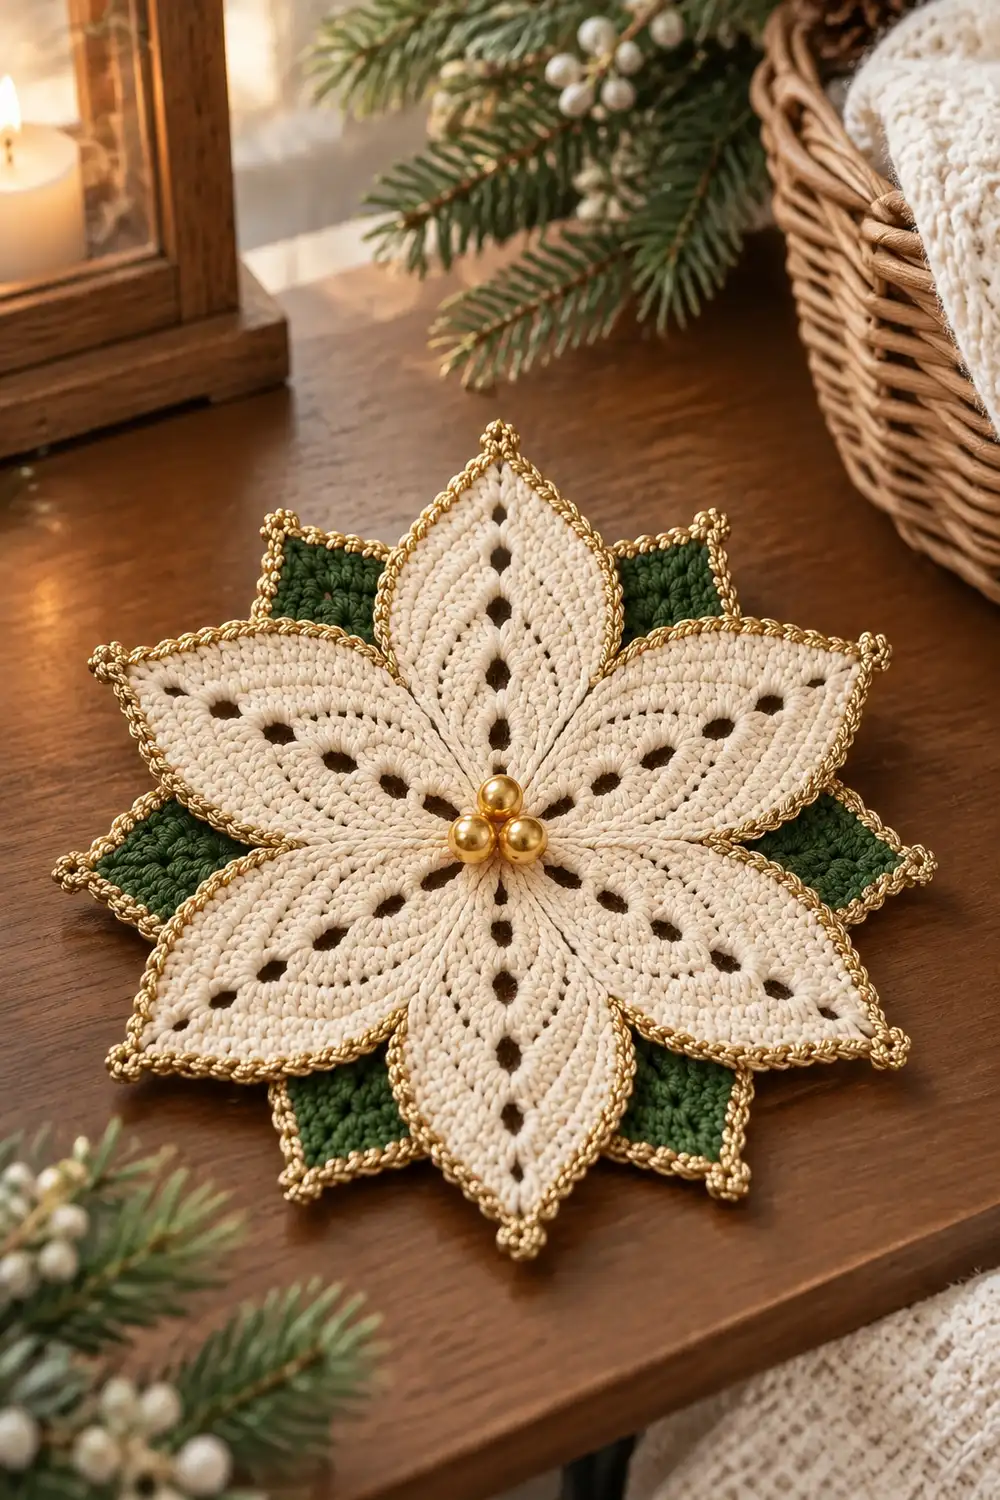
This star-shaped flower motif layers five cream petals over five small forest green square petals. A shiny gold trim outlines every edge, and a cluster of three gold beads finishes the center. It makes a lovely holiday ornament, gift-tag topper, or coaster accent.
Each cream petal has an elongated leaf shape, with a column of oval eyelets running down its center. The stitching is dense and even, so the eyelets stand out clearly. The gold edge has small scallops along the cream petals and picot points at every petal tip, including the green tips between them.
The pattern uses US crochet terms. The finished motif measures about 4.5 in (11.4 cm) across the petal tips, which falls within the 4–5 in (10.2–12.7 cm) range of the original piece.
The motif is worked as one piece. You crochet a small cream center first. Then you work the green square petals into the back loops of the center, so they sit behind. Next you work the cream petals in rows into the front loops, and finish with the gold trim and beads.
Finished Size and Construction
- Finished size: about 4.5 in (11.4 cm) across the tips
- Skill level: Intermediate
- Terminology: US
- Yarn weight: Super Fine (#1) cotton, fingering weight, plus a fingering-weight metallic
- Hook: 2.25 mm (B-1)
- Number of pieces: 1 (single motif)
- Layout: 5 cream petals in front, 5 green petals behind and between them, all worked from one center
- Center size: 0.9 in (2.3 cm) across
- Cream petal: about 1.5 in (3.8 cm) long and 1.4 in (3.6 cm) wide
- Green petal: about 1 in (2.5 cm) long and 1.1 in (2.8 cm) wide
- Size before gold border: about 4 in (10.2 cm) across the tips
- Border depth: about 0.25 in (0.6 cm) on the cream petals
Materials
Choose a smooth mercerized cotton so the eyelets stay crisp and the petals block flat. For the gold, use a soft metallic yarn or metallic thread of similar thickness. A scratchy metallic will fight you on the scallops.
- Cream (Color A): 5 g / 20 m
- Forest green (Color B): 3 g / 12 m
- Gold metallic (Color C): 3 g / 15 m
All quantities include a margin for a gauge swatch and weaving in ends.
Tools:
– 2.25 mm (B-1) hook
– 6 locking stitch markers
– Tapestry needle and a fine beading needle
– 3 gold beads, 6 mm
– Gold or cream sewing thread
– Scissors, blocking mat, rustproof pins, and a spray bottle
Abbreviations (US Terms)
- ch – chain
- sl st – slip stitch
- sc – single crochet
- hdc – half double crochet
- sc2tog – single crochet 2 together
- sc3tog – single crochet 3 together
- hdc2tog – half double crochet 2 together
- FL / BL – front loop / back loop
- sk – skip
- sp – space
- MR – magic ring
- st(s) – stitch(es)
Special stitches:
– Picot: ch 3, sl st in the 3rd ch from hook.
– Shell: (sc, hdc, sc) all in the same stitch.
Gauge and Checkpoints
Gauge: 7 sc and 8 sc rows = 1 in (2.5 cm). In hdc rows, 5 rows = 1 in (2.5 cm).
To swatch, chain 15 and work 16 rows of sc on 14 sts. The swatch should measure 2 in (5.1 cm) square.
Test first: Work the center and one cream petal before committing to the whole motif. Check these measurements:
- After Round 2: the center is 0.9 in (2.3 cm) across.
- After one green petal: it is about 1 in (2.5 cm) long from the center edge.
- After one cream petal: it is about 1.5 in (3.8 cm) long and 1.4 in (3.6 cm) at its widest.
- Before the border: the tips measure about 4 in (10.2 cm) across.
- After the border: the tips measure about 4.5 in (11.4 cm) across.
If your piece is too big: go down to a 2.0 mm hook, or tighten your hdc loops.
If your piece is too small: go up to a 2.5 mm hook.
Small differences matter here. A center that is 0.1 in (0.3 cm) too large adds roughly that much again in petal spread.
Center (Color A)
Round 1: MR, ch 1, 10 sc in ring. Join with sl st to first sc. (10 sts)
Round 2: Ch 1, 2 sc in each st around. Join. (20 sts)
Fasten off and pull the ring tight. The center should measure 0.9 in (2.3 cm).
Mark the petal groups. Number the Round 2 stitches 1–20, starting after the join. The cream petals will use groups of 4 stitches: 1–4, 5–8, 9–12, 13–16, and 17–20. Place a marker in stitch 1 of each group.
Green Square Petals (Color B, Make 5)
Each green petal is worked into the back loops of 2 stitches that straddle the gap between two cream petal groups. Use stitches 4 & 5, 8 & 9, 12 & 13, 16 & 17, and 20 & 1.
With the right side facing, join B with a sl st in the BL of the first stitch of the pair.
Row 1: Ch 1, 2 sc in same BL, 2 sc in BL of next st. Turn. (4 sts)
Row 2: Ch 1, 2 sc in first st, sc in next 2, 2 sc in last st. Turn. (6 sts)
Row 3: Ch 1, 2 sc in first st, sc in next 4, 2 sc in last st. Turn. (8 sts)
Row 4: Ch 1, sc in each st across. Turn. (8 sts)
Row 5: Ch 1, sc2tog, sc in next 4, sc2tog. Turn. (6 sts)
Row 6: Ch 1, sc2tog, sc in next 2, sc2tog. Turn. (4 sts)
Row 7: Ch 1, sc2tog twice. Turn. (2 sts)
Row 8: Ch 1, sc2tog. (1 st) Fasten off.
Repeat for all 5 pairs. Each green petal is a small square set on its point, about 1 in (2.5 cm) long. Because the petals grow from the back loops, they tilt behind the center.
Green Petal Gold Edging (Color C)
Join C at the Row 1 edge of a green petal.
- Work 1 sc in each row end of Rows 1–7 up the side. (7 sc)
- In the Row 8 tip stitch, work (sc, picot, sc).
- Work 1 sc in each row end of Rows 7–1 down the other side. (7 sc)
Each green petal gets 16 sc and 1 picot in total. Fasten off. Repeat on all 5 green petals.
The lower rows will end up hidden behind the cream petals. Edge them anyway so the sides lie evenly. This trim is about 1/8 in (0.3 cm) deep.
Cream Eyelet Petals (Color A, Make 5)
Each cream petal is worked in rows into the front loops of one 4-stitch group. The “ch 2” at the start of hdc rows does not count as a stitch. Each eyelet is the ch-2 space, and it stacks directly above the one before.
With the right side facing, join A with a sl st in the FL of the first stitch of a group.
Row 1: Ch 1, 2 sc in same FL, sc in FL of next 2, 2 sc in FL of last st. Turn. (6 sc)
Row 2: Ch 2, 2 hdc in first st, hdc in next st, ch 2, sk 2, hdc in next st, 2 hdc in last st. Turn. (6 hdc + ch-2 sp)
Row 3: Ch 1, 2 sc in first st, sc in next 2, 2 sc in ch-2 sp, sc in next 2, 2 sc in last st. Turn. (10 sc)
Row 4: Ch 2, hdc in next 4, ch 2, sk 2, hdc in next 4. Turn. (8 hdc + ch-2 sp)
Row 5: Ch 1, sc in next 4, 2 sc in ch-2 sp, sc in next 4. Turn. (10 sc)
Row 6: Ch 2, hdc2tog, hdc in next 2, ch 2, sk 2, hdc in next 2, hdc2tog. Turn. (6 hdc + ch-2 sp)
Row 7: Ch 1, sc2tog, sc in next st, 2 sc in ch-2 sp, sc in next st, sc2tog. Turn. (6 sc)
Row 8: Ch 2, hdc2tog, ch 2, sk 2, hdc2tog. Turn. (2 hdc + ch-2 sp)
Row 9: Ch 1, sc in first hdc, sc in ch-2 sp, sc in last hdc. Turn. (3 sc)
Row 10: Ch 1, sc3tog. (1 st, petal tip) Fasten off.
Check: The petal should be about 1.5 in (3.8 cm) long, with 4 oval eyelets in a straight column. It widens through Row 3, holds its width through Row 5, and tapers to a point.
Repeat on all 5 groups. Once all are done, the tips should measure about 4 in (10.2 cm) across.
Border (Color C)
Border gauge: The gold border is worked at a tighter gauge than the petals. It runs about 9 sc per in along a petal side, compared with 7 sc per in in the cotton body. The metallic is thinner, and the extra density keeps the scallops from flaring.
Border Round 1 (sc foundation)
Join C with a sl st into the gap between two cream petals, around the post of the Round 2 stitch at the junction. This sl st is the valley sl st.
Then work around each petal as follows:
- Up the side: Work 1 sc in each sc row end (Rows 1, 3, 5, 7, 9 = 5 sc) and 2 sc in each hdc row end (Rows 2, 4, 6, 8 = 8 sc). (13 sc)
- Tip: Work (sc, ch 2, sc) in the Row 10 tip stitch.
- Down the other side: Work 13 sc the same way, in reverse.
- Valley: Sl st into the next valley.
Repeat around all 5 petals and join to the first valley sl st.
Counts: Each petal side has 14 sc. That is the 13 row-end sc plus 1 tip sc. The two tip sc are corner stitches, one belonging to each side, and they are not counted again anywhere else.
- Per petal: 28 sc, 1 ch-2 tip space, and 1 valley sl st
- Per round: 140 sc, 5 tip spaces, and 5 valley sl sts
Border Round 2 (scallops and picots)
Sl st into the first sc of the round, then work each petal as follows:
- Up the side: Sk next sc, shell in next sc 7 times. The last shell lands in the tip-corner sc. (7 shells)
- Tip: In the ch-2 tip space, work (sc, picot, sc).
- Down the other side: Shell in next sc, sk next sc 7 times. The first shell lands in the other tip-corner sc. (7 shells)
- Valley: Sl st in the valley sl st.
Repeat around and join. Fasten off.
Counts:
– Per petal: 14 shells and 1 picot tip
– Per round: 70 shells, 5 picot tips, and 5 valley sl sts
Why the math works: Each shell repeat uses 2 stitches. With 14 sc per side, you get exactly 7 shells and no leftover stitch. The repeats run in mirror order on the two sides, so the scallops are symmetrical around each tip.
Combined with the green picot tips, you get a gold point at every cream tip and between them.
Checkpoint: The tips should now measure about 4.5 in (11.4 cm) across.
Beads
Use a beading needle and sewing thread to stitch the three 6 mm gold beads in a tight triangle over the magic ring. Pass through each bead twice and knot on the back.
Final Blocking
- Weave in all ends along same-color stitches, keeping gold ends inside gold stitches.
- Mist the motif with water until it is evenly damp. Do not soak the metallic.
- Lay it right side up on the blocking mat.
- Pin the 5 cream tips evenly around a 4.5 in (11.4 cm) circle.
- Pin the 5 green tips midway between the cream tips, just inside the cream tips.
- Run a pin through each eyelet column to straighten it, and open any eyelets that look pinched.
- Let it dry completely. Do not apply a hot iron to the gold.
Final Quality-Control Checklist
- [ ] The center is 0.9 in (2.3 cm) across, with the ring closed tight
- [ ] There are 5 green petals, each 8 rows with 16 sc and 1 picot of gold edging
- [ ] There are 5 cream petals, each 10 rows with 4 aligned eyelets
- [ ] Border Round 1 has 140 sc (14 per petal side)
- [ ] Border Round 2 has 70 shells and 5 picot tips
- [ ] The finished motif is 4.5 in (11.4 cm) across the tips
- [ ] The green petals sit behind the cream petals
- [ ] The 3 beads are secure and the ends are hidden
Troubleshooting
Eyelets drift sideways. You are miscounting before the ch-2. Re-check that equal stitch counts sit on both sides of every space.
The petal cups instead of lying flat. Your hdc rows are too tight. Loosen the yarn-over slightly, or block more firmly.
Green petals poke out in front. You worked them into the front loops. Redo them in the back loops.
The gold border ruffles. Use exactly 13 sc per side in Round 1 and do not add extras at the tip.
The gold border pulls the petal in. Your metallic tension is too tight. Go up 0.25 mm for the border only.
Uneven picots. Chain exactly 3 each time and pull the sl st snug.
Care
Hand wash cool with mild soap, press out the water in a towel, and dry flat. Reshape the tips while damp, and keep the beads and metallic away from heat.
Final Notes
The measurement chain is simple to follow:
- The center measures 0.9 in (2.3 cm).
- The green petals reach about 1 in (2.5 cm) out from the center.
- The cream petals reach about 1.5 in (3.8 cm) out, bringing the motif to 4 in (10.2 cm) across before the border.
- The 0.25 in (0.6 cm) gold border finishes it at 4.5 in (11.4 cm).
Hit each checkpoint and the stitch counts take care of the rest. Optional: several motifs could be strung into a garland, but the pattern above is the single motif.
Happy crocheting!