

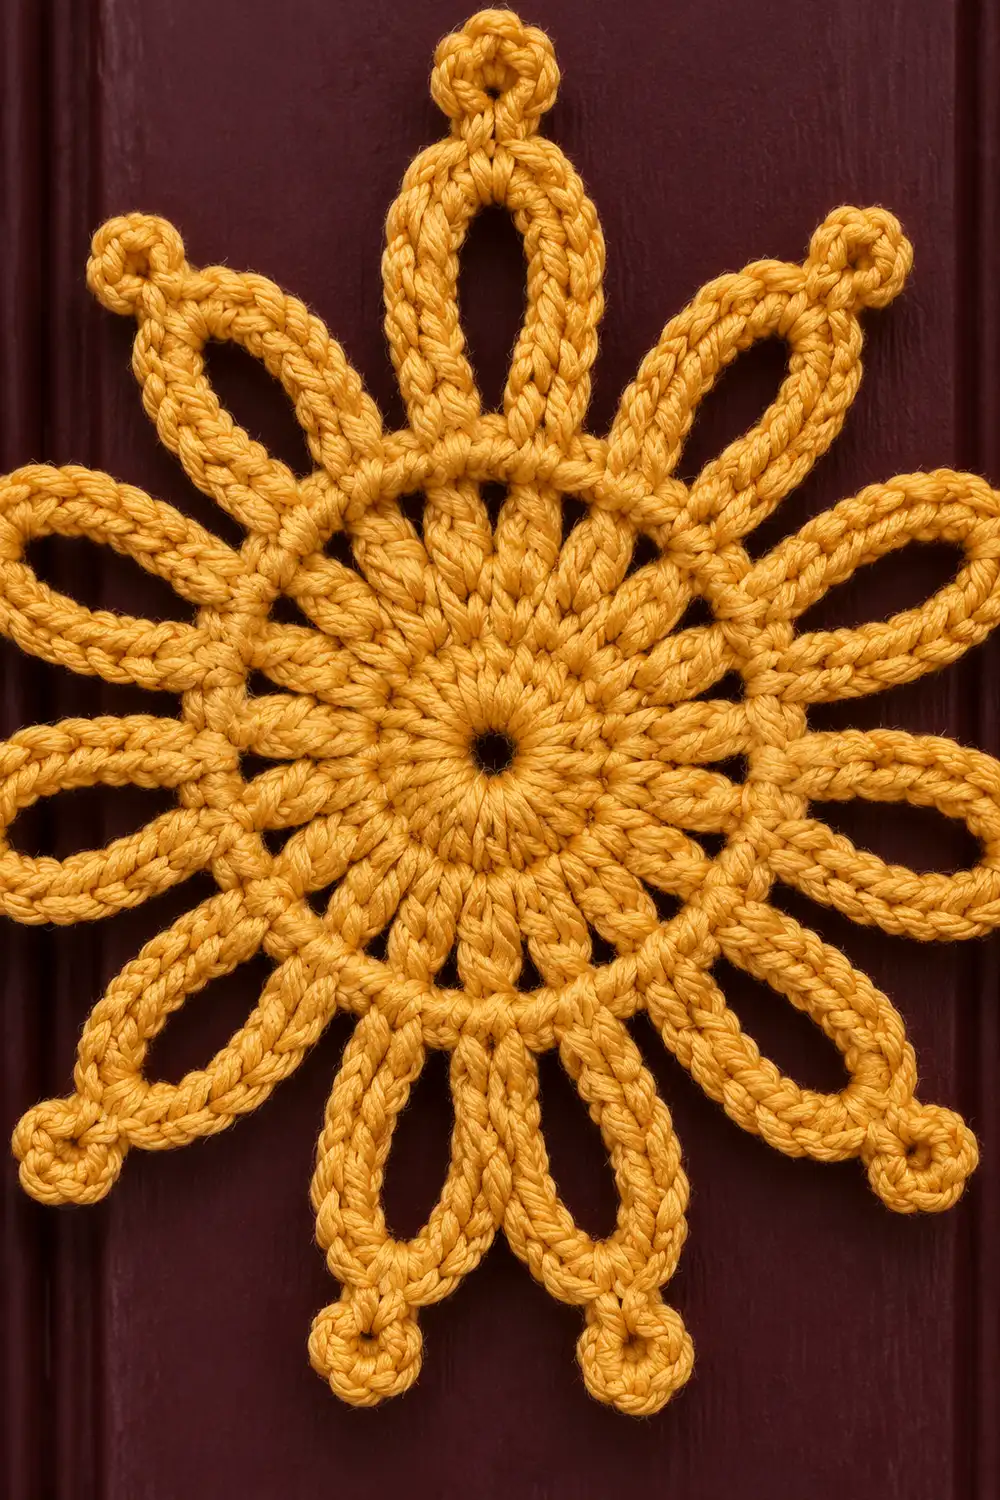
The Golden Sunburst is a single round crochet motif with a filled center circle and twelve teardrop-shaped petal loops radiating outward like rays. Each loop has a small picot at its tip. The edges are thick and rounded, which gives the motif a dimensional look while the center stays open and lacy.
The motif is worked in one golden-yellow or mustard yarn. The warm color looks festive against dark wood, deep red, or evergreen, so the motif works well as a holiday ornament, gift-tag topper, or appliqué. The style sits between a doily and a snowflake: light and airy, with a firm, defined outline.
This pattern uses US crochet terms. The finished motif measures 3.5 in (8.9 cm) across, from picot tip to opposite picot tip, after blocking.
Construction is simple. You work four rounds in the round from a magic ring to make the flat center circle: three double crochet rounds, one of them lacy, then a single crochet round. Two edging rounds follow. The first sets up twelve chain loops. The second covers each loop with single crochet and adds a picot at the tip. The motif is worked in one piece with no sewing.
Finished Size and Construction
- Finished size: 3.5 in (8.9 cm) diameter, tip to tip
- Skill level: Easy (advanced beginner)
- Terminology: US crochet terms
- Yarn weight: DK / light worsted (CYC weight 3), cotton or cotton blend
- Hook: 4.0 mm (US G-6)
- Number of pieces: 1
- Layout: Single circular motif, 12 petals spaced evenly (30° apart)
- Piece size: 3.5 in (8.9 cm)
- Size before border: Center circle (Rounds 1–4) = 2 in (5.1 cm) diameter
- Border depth: 0.75 in (1.9 cm) per side (petal length), so 2 in + 0.75 in + 0.75 in = 3.5 in (5.1 cm + 1.9 cm + 1.9 cm = 8.9 cm)
Materials
Yarn advice: Choose a smooth, tightly plied cotton or cotton blend. Mercerized cotton gives the crisp, slightly shiny look of the original, and its petals hold their shape after blocking. Avoid fuzzy or very soft acrylic, because it blurs the picots and lets the loops droop.
Color:
– Golden yellow / mustard: 10 g (approx. 23 m, based on a yarn with 230 m per 100 g)
The quantity includes a comfortable margin for a gauge swatch, the starting tail, and weaving in ends. One motif uses about 6 g.
Tools:
– 4.0 mm (US G-6) crochet hook
– Yarn needle
– Scissors
– Stitch marker (optional, for the start of rounds)
– Ruler or tape measure
– Blocking mat and rust-proof pins
– Spray bottle with water
Abbreviations (US Terms)
- ch – chain
- sl st – slip stitch
- sc – single crochet
- dc – double crochet
- st(s) – stitch(es)
- sp – space
- rep – repeat
- * * – repeat the instructions between asterisks as directed
Special stitch: Picot. Ch 3, then sl st into the 3rd ch from the hook (the first ch you made). This forms a small round bump. It is the decorative detail at the tip of each petal.
Magic ring: Wrap the yarn around two fingers to form an adjustable loop. Work the first round into the loop, then pull the tail to close the center.
Gauge and Checkpoints
Gauge is not critical for a decorative motif. It does matter if you want the stated 3.5 in (8.9 cm) size, or if you plan to make several matching motifs. Make one test motif first and measure at each checkpoint below.
Checkpoints (measured flat, unblocked):
– After Round 1: 0.75 in (1.9 cm) diameter
– After Round 2: 1.25 in (3.2 cm) diameter
– After Round 3: 1.75 in (4.4 cm) diameter
– After Round 4: 2 in (5.1 cm) diameter
– After Round 6 (blocked): 3.5 in (8.9 cm) tip to tip
If your motif is too big: go down to a 3.5 mm (US E-4) hook. Also check that you are not pulling up extra-tall dc stitches.
If your motif is too small: go up to a 4.5 mm (US 7) hook. Relax your tension on the chains in Round 5 in particular.
If the center ruffles or cups: see Troubleshooting. Most often the stitch counts are off, or the chains in Round 3 are too tight or too loose.
Center Circle (Rounds 1–4)
Round 1: Make a magic ring. Ch 3 (counts as first dc), work 11 dc into the ring. Pull the tail to close. Sl st into the top of the beginning ch-3.
(12 dc)
Round 2: Ch 3 (counts as first dc), dc in the same st. Work 2 dc in each remaining st around. Sl st into the top of the beginning ch-3.
(24 dc. Round 2 is a growth round: each of the 12 sts receives 2 dc.)
Checkpoint: 1.25 in (3.2 cm) across.
Round 3 (lacy round): Ch 4 (counts as first dc + ch 1). *Dc in next st, ch 1*. Rep from * to * 22 more times. Sl st into the 3rd ch of the beginning ch-4.
(24 dc and 24 ch-1 sps.)
This round adds no new dc. Instead, the ch-1 spaces between the dc widen the circle and create the lacy ring of small openings around the center.
Checkpoint: 1.75 in (4.4 cm) across.
Round 4 (trim round): Ch 1. Sc in the same st as the sl st. Sc in the next ch-1 sp. *Sc in next dc, sc in next ch-1 sp*. Rep from * to * 22 more times. Sl st into the first sc.
(48 sc = 24 sc worked 1 per existing dc + 24 sc worked 1 per ch-1 sp.)
This conversion round turns the lacy round into a smooth, solid sc edge. That edge is the base for the petals.
Checkpoint: 2 in (5.1 cm) across. The circle should lie flat with no ruffling or cupping. Do not move on until it does.
Border: Sunburst Petals (Rounds 5–6)
The two petal rounds act as the motif’s border. They add 0.75 in (1.9 cm) on every side.
Border gauge: Each petal is 16 sc worked over a ch-12 loop. A finished petal measures about 0.75 in (1.9 cm) from the edge of the center circle to the tip of the picot, and about 0.375 in (1 cm) wide at its widest point.
Round 5 (loop setup): Ch 1. *Sc in next sc, ch 12, sc in the same sc (this forms a closed loop), sc in each of the next 3 sc*. Rep from * to * 11 more times, for 12 repeats total. Sl st into the first sc.
(60 sc + 12 ch-12 loops.)
Round 5 count breakdown: 48 sc are worked 1 per existing Round 4 st. Another 12 sc are extra: the second sc in each loop st that closes the loop. So 48 + 12 = 60 sc.
Each repeat uses exactly 4 Round 4 sts: 1 st holds the loop and 3 sts space the petals. 4 x 12 = 48, which matches the Round 4 count exactly.
Let the loops lie flat for now. They will look floppy until Round 6 covers them.
Round 6 (petal covering and picots): Sl st into the first ch-12 loop. *In this ch-12 loop, work 8 sc, picot, 8 sc. Skip the closing sc of this loop and the next sc. Sl st into the next sc (the middle sc of the 3 spacer sts). Skip the next sc*. You should now be at the next loop.
Rep from * to * 11 more times, working the first 8 sc of each petal into the next ch-12 loop. After the final petal, sl st into the middle spacer sc. Fasten off, leaving a 6 in (15.2 cm) tail.
(Per petal: 16 sc + 1 picot. Total: 192 sc, 12 picots, 12 sl sts between petals.)
When you work the sc, insert the hook into the loop’s opening, not into the individual chains. The sc then wrap around the chain like a cord, which creates the rounded, rope-like outline of each teardrop. Keep the sc snug and push them together along the loop as you go so the chain is fully hidden.
Why the math works:
– Round 4 has 48 sts. Divided into 12 petals, that is 4 sts per petal unit (1 anchor + 3 spacers). Nothing is left over.
– The sl st into the middle spacer sc anchors each petal gap to the center at the same point, 30° apart. This keeps the sunburst symmetrical.
– 16 sc over a ch-12 loop is a 4:3 ratio. The outer edge of a covered loop is longer than the chain itself, so the extra sc fill that distance. The slight surplus makes the petal round out and lift a little, which gives the dimensional, three-dimensional look.
– The picot sits at the exact halfway point (8 sc before, 8 sc after). This keeps the tip centered and the teardrop symmetrical.
– Petal depth is 0.75 in (1.9 cm) x 2 sides, plus the 2 in (5.1 cm) center, for 3.5 in (8.9 cm) total.
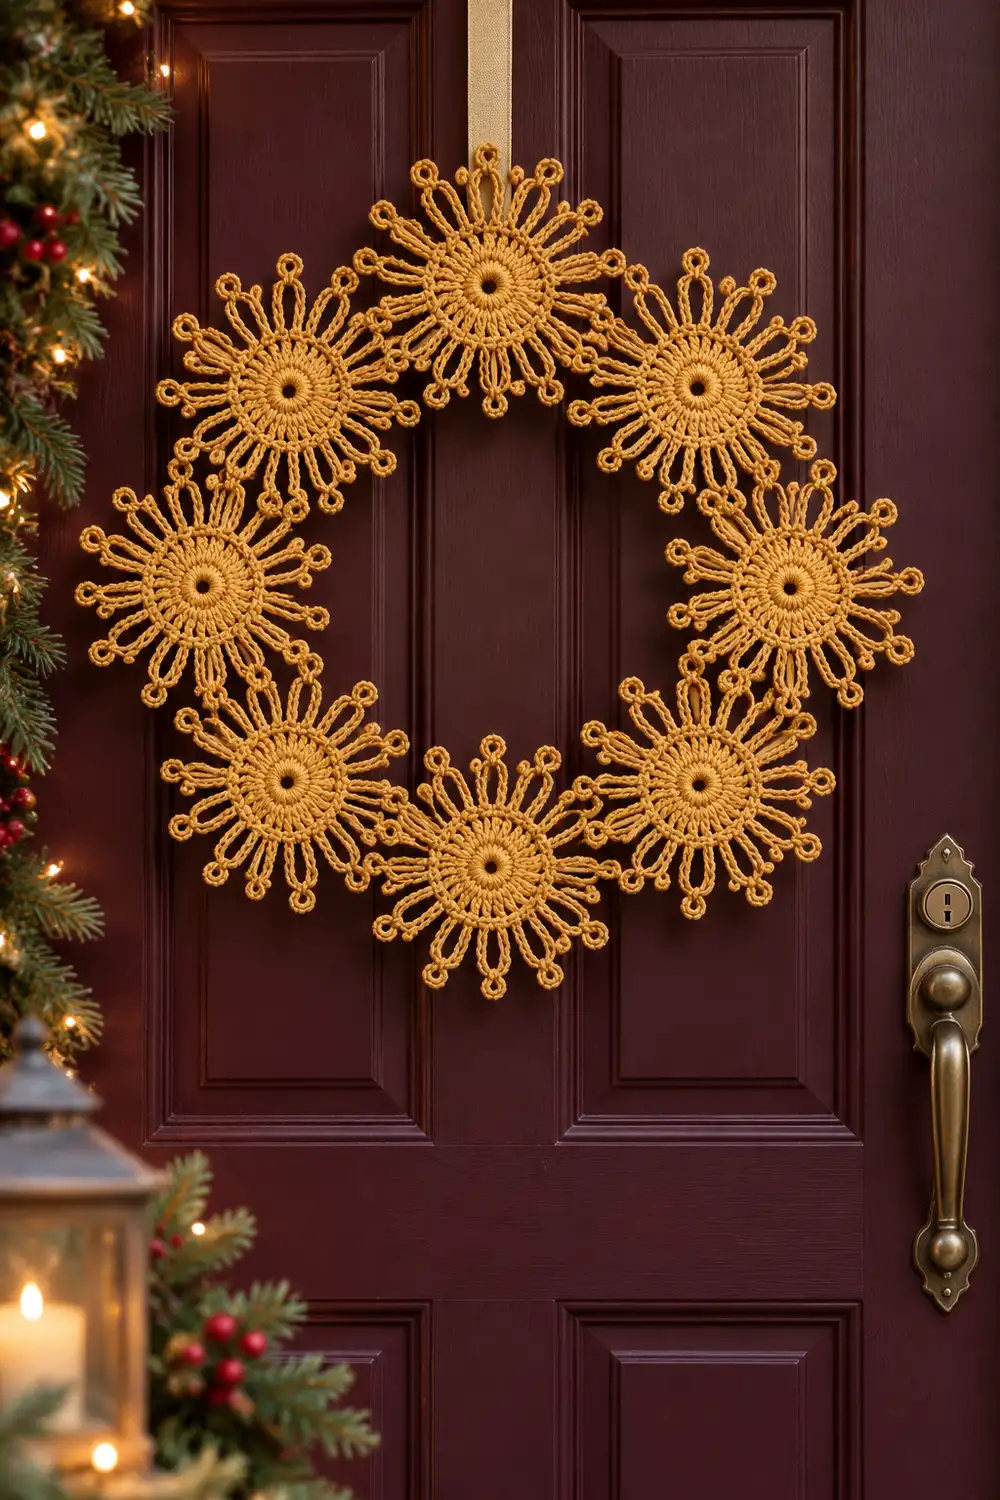
Optional: The photo also shows nine of these motifs joined at the petal tips into a circular door wreath. To build one, make nine motifs and sl st touching picots together. This is an optional extra and not part of this pattern.
Final Blocking
Blocking turns the floppy petals into crisp rays. Do not skip it.
- Weave in ends. Weave the starting tail through the back of Round 1, then pull it snug to close the center hole. Weave the final tail through the back of the Round 6 sc on one petal.
- Draw a guide. On paper, draw a 3.5 in (8.9 cm) circle with a 2 in (5.1 cm) circle in the middle. Mark 12 points 30° apart on the outer circle. Place the paper under clear plastic or on your blocking mat.
- Dampen. Mist the motif with water until it is evenly damp, not dripping. Cotton can also be dipped and gently squeezed in a towel.
- Pin the center. Lay the motif on the guide. Pin the edge of Round 4 at four points so the center measures 2 in (5.1 cm).
- Pin each picot. Pin through each picot onto one of the 12 marks so it sits on the 3.5 in (8.9 cm) circle. Work in opposite pairs (12 and 6 o’clock, then 3 and 9, and so on) to keep the motif even.
- Shape the petals. Use your fingertip to open each loop into a teardrop with the hole centered.
- Dry fully. Leave the motif pinned until it is completely dry, usually 6–12 hours. For extra stiffness, spray it lightly with fabric stiffener or starch before drying.
- Unpin and measure. The motif should measure 3.5 in (8.9 cm) tip to tip.
Final Quality-Control Checklist
- [ ] Round 1 has 12 dc and the center hole is pulled closed.
- [ ] Round 2 has 24 dc.
- [ ] Round 3 has 24 dc and 24 ch-1 sps, evenly spaced.
- [ ] Round 4 has 48 sc and lies flat at 2 in (5.1 cm).
- [ ] Round 5 has 12 loops, each anchored in a single st, with exactly 3 sc between loops.
- [ ] Every petal has 8 sc + picot + 8 sc, and no chain shows through.
- [ ] All 12 picots are centered at the petal tips.
- [ ] The petals are evenly spaced, 30° apart.
- [ ] The blocked motif measures 3.5 in (8.9 cm) tip to tip.
- [ ] Both ends are woven in securely, and the motif looks the same on both sides when viewed from a distance.
Troubleshooting
Center cups into a bowl: Your stitches are too tight, or a round is short on stitches. Recount Rounds 2 and 4. Try loosening your tension or going up 0.5 mm.
Center ruffles: You have extra stitches, usually from working into the beginning ch-3 twice. Recount. On Round 3, keep the ch-1 spaces snug.
Petals uneven in length: The ch-12 loops differ in tension. Count each chain carefully and keep the same relaxed tension for every loop.
Chain shows between sc on petals: Push the sc closer together, or add 1 sc on each side (9 sc, picot, 9 sc). Keep that change consistent on all 12 petals.
Petals twist: The loop chain twisted before you worked the closing sc. Check that the chain lies flat before anchoring each loop.
Picot off-center: You miscounted the sc on one side. Count to exactly 8 before the picot and 8 after.
Motif too floppy after blocking: Use a stiffener, or switch to mercerized cotton.
Wrong number of petals at the end: You did not skip correctly between petals. Each repeat must skip the closing sc, skip 1 sc, sl st in 1 sc, and skip 1 sc.
Care
Hand wash in cool water with mild soap, press out the water in a towel, and re-block flat to dry. If you used a stiffener, re-apply it after washing to restore crisp petals.
Final Notes
The measurement chain for the Golden Sunburst runs as follows. Round 1 measures 0.75 in (1.9 cm). Round 2 grows to 1.25 in (3.2 cm). The lacy Round 3 opens to 1.75 in (4.4 cm). The sc trim of Round 4 settles the center at 2 in (5.1 cm) with 48 sts. The 48 sts divide into 12 petal units of 4 sts each. Each covered petal adds 0.75 in (1.9 cm) per side, for a blocked total of 3.5 in (8.9 cm) tip to tip.
If each checkpoint matches and each count is right, the sunburst will come out symmetrical and flat, with crisp, dimensional petals.
Happy crocheting!