

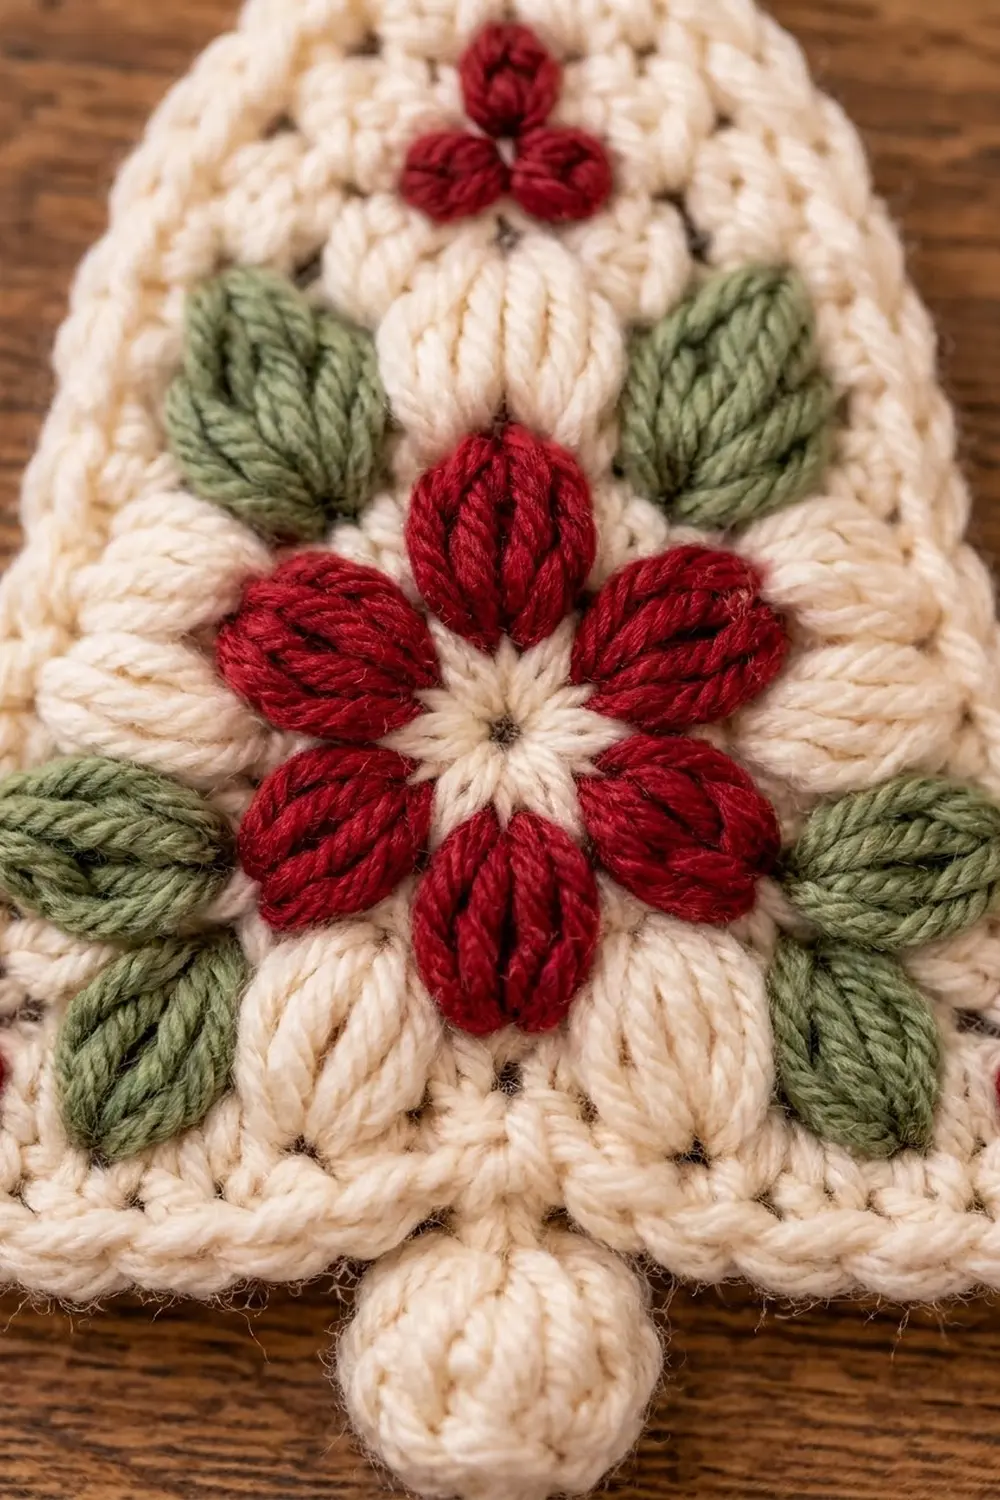
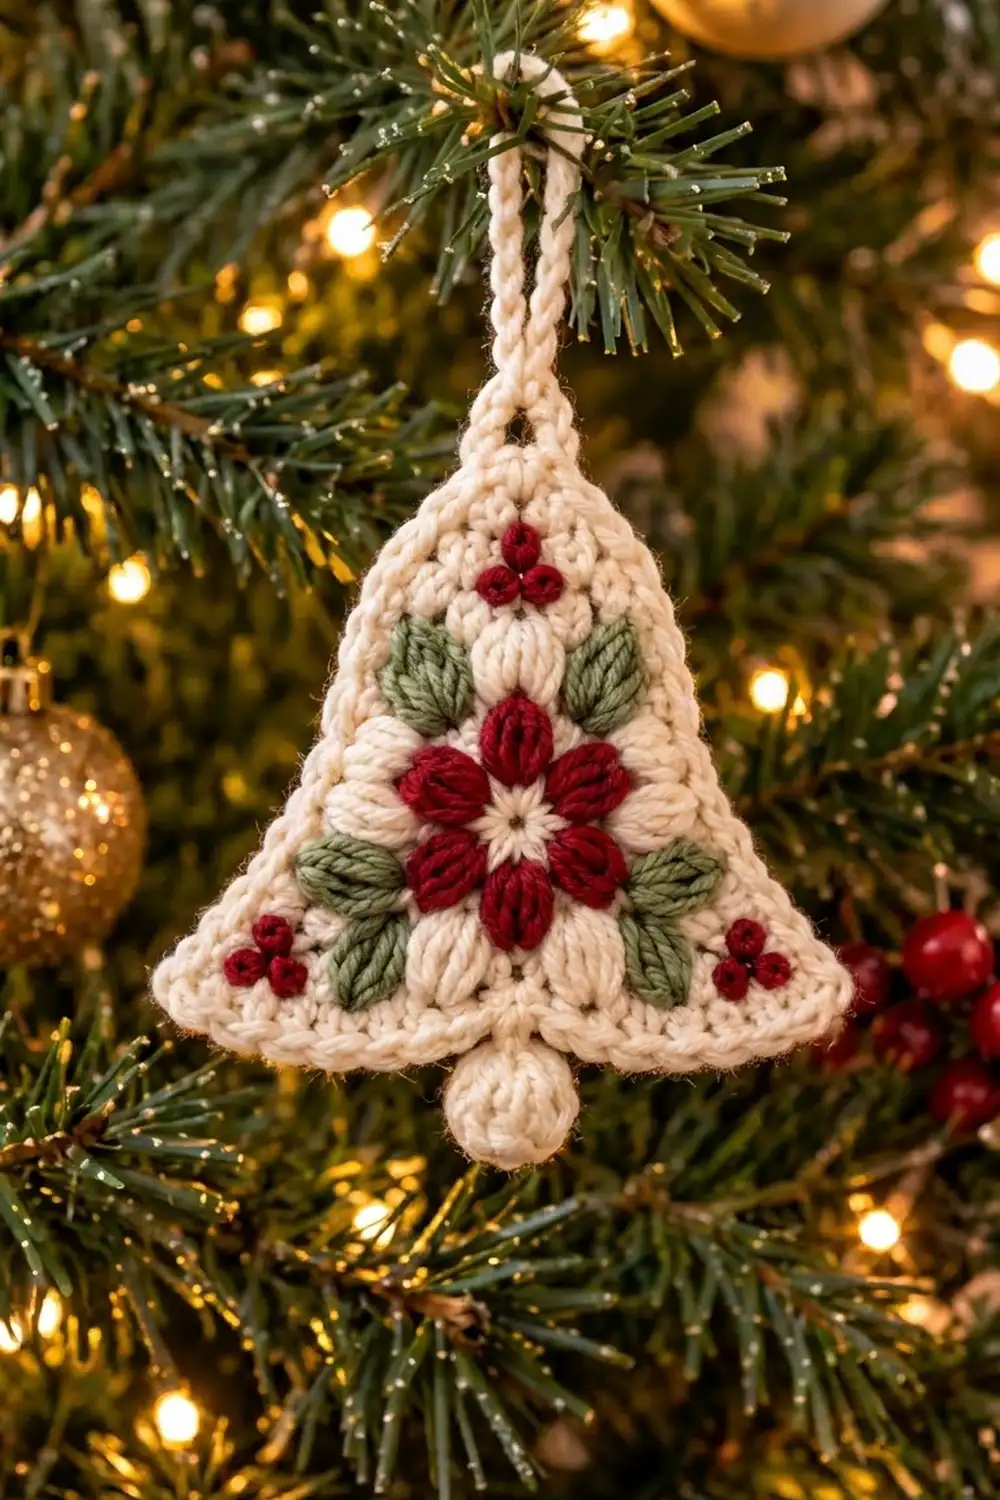
This little bell has a lot of texture packed into a small space. At the center, a deep cranberry flower made of eight plump puff-stitch petals sits on a cream background. Sage-green leaf clusters ring the flower, and tiny red berry trios accent the top and both flared corners.
The palette is classic Christmas but quiet: ivory, cranberry and sage. The rim is a neat single-crochet edge, a cream bobble clapper hangs at the bottom, and a chain loop at the top lets you hang it right away. The pattern uses US crochet terms throughout.
The finished bell measures 4.25 in (10.8 cm) wide by 3.75 in (9.5 cm) tall, not counting the loop or clapper. With the clapper it is 4.25 in (10.8 cm) tall.
Construction overview: you start with a circular medallion worked in the round. One shaping round turns the circle into a bell with two pointed corners, and a single-crochet border tidies the edge and adds the hanging loop. Last, you make a tiny stuffed clapper and three berry appliqués and sew them on.
Finished Size and Construction
- Finished size: 4.25 in (10.8 cm) wide x 3.75 in (9.5 cm) tall
- Height with clapper: 4.25 in (10.8 cm)
- Hanging loop: about 1.25 in (3.2 cm) tall
- Skill level: Intermediate (puff stitches, color changes, mixed stitch heights)
- Terminology: US crochet terms
- Yarn weight: DK (light worsted, #3)
- Hook: 3.5 mm (E-4)
- Number of pieces: 1 bell body, plus 1 clapper and 3 berry appliqués sewn on
- Layout: single ornament; no joining
- Medallion size (after Round 5): 3 in (7.6 cm) diameter
- Size before border: 4 in (10.2 cm) wide x 3.5 in (8.9 cm) tall
- Border depth: about 0.125 in (0.3 cm) per edge
Materials
Use a smooth DK yarn with good stitch definition. Cotton or a cotton-acrylic blend makes the crispest puffs. Fuzzy yarns blur the petal shapes.
- Cream: 12 g / about 28 m
- Cranberry red: 4 g / about 9 m
- Sage green: 3 g / about 7 m
- 3.5 mm (E-4) crochet hook
- Tapestry needle
- Stitch markers (4)
- A pinch of fiberfill or cream yarn scraps (for the clapper)
- Scissors
- Blocking mat and rust-proof pins
- Spray bottle
Quantities are for one ornament and include about a 20% margin for swatching and weaving in ends.
Abbreviations (US Terms)
- ch – chain
- sl st – slip stitch
- sc – single crochet
- hdc – half double crochet
- dc – double crochet
- tr – treble crochet
- dtr – double treble crochet (yo 3 times; work off loops 2 at a time)
- sp – space
- st(s) – stitch(es)
- MR – magic ring
- yo – yarn over
- RS – right side
Special Stitches
Puff: (yo, insert hook in the indicated st or sp, yo, pull up a loop to about 3/8 in / 1.0 cm) 4 times. You now have 9 loops on the hook. Yo, pull through all 9 loops. A puff counts as 1 stitch.
Leaf cluster: (puff, ch 1, puff) in the same st. This counts as 3 stitches: puff, ch-1, puff. The ch-1 between the two lobes forms the center “vein” of the leaf.
Berry puff: (yo, insert hook, yo, pull up a loop) 3 times. You now have 7 loops on the hook. Yo, pull through all 7 loops.
Gauge and Checkpoints
Gauge: 20 sc x 22 rows = 4 in (10.2 cm) in sc with a 3.5 mm hook.
Make one full medallion (Rounds 1–5) before anything else. It is your real gauge test, because puff stitches vary more between crocheters than plain sc does.
Checkpoints (diameter measured flat):
- After Round 1: 0.6 in (1.5 cm)
- After Round 2: 1.5 in (3.8 cm)
- After Round 3: 2 in (5.1 cm)
- After Round 4: 2.6 in (6.6 cm)
- After Round 5: 3 in (7.6 cm)
- After Round 6: 4 in (10.2 cm) wide x 3.5 in (8.9 cm) tall
- After Round 7: 4.25 in (10.8 cm) wide x 3.75 in (9.5 cm) tall
If your medallion is too big (over 3.25 in / 8.3 cm after Round 5), go down to a 3.25 mm hook, or pull the puff loops up a little shorter.
If it’s too small (under 2.75 in / 7.0 cm), go up to a 3.75 mm hook.
If it cups, your puffs are too tight; lengthen the loops. If it ruffles, shorten them.
Bell Body
Round 1 (cream)
MR, ch 1, 8 sc in ring. Pull ring closed. Sl st to first sc. (8 sc)
Fasten off cream.
Round 2 (red petals)
Join red in any sc. Ch 2 (does not count as a st). Puff in same st, ch 2. (Puff in next sc, ch 2) 7 times. Sl st to top of first puff. (8 puffs, 8 ch-2 sps)
Fasten off red. These eight puffs are the flower petals.
Round 3 (cream)
Join cream in any ch-2 sp. Ch 1, 3 sc in same sp, sc in top of next puff. (3 sc in next ch-2 sp, sc in top of next puff) 7 times. Sl st to first sc. (32 sc)
Each repeat is 4 sts: 3 sc over a space and 1 sc over a petal. Fasten off.
Round 4 (cream and green leaves)
This round has eight leaf clusters. Number them 1–8 as you go:
- Clusters 1 and 5: cream (top and bottom of the bell)
- Clusters 2, 3, 4, 6, 7 and 8: green (the leaves)
Join cream in any sc that sits above a petal.
Each repeat: with cream, ch 1 (first repeat only, does not count), sc in same st, ch 1, skip 1 st. Work the leaf cluster in the next st in the color for that cluster. With cream, ch 1, skip 1 st.
For the following repeats: sc in the next st (above a petal), ch 1, skip 1, leaf cluster in next st, ch 1, skip 1.
Color changes: when a green cluster comes up, drop cream on the wrong side and work the whole cluster with green. Drop green and pick up cream for the next ch-1. Carry the inactive strand loosely across the back. The floats are short, about 0.4 in (1.0 cm). Leave them slack so the round lies flat.
Sl st to first sc. Fasten off green.
Count: 8 repeats x (sc, ch-1, puff, ch-1, puff, ch-1) = 48 sts (8 sc, 16 puffs, 24 ch-1 sps)
Each leaf cluster sits between two petals, so the leaves sit in the gaps between the petals.
Round 5 (cream)
Keep cream on the hook. Sl st in the next ch-1 sp, then in the next puff, then in the center ch-1 sp of Cluster 1 (the top cream cluster).
Ch 1. Sc in the same sp. Then work 1 sc in each st and each ch-1 sp around. Sl st to first sc. (48 sc)
This first sc is st 1 and marks the top center of the bell. Number the sts clockwise 1–48. St 25 is the bottom center (the center of Cluster 5). Place markers in sts 1, 18, 25 and 32.
Round 6 (cream – bell shaping)
This round has mixed stitch heights. Short stitches keep the dome and sides close to the medallion. Taller stitches build the two flared corners at sts 18 and 32.
Ch 2 (does not count as a st). Then work:
Top center and right side:
- St 1: hdc
- St 2: hdc
- St 3: 2 hdc
- Sts 4–9: hdc in each (6)
- St 10: 2 hdc
- Sts 11–14: hdc in each (4)
- St 15: dc
- St 16: dc
- St 17: tr
- St 18 (right corner): (dtr, ch 2, dtr)
- St 19: dc
- St 20: dc
- Sts 21–22: hdc in each (2)
- St 23: 2 hdc
- St 24: hdc
Bottom center:
- St 25: hdc
Left side (mirror image):
- St 26: hdc
- St 27: 2 hdc
- Sts 28–29: hdc in each (2)
- St 30: dc
- St 31: dc
- St 32 (left corner): (dtr, ch 2, dtr)
- St 33: tr
- St 34: dc
- St 35: dc
- Sts 36–39: hdc in each (4)
- St 40: 2 hdc
- Sts 41–46: hdc in each (6)
- St 47: 2 hdc
- St 48: hdc
Sl st to first hdc.
Count: right half (sts 2–24) = 27 sts. Left half (sts 26–48) = 27 sts. Add 1 st each for sts 1 and 25. Total: 27 + 27 + 1 + 1 = 56 sts, plus 2 corner ch-2 sps.
Segment check (clockwise from top center):
- Top center: 1
- Right slope (st 2 through the first corner dtr): 19
- Right corner: ch-2 sp
- Lower right (second dtr through st 24): 8
- Bottom center: 1
- Lower left (st 26 through first corner dtr): 8
- Left corner: ch-2 sp
- Left slope (second dtr through st 48): 19
Total: 1 + 19 + 8 + 1 + 8 + 19 = 56 sts
The six paired 2-hdc increases (sts 3/47, 10/40, 23/27) add the extra length the outer edge needs so the round stays flat.
Checkpoint: 4 in (10.2 cm) wide at the corners, 3.5 in (8.9 cm) tall.
Border
Border gauge: 5 sc per inch (2.54 cm), same as the main gauge.
Round 7 (cream)
Ch 1. Sc in the same st (top center). Sc in each st to the right corner ch-2 sp. Work (2 sc, ch 1, 2 sc) in the corner sp. Sc in each st to the left corner sp, work (2 sc, ch 1, 2 sc) in that sp, then sc in each remaining st. Sl st to first sc.
Counts per segment:
| Segment | Stitches |
|---|---|
| Top center | 1 sc |
| Right slope | 19 sc |
| Right corner | 2 sc + ch-1 + 2 sc |
| Lower right | 8 sc |
| Bottom center | 1 sc |
| Lower left | 8 sc |
| Left corner | 2 sc + ch-1 + 2 sc |
| Left slope | 19 sc |
Total: 56 sc (1 per Round 6 st) + 8 corner sc = 64 sc, plus 2 corner ch-1 sps.
Why the math works: the bell’s outline is about 13 in (33.0 cm) around. At 5 sc per inch, that needs about 65 stitches. You have 64 sc plus 2 corner chains, so the rim lies flat without pulling or rippling.
The bottom edge from corner tip to corner tip is 2 + 8 + 1 + 8 + 2 = 21 sc. At 5 sc per inch that is about 4.2 in (10.7 cm), which matches the 4.25 in (10.8 cm) finished width.
The extra 2 sc on each side of the corner ch-1 keep the points sharp instead of curling inward.
Hanging Loop
Without turning, ch 20. Sl st into the same top-center sc (the first sc of Round 7). The loop is about 1.25 in (3.2 cm) tall.
Fasten off, leaving a 6 in (15.2 cm) tail. Weave this tail back through the base of the loop twice to anchor it.
Clapper (cream, make 1)
- Rnd 1: MR, 6 sc in ring. (6 sc)
- Rnd 2: 2 sc in each st around. (12 sc)
- Rnds 3–4: sc in each st around. (12 sc)
- Rnd 5: (sc2tog) 6 times. (6 sts)
Stuff firmly with a pinch of fiberfill. Fasten off, leaving a 10 in (25.4 cm) tail. Weave the tail through the front loops of the last round and pull to close.
The finished ball is about 0.75 in (1.9 cm) across.
Berry Clusters (red, make 3)
MR, ch 1. (Berry puff, ch 1) 3 times in the ring. Sl st to the top of the first berry puff. Pull the ring very tight. (3 berry puffs, 3 ch-1 sps)
The three puffs pull into a tight triangle about 0.5 in (1.3 cm) across. Fasten off, leaving an 8 in (20.3 cm) tail.
Assembly
- Top berry: center it over Rounds 5–6 at top center, just above the cream top cluster. Turn it so one berry points up and two sit below.
- Corner berries: place one inside each flared corner, in the tall-stitch area of Round 6. Turn each so one berry points toward the corner tip.
- Sewing the berries: whipstitch through the ch-1 sps and under the base of each puff. Leave the puffs domed; don’t flatten them.
- Clapper: center it under the bottom-center sc of Round 7. Sew it so the upper third overlaps the rim and about 0.5 in (1.3 cm) hangs below the edge.
- Weave in all ends along same-color stitches.
Final Blocking
- Lightly mist the bell (not the clapper) until it is damp but not wet.
- Lay it RS up on the blocking mat.
- Pin the top center and bottom center 3.75 in (9.5 cm) apart.
- Pin the two corner tips 4.25 in (10.8 cm) apart, level with the bottom edge.
- Pin the bottom edge straight between the corners.
- Ease the slopes into smooth, slightly concave lines; don’t stretch them.
- Gently press each puff and berry back into a rounded shape with a fingertip.
- Let it dry completely, then unpin.
Final Quality-Control Checklist
- The bell measures 4.25 in (10.8 cm) wide x 3.75 in (9.5 cm) tall.
- There are 8 red petals, 6 green leaves, and 2 cream clusters at the top and bottom.
- The leaves sit between petals and are mirror-symmetric.
- The corners are equally sharp and level.
- Round 7 has 64 sc plus 2 ch-1 corners.
- The loop is centered and anchored.
- All three berry trios point outward.
- The clapper is centered and firmly sewn.
- No floats show from the front.
Troubleshooting
Medallion cups: your puffs are too short. Pull the loops up to a full 3/8 in (1.0 cm).
Medallion ruffles: your puffs are too tall, or the ch-1s in Round 4 are loose. Tighten them.
Green shows through cream areas: your floats are too tight or crossing the front. Keep them loose and behind the work.
Corners curl: check that you worked (2 sc, ch 1, 2 sc) in each corner sp, then block with pins at the tips.
Lopsided bell: recount Round 6 from st 1. Each half must have 27 sts.
Clapper droops: stitch through the ball twice more, closer to its top.
Care
Hand wash in cool water with mild soap, press out the water in a towel, and dry flat. Reshape the puffs while damp.
Final Notes
The measurement chain is: medallion of 3 in (7.6 cm) after Round 5; bell shaping to 4 in x 3.5 in (10.2 cm x 8.9 cm) after Round 6; border to 4.25 in x 3.75 in (10.8 cm x 9.5 cm) with 64 sc. If each checkpoint matches, the finished bell will too. Make one, then a whole set for the tree.
Happy crocheting!