

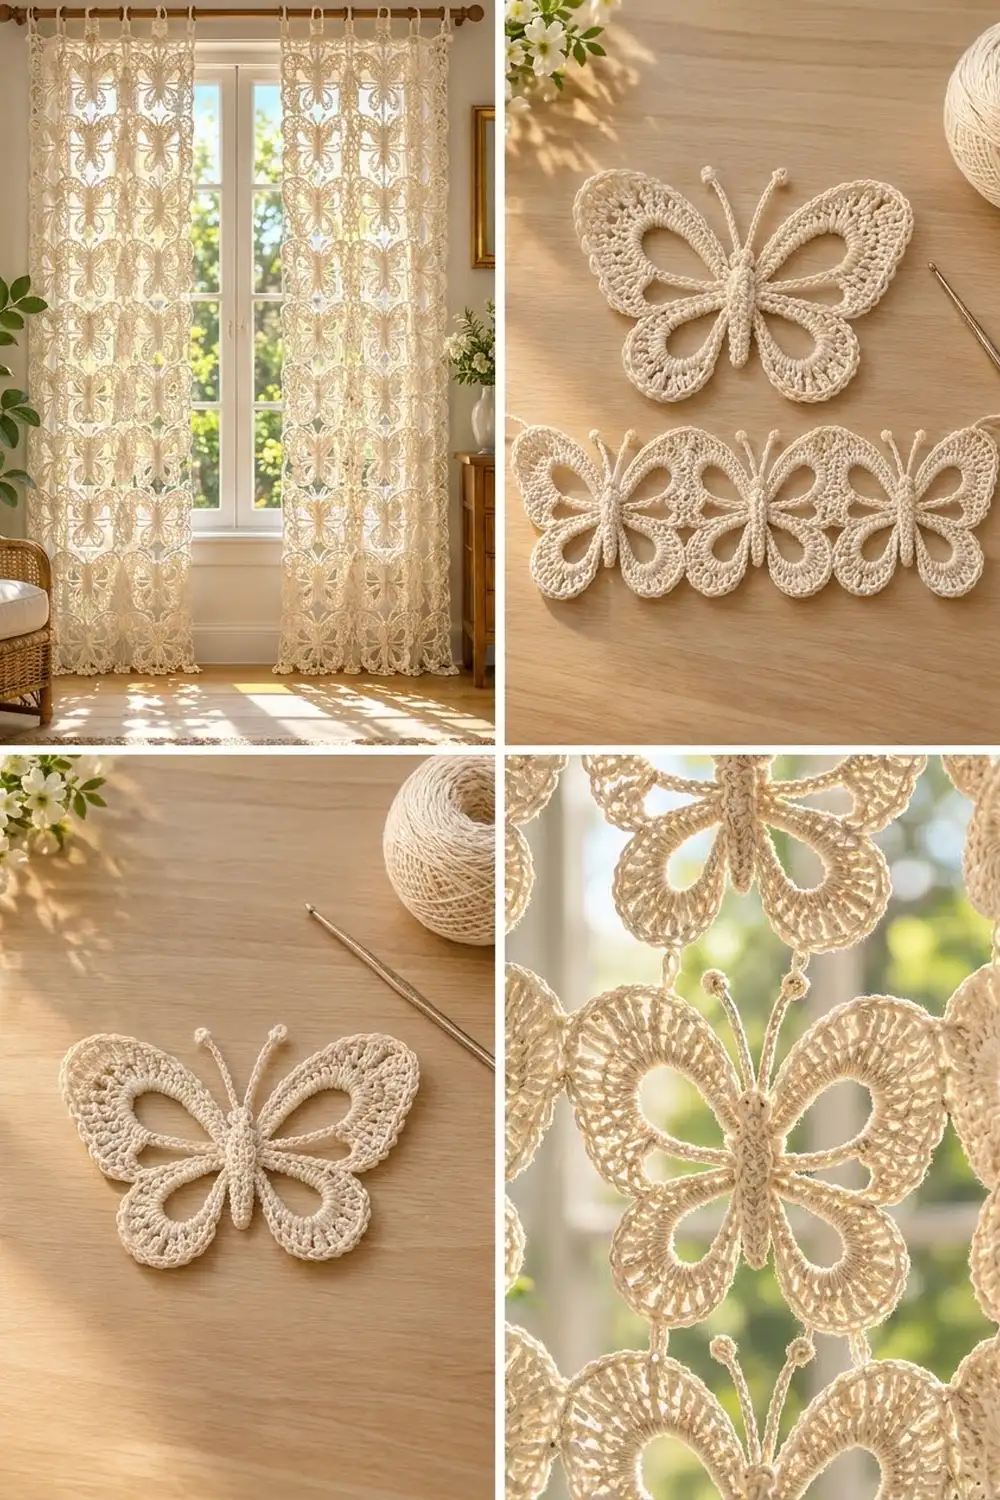
This lace curtain panel is a grid of identical butterfly motifs joined at the wingtips. Sunlight passes through the open wing centers and the gaps between motifs, casting soft butterfly shadows.
Each butterfly has a raised oval body with a rope texture, two knob-tipped antennae, two large upper wings, and two smaller lower wings. Every wing has an open teardrop center outlined by a thick padded cord, a band of radiating lace stitches, and a smooth single crochet rim. The panel uses one color: warm ivory cotton.
The pattern uses US crochet terms. One panel measures 32 x 79 in (81.3 x 200.7 cm), not counting the tabs. Each motif measures 8 x 6.5 in (20.3 x 16.5 cm).
You work each butterfly in the round from the body out and join it to its neighbors on the last round. A straight heading band with tabs finishes the top. Make two panels for a pair.
Finished Size and Construction
- Finished panel size: 32 x 79 in (81.3 x 200.7 cm), plus tabs about 2 in (5.1 cm) deep
- Skill level: Intermediate
- Terminology: US
- Yarn weight: DK (#3) mercerized cotton
- Hook: 4.0 mm (US G-6)
- Number of pieces: 48 motifs per panel (96 for a pair)
- Layout: 4 motifs across x 12 down
- Motif size: 8 x 6.5 in (20.3 x 16.5 cm); the antennae add about 0.5 in (1.3 cm)
- Size before border: 32 x 78 in (81.3 x 198.1 cm)
- Border depth: top heading only, about 1 in (2.5 cm). The sides and bottom keep the butterfly outline.
Materials
Use a smooth mercerized DK cotton. It shows crisp stitches, holds the padded cords firmly, and hangs without stretching. Avoid fuzzy or stretchy blends.
- Ivory (only color): about 660 g / 1,452 m per panel, or 14 balls of 50 g / 110 m. For a pair, buy 28 balls (1,400 g / 3,080 m).
- Each motif: about 12 g / 26.4 m
- Heading and tabs: about 24 g / 53 m per panel
These amounts include a margin of about 10% for swatching, joining, and differences in tension.
Tools: 4.0 mm (G-6) hook, tapestry needle, at least 6 stitch markers, rust-proof pins, blocking mats, measuring tape.
Abbreviations (US Terms)
- ch: chain
- sl st: slip stitch
- sc: single crochet
- hdc: half double crochet
- dc: double crochet
- tr: treble crochet
- st(s): stitch(es)
- sp: space
- FLO / BLO: front loop only / back loop only
- RS: right side
Special stitches
- 3-dc cluster (3dc-cl): (Yarn over, insert hook in st, pull up a loop, yarn over, pull through 2 loops) 3 times in the same st, then yarn over and pull through all 4 loops.
- Join sl st: Take the hook out of the working loop. Insert it from front to back through the matching st of the finished motif, pick up the dropped loop, and pull it through. This adds no stitches.
Gauge and Checkpoints
Gauge: 18 sc and 20 rows = 4 in (10.2 cm).
Make one test motif first and wet-block it. Check it at each stage:
- After Rnd 3 (body): 2.75 x 0.75 in (7.0 x 1.9 cm)
- After Rnd 5: upper wing openings about 2 in (5.1 cm) long, lower openings about 1.5 in (3.8 cm)
- After Rnd 7, blocked: 8 x 6.5 in (20.3 x 16.5 cm), within 0.25 in (0.6 cm)
Too big? Use a 3.75 mm hook. Too small? Use a 4.5 mm hook. Being off by 0.25 in (0.6 cm) per motif changes the panel width by 1 in (2.5 cm).

Butterfly Motif
Work with the RS facing and work counterclockwise. Never turn. With the head at the top, Side A is on your right and Side B is on your left.
Body
Rnd 1: Ch 12. Sc in the 2nd ch from the hook and in the next 9 ch, then 3 sc in the last ch. Working along the other side of the chain, sc in the next 9 ch, then 2 sc in the same ch as the first sc. Join with a sl st. (24 sc) The 3-sc end is the head and the starting end is the tail.
Rnd 2: Ch 1, 2 sc in the first st, sc in the next 9 sts, 2 sc in each of the next 3 sts (head), sc in the next 9 sts, 2 sc in each of the last 2 sts. Join. (30 sc)
Label the Rnd 2 stitches:
– A1–A9: sts 3–11 (Side A)
– H1–H6: sts 12–17 (head)
– B1–B9: sts 18–26 (Side B)
– T1–T6: sts 27–30, then 1–2 (tail)
Rnd 3 (rope texture): Working in FLO, sl st loosely in each st around. (30 sl st) Fasten off. This round makes the raised, ridged body and leaves the back loops of Rnd 2 free.
Wing Frames and Antennae
Rnd 4: Work into the free back loops of Rnd 2.
1. Join the yarn with a sc in A1.
2. Lower wing A: Ch 16, skip A2–A3, sc in A4.
3. Sc in A5.
4. Upper wing A: Ch 22, skip A6–A8, sc in A9.
5. Sc in H1 and H2.
6. Antennae: Sc in H3, ch 10, 3dc-cl in the 4th ch from the hook, sl st in each of the next 6 ch. Sc in H4 and make a second antenna the same way.
7. Sc in H5, H6, and B1.
8. Upper wing B: Ch 22, skip B2–B4, sc in B5.
9. Sc in B6.
10. Lower wing B: Ch 16, skip B7–B8, sc in B9.
11. Sc in T1–T6. Join to the first sc.
(20 sc, 4 chain loops of 16, 22, 22, and 16 ch, and 2 antennae about 1.5 in / 3.8 cm long)
Padded Cords
Rnd 5:
1. Ch 1, sc in the same st.
2. Work 26 sc into the lower wing A loop, then sc in the next 2 sc.
3. Work 36 sc into the upper wing A loop, then sc in the next sc.
4. Sl st in each of the 6 head sc, keeping the antennae in front.
5. Sc in the next sc, then work 36 sc into the upper wing B loop.
6. Sc in the next 2 sc, then work 26 sc into the lower wing B loop.
7. Sc in the next sc, then sl st in each of the 6 tail sc. Join.
(144 sts: 124 wing sc + 8 connector sc + 12 sl st)
Pack the sc tightly. They form a thick cord, and each loop opens into a teardrop.
Lace Fans
Rnd 6:
1. Ch 1, sc in the first sc.
2. Lower wing A: Sc in the next 3 sc, hdc in the next sc, ch 1, (dc in the next sc, ch 1) 18 times, hdc in the next sc, sc in the next 3 sc.
3. Sc in the next 2 sc.
4. Upper wing A: Sc in the next 3 sc, hdc in the next sc, dc in the next sc, ch 1, (tr in the next sc, ch 1) 26 times, dc in the next sc, hdc in the next sc, sc in the next 3 sc.
5. Sc in the next sc, sl st in each of the next 6 sts, sc in the next sc.
6. Upper wing B: Work as for upper wing A.
7. Sc in the next 2 sc.
8. Lower wing B: Work as for lower wing A.
9. Sc in the next sc, then sl st in each of the next 6 sts. Join.
(144 sts plus 92 ch-1 sps)
– Each upper wing: 36 sts (3 sc, hdc, dc, 26 tr, dc, hdc, 3 sc) and 27 ch-1 sps
– Each lower wing: 26 sts (3 sc, hdc, 18 dc, hdc, 3 sc) and 19 ch-1 sps
Rim
Rnd 7: Ch 1, sc in the first sc. Across every wing, sc in each st and in each ch-1 sp. Sc in each connector sc, and sl st in each of the 6 head and 6 tail sts. Join and fasten off.
(236 sts: 216 wing sc + 8 connector sc + 12 sl st) Each upper wing rim has 63 sc (36 + 27), and each lower wing rim has 45 sc (26 + 19).
Join points. Count each wing’s rim sc in the order you work them:
– Lower wing A: st 14 = bottom, st 30 = side
– Upper wing A: st 22 = side, st 46 = top
– Upper wing B: st 18 = top, st 42 = side
– Lower wing B: st 16 = side, st 32 = bottom
Mark these points on your test motif. If your shape is slightly different, move a point by 1 st, then use the same numbers on every motif.
Make All Pieces
- One panel: 48 ivory motifs. Finish motif 1 completely, then join motifs 2–48 as you work their Rnd 7.
- Pair: 96 ivory motifs, made as 2 separate panels.
Layout grid for one panel (all motifs upright, heads toward the top):
Row 1:   M1   M2   M3   M4
Row 2:   M5   M6   M7   M8
Row 3:   M9   M10  M11  M12
 ...    (repeat down)
Row 12:  M45  M46  M47  M48
Work each row from left to right, and the rows from top to bottom.
Joining
Method: Join as you go on Rnd 7. Work the rim sc at the join point, make a join sl st into the matching st, and keep going.
How the stitches match up:
– To the motif on the left: new upper B st 42 joins its upper A st 22, and new lower B st 16 joins its lower A st 30.
– To the motif above: new upper B st 18 joins its lower B st 32, and new upper A st 46 joins its lower A st 14.
Each join uses existing stitches and adds none. The rim stays at 236 sts, so the panel size is the sum of the motif sizes.
Tension: Pull each joining loop up to sc height. Tight joins pucker the wingtips, and loose joins let the motifs droop.
Size checkpoint: After grid Row 1, the strip should measure 32 in (81.3 cm) wide, within 0.5 in (1.3 cm). Two rows should measure 13 in (33.0 cm) tall. Fix any problems before you go on.
Border (Top Heading Band and Tabs)
Border gauge: 18 sc = 4 in (10.2 cm), so 32 in (81.3 cm) needs 144 sts. Work in rows across the top of motifs M1–M4, using the free top points of the upper wings.
Row 1 (foundation): Make a slipknot (not counted). Ch 5, sc in upper B sts 16–20, ch 16, sc in upper A sts 44–48, ch 5; repeat from * on each motif. Turn. Between motifs, the two ch-5 runs make ch 10. (36 sts per motif x 4 = 144 sts)*
Row 2: Ch 1, sc in each sc and each ch. Turn. (144 sc = 144 worked 1 per existing st + 0 extra)
Row 3: Ch 3 (counts as dc), dc in each remaining st. Turn. (144 dc)
Row 4: Ch 1, sc in each st. (144 sc) Fasten off.
Tabs (9 per panel): Each tab is 8 sts wide, with 9 sts between tabs. The tabs start at sts 1, 18, 35, 52, 69, 86, 103, 120, and 137.
1. Join the yarn and sc in 8 sts.
2. Work 19 more rows of 8 sc, turning with ch 1 each time. (20 rows, about 4 in / 10.2 cm)
3. Fold the tab to the back and whipstitch the last row to the back of Row 2.
A folded tab is about 1.75 in (4.4 cm) wide and 2 in (5.1 cm) deep. It fits a rod up to 1 in (2.5 cm) thick.
Why the math works:
– Each motif gives 36 band sts: 10 sc on the wing tops plus 26 ch across the dips.
– The chains already include half the gap to each neighbor, so you add no seam stitches.
– 4 x 36 = 144, and 144 ÷ 4.5 sts per in = 32 in (81.3 cm), which matches the grid.
– The tabs fit exactly: 9 x 8 + 8 x 9 = 144.
Final Blocking
- Weave in the ends along the padded cords, where they hide best.
- Soak the panel in cool water for 15 minutes. Press the water out in a towel, without wringing.
- Working on mats in sections, pin the heading straight to 32 in (81.3 cm).
- Pin the joins row by row so the columns stay square, to a total length of 79 in (200.7 cm).
- Pin each wing’s outer curve and gently open the teardrop centers.
- Straighten the antennae and round the knobs with your fingers.
- Let each section dry completely before you move on to the next.
Final Quality-Control Checklist
- Every motif has 236 rim sts and four even wing openings.
- All antennae point upward and have firm knobs.
- No join point is skipped or doubled.
- Before the border, the panel measures 32 x 78 in (81.3 x 198.1 cm).
- Every heading row has 144 sts.
- All 9 tabs are evenly spaced and securely stitched.
- The two panels of a pair match in length within 0.5 in (1.3 cm).
Troubleshooting
- Wing opening closes up or twists: The padding is too loose. Pack the 36 or 26 sc more tightly.
- Fans ruffle: Your tr are too tall. Pull up shorter loops, or use a 3.75 mm hook for Rnd 6 only.
- Fans cup: Work the ch-1 spaces a little looser.
- Join points don’t line up: Move the point by 1 st on every motif.
- Heading band ripples: The band gauge doesn’t match the motifs. Rework Row 1 with a hook size that gives gauge, keeping 144 sts.
Care
Hand wash in cool water with mild detergent and press out the water. Dry flat or over a rod, away from heat.
Final Notes
Here is the measurement chain:
– Gauge: 18 sc to 4 in (10.2 cm)
– One motif: 8 x 6.5 in (20.3 x 16.5 cm)
– 4 motifs across: 32 in (81.3 cm)
– 12 motifs down: 78 in (198.1 cm)
– The 144-st heading adds 1 in (2.5 cm), for a finished panel of 32 x 79 in (81.3 x 200.7 cm).
Check each measurement before you move to the next step, and the panel will hang straight. Happy crocheting!