

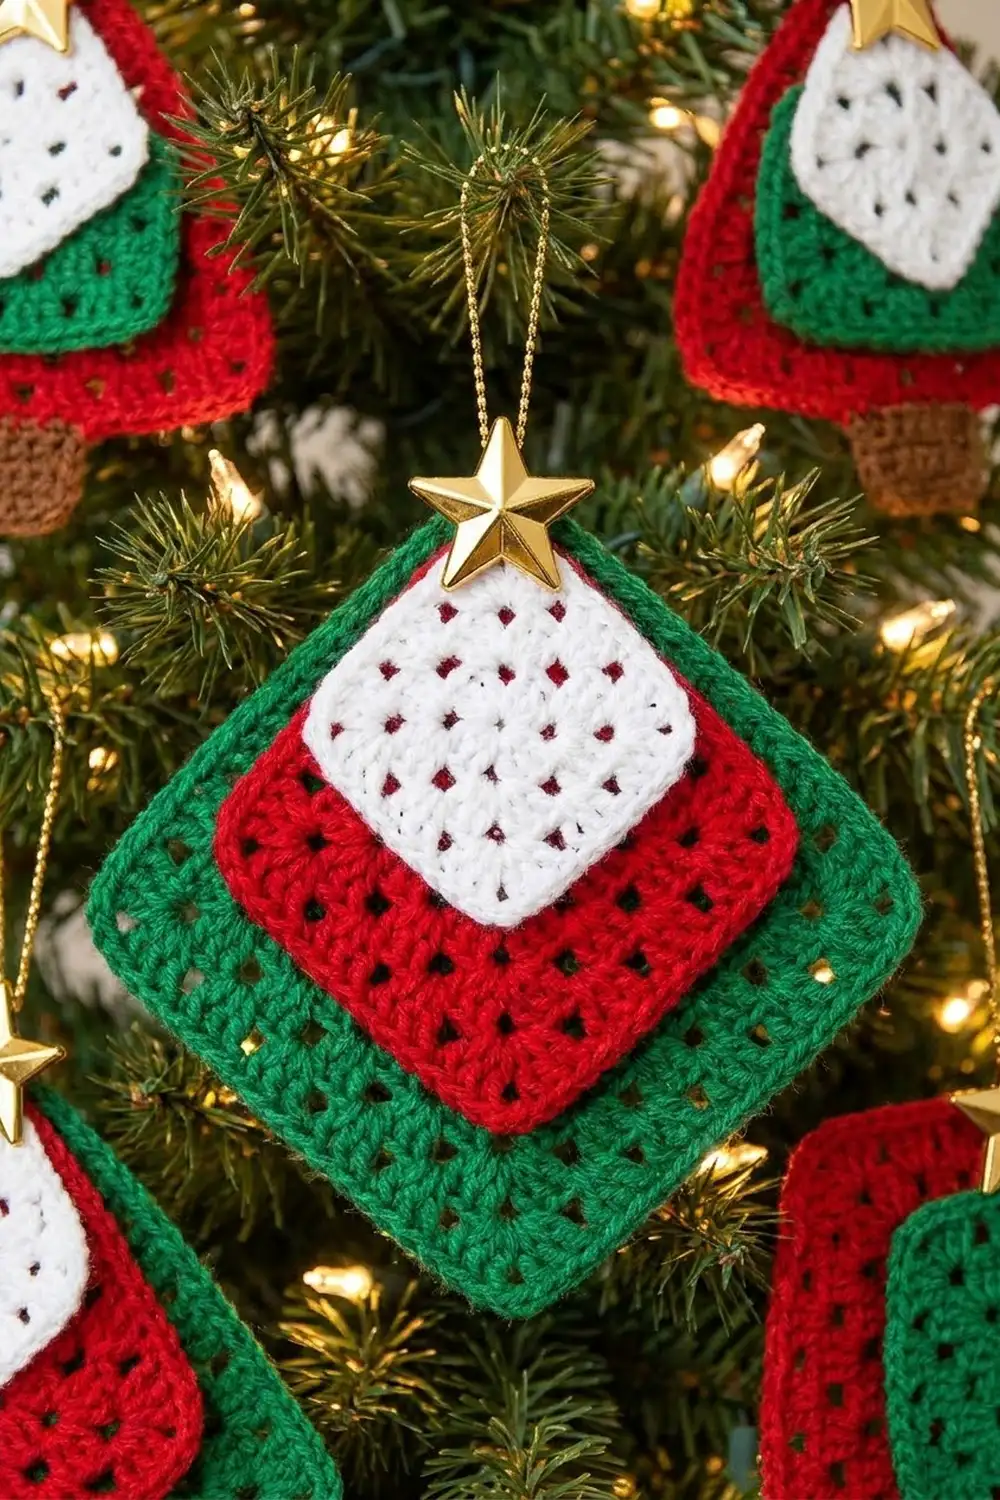
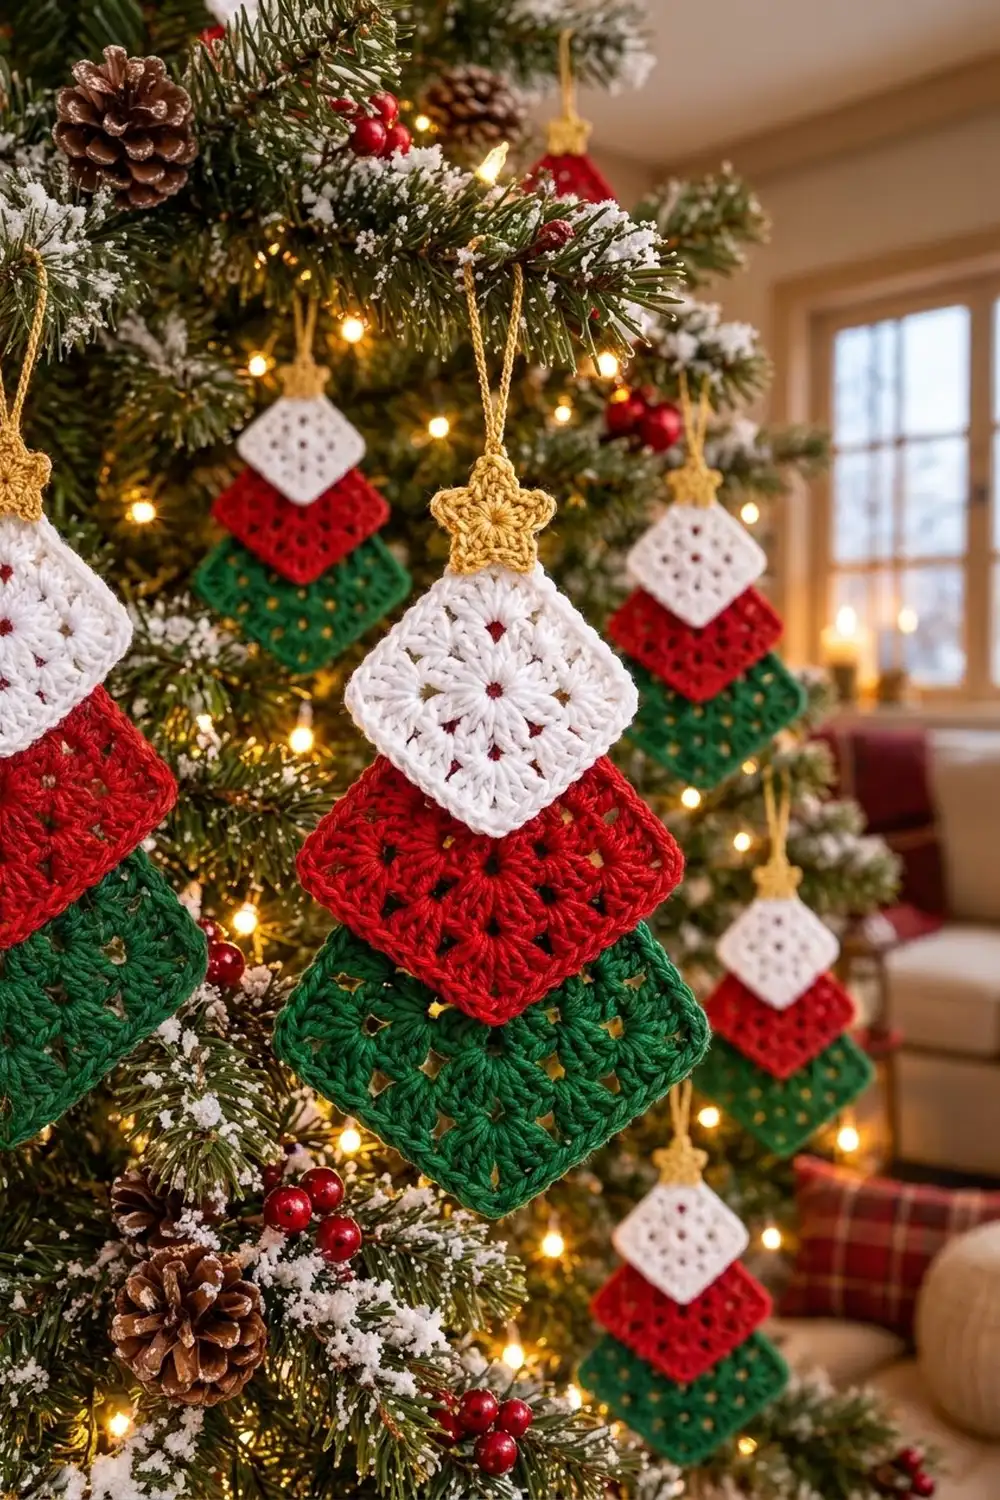
This little Christmas tree ornament is made from three granny squares turned on point and stacked like the tiers of a tree. A large green square sits at the bottom, a medium red square in the middle, and a small white square at the top. A tiny gold star with a chain hanging loop sits at the top of the tree.
The look is classic and cozy. Each square has the familiar granny texture of 3-dc clusters with small open gaps. A neat, solid single crochet edge gives every tier a crisp outline. A few tiny red French knots in the white square’s openings look like small berries.
The pattern uses US crochet terms. The finished ornament is about 5.7 in (14.5 cm) wide and 9.7 in (24.6 cm) tall from the bottom point to the star tip. With the hanging loop, it is about 11.5 in (29.2 cm) tall.
Construction is simple. You crochet three granny squares in different sizes (2, 3 and 4 rounds) and add a single crochet border to each. Then you make one five-point star with a chain loop. Finally, you stack the squares on point, overlap them by a set amount and tack them together.
Finished Size and Construction
- Finished size: about 5.7 in (14.5 cm) wide x 9.7 in (24.6 cm) tall; about 11.5 in (29.2 cm) with the loop
- Skill level: Easy
- Terminology: US crochet terms
- Yarn weight: Worsted (#4)
- Hook: 4.5 mm (US 7)
- Number of pieces: 4 (3 granny squares + 1 star with loop)
- Layout: One vertical stack, all squares on point, largest at the bottom
- Piece sizes (side length, with border): green 4.0 in (10.2 cm), red 3.25 in (8.3 cm), white 2.5 in (6.4 cm); star 1.5 in (3.8 cm) point to point
- Size before border: green 3.75 in (9.5 cm), red 3.0 in (7.6 cm), white 2.25 in (5.7 cm)
- Border depth: 1 round of sc, about 0.125 in (0.3 cm) per edge, adding 0.25 in (0.6 cm) to each side length
Materials
Choose a smooth worsted-weight yarn so the granny clusters stay clear. Acrylic is light and durable for tree ornaments. Cotton gives sharper stitch definition and blocks very flat. Use the same yarn type for all four colors so the tiers match in thickness.
Yarn (about 200 m per 100 g):
- Green: 10 g, 20 m (bottom square)
- Red: 8 g, 16 m (middle square and French knots)
- White: 6 g, 12 m (top square)
- Gold: 4 g, 8 m (star and loop)
All quantities include a margin of roughly 40-50% for your test piece, sewing tails and weaving in ends.
Tools:
- 4.5 mm (US 7) crochet hook
- Tapestry needle
- Scissors
- Ruler or tape measure
- Rust-proof pins and a blocking mat or folded towel
- Spray bottle with water
Abbreviations (US Terms)
- ch: chain
- sl st: slip stitch
- sc: single crochet
- hdc: half double crochet
- dc: double crochet
- sp: space
- st(s): stitch(es)
- corner: (3 dc, ch 2, 3 dc) all in the same ch-2 sp
Special stitch: French knot (embroidery). Bring the needle up from the back and wrap the yarn twice around the needle. Insert the needle back down right next to where it came up, and hold the wraps snug as you pull through.
Gauge and Checkpoints
You measure gauge on the squares themselves. Make the white square first as your test piece. It is quick, and it checks the two rounds that every square shares.
- After Round 1: about 1.25 in (3.2 cm) square
- After Round 2: 2.25 in (5.7 cm) square
- Each further granny round: adds 0.75 in (1.9 cm) to the side length
- Border round: adds 0.25 in (0.6 cm) to the side length
- Border gauge: about 4.5 sc per inch (1.8 sc per cm) along the edge
Measure the side length straight across from edge to edge, with the square lying flat and unstretched. Being within 0.125 in (0.3 cm) is fine.
If your square is too big: switch to a 4.0 mm (US G-6) hook. If it is too small: switch to a 5.0 mm (US H-8) hook. Change hooks for all pieces, not just one, so the tiers stay in proportion.
Granny Squares
All three squares share the same first rounds. The white square stops after Round 2, the red after Round 3 and the green after Round 4. Each square then gets the border round from the Border section before you stack them.
Work every round with the right side facing. Do not turn.
Round 1: Make a magic ring. Ch 3 (counts as first dc), 2 dc in ring, ch 2, 3 dc in ring, ch 2; repeat from * 2 more times. Sl st to top of beginning ch-3. Pull the ring closed. (12 dc, 4 ch-2 sps)*
Round 2: Sl st in next 2 dc and into the ch-2 sp. (Ch 3, 2 dc, ch 2, 3 dc) in same sp, ch 1, corner in next ch-2 sp, ch 1; repeat from * 2 more times. Sl st to top of beginning ch-3. (24 dc, 4 corners, 4 ch-1 sps)*
Checkpoint: 2.25 in (5.7 cm) per side.
White square: stop here and go to the Border section.
Round 3 (red and green only): Sl st in next 2 dc and into the ch-2 sp. (Ch 3, 2 dc, ch 2, 3 dc) in same sp, ch 1, 3 dc in next ch-1 sp, ch 1, corner in next ch-2 sp, ch 1, 3 dc in next ch-1 sp, ch 1; repeat from * 2 more times. Sl st to top of beginning ch-3. (36 dc, 4 corners, 8 ch-1 sps)*
Checkpoint: 3.0 in (7.6 cm) per side.
Red square: stop here and go to the Border section.
Round 4 (green only): Sl st in next 2 dc and into the ch-2 sp. (Ch 3, 2 dc, ch 2, 3 dc) in same sp, ch 1, (3 dc in next ch-1 sp, ch 1) twice, corner in next ch-2 sp, ch 1, (3 dc in next ch-1 sp, ch 1) twice; repeat from * 2 more times. Sl st to top of beginning ch-3. (48 dc, 4 corners, 12 ch-1 sps)*
Checkpoint: 3.75 in (9.5 cm) per side.
The pattern follows a simple rule. After Round n, a square has 12n dc in total and 3n dc per side, counting the half-corner groups at each end. Each side also has n – 1 ch-1 sps.
Gold Star with Loop
Round 1: With gold, make a magic ring. Ch 2 (does not count as a st), 10 hdc in ring. Sl st to first hdc. Pull the ring closed. (10 hdc)
The circle should measure about 0.75 in (1.9 cm) across.
Round 2 (points): Ch 4, sl st in 2nd ch from hook, sc in next ch, hdc in next ch, skip next hdc, sl st in next hdc; repeat from * 4 more times. The last sl st lands in the first hdc of the round. (5 points)*
Each point uses 2 hdc of Round 1, so 5 points x 2 sts = 10 sts, exactly the Round 1 count. The star measures about 1.5 in (3.8 cm) point to point. Fasten off, leaving a 10 in (25.4 cm) tail for sewing.
Hanging loop: Join gold with a sl st at the tip of one point. Ch 20, then sl st in the same tip. Fasten off and weave in the end. The loop stands about 1.75 in (4.4 cm) tall.
Make All Pieces
You need one of each piece:
- Green: 1 square, Rounds 1-4 + border (72 sc)
- Red: 1 square, Rounds 1-3 + border (56 sc)
- White: 1 square, Rounds 1-2 + border (40 sc)
- Gold: 1 star with loop
Red accents on the white square: Cut a 12 in (30.5 cm) length of red. Work 5 French knots on the white square: one in the center ring and one in each of the 4 ch-1 sps of Round 2. Secure the tails on the back.
Layout (all squares on point, top to bottom):
     [ Gold star + loop ]
     [ White, 2.5 in    ]
     [ Red, 3.25 in     ]
     [ Green, 4.0 in    ]
Joining
The squares are stacked, not seamed edge to edge. Each upper square overlaps the one below it, and you tack down only its two lower border edges.
Step 1: Position the red square. Lay the green square on point, right side up. Place the red square on point on top of it, with the red bottom corner exactly on the green square’s center ring. Center it left to right. The red square now covers the upper half of the green square.
Step 2: Tack red to green. Thread a tapestry needle with red yarn. Along the red square’s two lower sides, take one small stitch through each border sc, catching the green fabric directly underneath. Each side has 15 sc including both corners, and the two sides share the bottom corner. That gives 15 + 15 – 1 = 29 tacking stitches.
Step 3: Position the white square. Place the white square on point on top of the red, with its bottom corner on the red square’s center ring.
Step 4: Tack white to red. With white yarn, work one stitch through each border sc along the white square’s two lower sides: 11 + 11 – 1 = 21 tacking stitches.
Step 5: Attach the star. Place the star so its two lower points and center overlap the white square’s top corner by 0.5 in (1.3 cm), with the loop pointing straight up. Use the gold tail to sew around the star’s center circle, then tack down the tips of the two lower points.
Tension tip: Keep the tacking stitches snug but not tight. If the lower square ripples, snip them and redo them with a little more slack.
Size checkpoint after joining:
- Green bottom point to red bottom point: about 2.85 in (7.2 cm)
- Red bottom point to white bottom point: about 2.3 in (5.8 cm)
- Width at the widest point: 5.7 in (14.5 cm), which is the green square’s diagonal
- Bottom point to white top point: about 8.7 in (22.1 cm)
- Bottom point to star tip: about 9.7 in (24.6 cm)
Border
Each square gets one round of sc in its own color. Work it right after the last granny round, before stacking. This round makes the solid outline around every tier.
Border gauge: about 4.5 sc per inch (1.8 sc per cm) along the edge.
Border Round: Do not fasten off after the last granny round. Ch 1, then sc in the same st as the join and in the next 2 dc. Continue around: sc in each dc and in each ch-1 sp, and work 3 sc in each ch-2 corner sp. Sl st to first sc. Fasten off.
Counts:
- White (n = 2): 40 sc total, 11 sc per side including both corner sts
- Red (n = 3): 56 sc total, 15 sc per side including both corner sts
- Green (n = 4): 72 sc total, 19 sc per side including both corner sts
Why the math works: After Round n, each side holds 3n dc and n – 1 ch-1 sps. The 3 sc in a corner are one center corner sc plus one flanking sc for each of the two sides that meet there. So each side gets 3n + (n – 1) + 2 flanking sc = 4n + 1 sts between corners. Adding the 2 corner center sts gives 4n + 3 per side. Each corner is shared by two sides, so the total is 4 x (4n + 3) – 4 = 16n + 8. For green, that is 16 x 4 + 8 = 72 total and 4 x 4 + 3 = 19 per side.
Checkpoints after border: white 2.5 in (6.4 cm), red 3.25 in (8.3 cm), green 4.0 in (10.2 cm) per side.
Final Blocking
- Weave in all ends. Run each tail through stitches of its own color so nothing shows through the open gaps.
- Lay the ornament face up on a blocking mat or folded towel.
- Pin the green square’s four corners. The bottom point should sit straight below the star, and the side corners should be 5.7 in (14.5 cm) apart.
- Pin the visible side corners of the red and white squares so they sit level, left to right.
- Shape the star points with your fingers and pin each tip.
- Mist evenly until damp, not soaked. Pat the clusters flat.
- Let it dry completely, at least 6 hours, before unpinning.
- Hang it by the loop to check that it hangs straight.
Final Quality-Control Checklist
- Green: 48 dc and 72 border sc; red: 36 dc and 56 sc; white: 24 dc and 40 sc
- Each square is within 0.125 in (0.3 cm) of its target side length
- Corners are sharp, with 3 sc in each corner
- Red bottom corner sits on the green center ring; white bottom corner sits on the red center ring
- 29 tacking stitches on red and 21 on white, none visible from the front
- 5 red French knots on the white square
- Star has 5 even points, with the loop centered
- Ornament hangs straight with no curling edges
Troubleshooting
Square cups. Your ch-2 corners are too tight. Loosen them or go up a hook size.
Square ripples. Your ch-1 sps are too loose. Keep them snug, or go down a hook size.
Square looks skewed. Make sure each round starts in a ch-2 corner sp after the sl sts.
Border count is off. Count each side before the border: you need 3n dc and n – 1 ch-1 sps.
Star points are floppy. Chain more tightly, or use a 4.0 mm (US G-6) hook for the star only.
Ornament tilts. The star is off-center. Re-sew it so the loop lines up with the green bottom point.
Care
Spot clean with a damp cloth and mild soap, then reshape and lay flat to dry. Store flat in tissue paper between seasons so the corners stay crisp.
Final Notes
The measurement chain is short and reliable. Round 2 sets your base at 2.25 in (5.7 cm). Each extra round adds 0.75 in (1.9 cm), and the border adds 0.25 in (0.6 cm). That gives tiers of 2.5 in (6.4 cm), 3.25 in (8.3 cm) and 4.0 in (10.2 cm). Turned on point and stacked corner to center, they form a tree about 5.7 in (14.5 cm) wide and 9.7 in (24.6 cm) tall to the star tip. Check each square as you go, and the finished ornament will come out as planned.
Happy crocheting!