

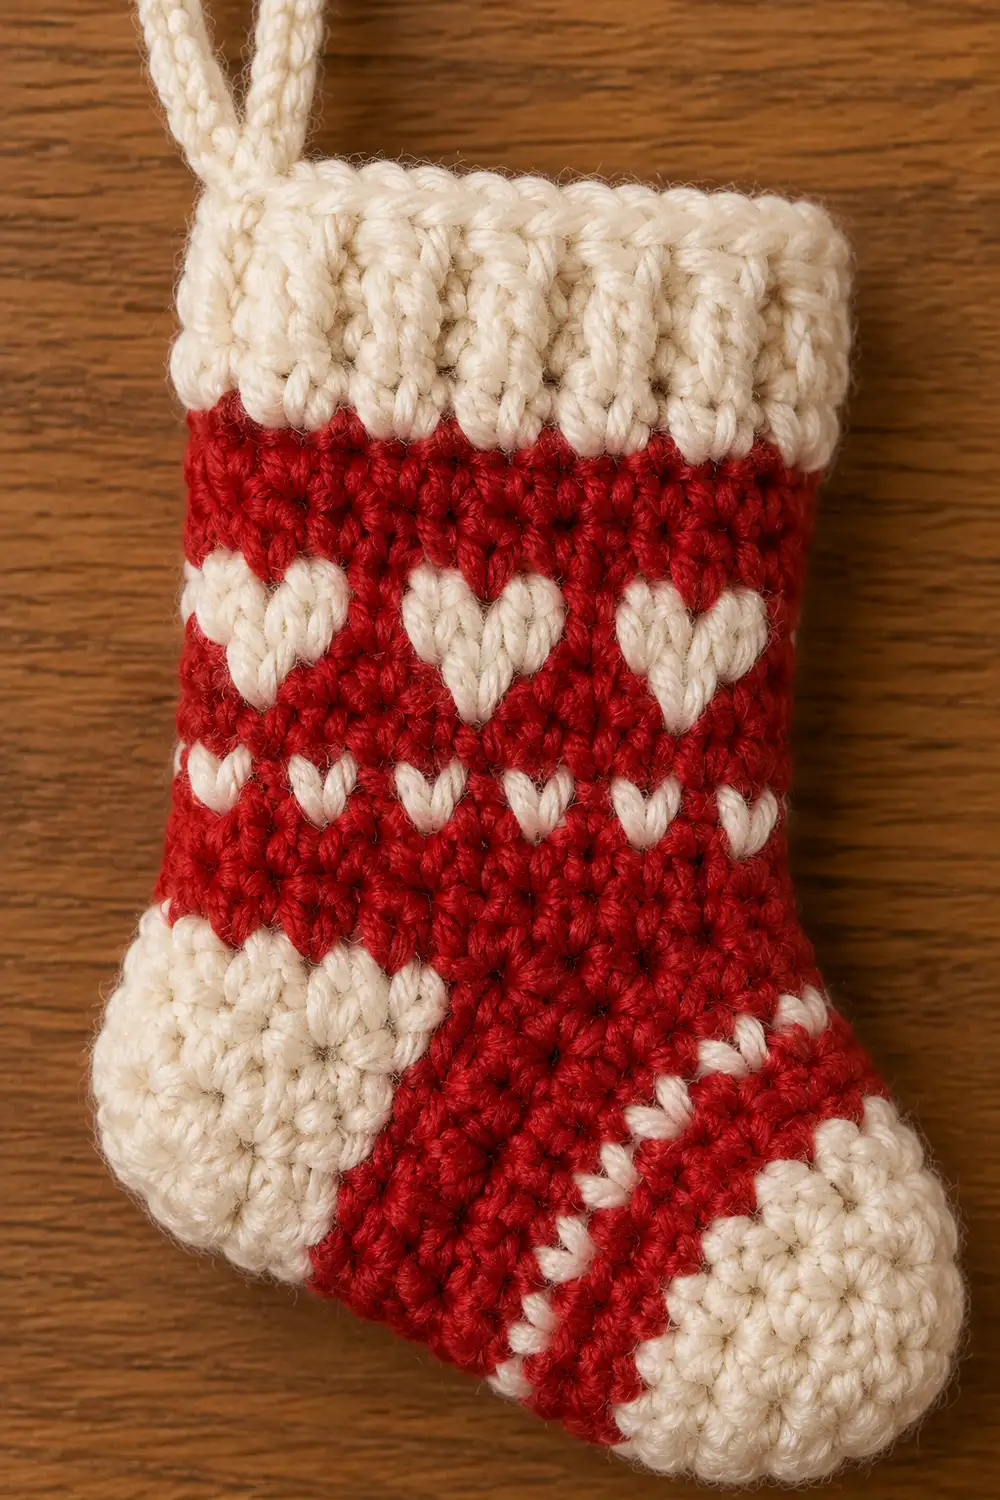
This little stocking is a classic tree ornament in miniature. It has a cream ribbed cuff with a hanging loop, a red leg with a band of cream tapestry-crochet hearts, and a cream heel, sole, and rounded toe.
The style is cozy and Nordic-inspired, with a traditional red-and-cream palette. Single crochet keeps the fabric firm. Tapestry crochet, where you carry the unused color inside the stitches, works the hearts and dots straight into the fabric, so there is nothing to sew on.
This pattern uses US crochet terms. The finished ornament is about 3.5 in (8.9 cm) tall from cuff to sole and 2.5 in (6.4 cm) long from heel to toe.
The stocking is made as one piece from cuff to toe. You chain a ring, work the ridged cuff in joined rounds, and then spiral down the leg with the heart chart. Next you work a cream heel flap in rows. You pick up stitches around the flap to rejoin the round, decrease the gusset back to 24 stitches, and finish with an evenly decreased rounded toe.
Finished Size and Construction
- Finished size: 3.5 in (8.9 cm) tall; 2.5 in (6.4 cm) heel to toe; leg 1.7 in (4.3 cm) wide when flat
- Skill level: Intermediate (tapestry crochet, heel flap)
- Terminology: US terms
- Yarn weight: DK (#3)
- Hook: 3.25 mm (US D/3)
- Number of pieces: 1
- Layout: one continuous piece, cuff to toe, plus a chain hanging loop
- Piece size: 3.5 in (8.9 cm) tall
- Size before border: about 3.35 in (8.5 cm) tall
- Border depth: 1 round of sc at the cuff top, about 0.15 in (0.4 cm)
Materials
Use a smooth, firm cotton or cotton-blend DK yarn. Light colors and clear stitch definition keep the hearts crisp. Fuzzy or very soft acrylic blurs the motifs and lets the carried strand show through.
- Cream (C): 6 g / 14 m (cuff, hearts, dots, heel, sole, toe, loop)
- Red (R): 5 g / 12 m (leg, instep)
Tools:
- 3.25 mm (US D/3) hook
- Stitch marker
- Tapestry needle
- Scissors
- Pins and a foam mat for blocking
- Optional: a small scrap of cardboard cut to the stocking shape, for blocking
The quantities include a margin of about 20% for swatching and tails.
Abbreviations (US Terms)
- ch: chain
- sl st: slip stitch
- sc: single crochet
- sc2tog: single crochet 2 together (insert in next st, pull up loop, insert in following st, pull up loop, yo, pull through all 3 loops)
- BLO: back loop only
- st(s): stitch(es)
- rnd(s): round(s)
- RS / WS: right side / wrong side
- C / R: cream / red
Special technique – tapestry color change: Work the last yarn-over of the stitch before the color change with the new color. Lay the unused strand along the tops of the stitches and work over it, so it travels hidden inside the sc. Keep the carried strand relaxed, never pulled tight.
Gauge and Checkpoints
Gauge: 7 sc and 7 rnds = 1 in (2.5 cm) in tapestry sc worked in the round.
Since this is a single small piece, the stocking itself is your swatch. Work through Rnd 6 and measure before you commit to the colorwork.
Checkpoints:
- After Rnd 5 (cuff): flat width 1.7 in (4.3 cm); depth about 0.7 in (1.8 cm).
- After Rnd 12 (leg): total length from the foundation edge is about 1.7 in (4.3 cm); width is still 1.7 in (4.3 cm).
- After the heel flap (6 rows): flap depth about 0.85 in (2.2 cm).
- After Foot Rnd 7: foot flat width 1.7 in (4.3 cm).
- Finished: 3.5 in (8.9 cm) tall, 2.5 in (6.4 cm) heel to toe.
If too big: go down to a 3.0 mm hook, or tighten your carried strand slightly.
If too small: go up to a 3.5 mm hook.
A gauge of 6 sc per in instead of 7 makes the ornament about 4 in (10.2 cm) tall. That is still within ornament range, but it uses about 15% more yarn.
Cuff (Cream)
The cuff is worked in joined rounds. Working in the back loop only creates the ridged rib texture.
Foundation: With C, ch 24. Sl st to the first ch to form a ring, taking care not to twist the chain.
Rnd 1: Ch 1, sc in each ch around, sl st to first sc. (24 sts)
Rnds 2–5: Ch 1, sc BLO in each st around, sl st to first sc. (24 sts)
Checkpoint 1: the flat width should be 1.7 in (4.3 cm).
Leg (Red with Cream Hearts)
From here, work in a continuous spiral. Do not join. Move the marker to the first st of each rnd. Keep C attached and carry it through every round.
Rnd 6: Join R with the last yo of the final sl st of Rnd 5. Sc in each st around, carrying C. (24 sts: 24 R)
Heart band (6 repeats of 4 sts):
Rnd 7 (heart tops): 1 C, 1 R, 1 C, 1 R; rep from * 5 more times. (24 sts: 12 C, 12 R)*
Rnd 8 (heart middles): 3 C, 1 R; rep from * 5 more times. (24 sts: 18 C, 6 R)*
Rnd 9 (heart points): 1 R, 1 C, 2 R; rep from * 5 more times. (24 sts: 6 C, 18 R)*
Because you work top-down, the two bumps of each heart come first and the point comes last. The hearts sit right side up when the stocking hangs. Each heart is 3 sts wide and 3 rnds tall, about 0.4 in (1.0 cm). Six hearts circle the leg, so three show on each flat side.
Rnd 10: Sc in each st with R. (24 sts)
Rnd 11 (dot stripe): 3 R, 1 C; rep from * 5 more times. (24 sts: 18 R, 6 C)* Each cream dot falls in the gap between two hearts.
Rnd 12: Sc in each st with R. (24 sts)
Fasten off R, leaving a 6 in (15.2 cm) tail. Keep C attached.
Checkpoint 2: the piece is about 1.7 in (4.3 cm) from the foundation edge. After the border round it will measure 1.85 in (4.7 cm) from cuff top to heel.
Heel Flap (Cream, Worked in Rows)
The heel is worked back and forth over the first 12 sts of the round only. The other 12 sts are left unworked for the instep.
Row 1 (RS): With C, ch 1, sc in each of the next 12 sts, turn. (12 sts)
Rows 2–4: Ch 1, sc in each st across, turn. (12 sts)
Row 5: Ch 1, sc 4, (sc2tog) 2 times, sc 4, turn. (10 sts)
Row 6: Ch 1, sc 3, (sc2tog) 2 times, sc 3. (8 sts) Do not turn yet.
The center decreases in Rows 5–6 cup the bottom of the flap. Together with the gusset below, this creates the angled heel. You now have the WS facing, at the same edge where the round started.
Checkpoint 3: the flap is about 0.85 in (2.2 cm) deep.
Foot (Cream Sole, Red Instep)
Foot Rnd 1 (pick-up round): Turn so the RS faces you. Ch 1 and work as follows:
- With C, sc in each of the 8 heel sts.
- Work 4 sc evenly along the side edge of the heel flap (1 sc in every row-end except Rows 2 and 5). Change to R on the last yo.
- Join R. With R, sc in each of the 12 unworked instep sts from Rnd 12, carrying C. Change to C on the last yo.
- Work 4 sc evenly along the other side edge of the flap with C, carrying R.
Place the marker in the first heel st. (28 sts: 8 + 4 + 12 + 4; 16 C, 12 R)
Foot Rnd 2: With C: sc 8, sc 2, sc2tog. With R: sc 12. With C: sc2tog, sc 2. (26 sts: 14 C, 12 R)
Foot Rnd 3: With C: sc 8, sc 1, sc2tog. With R: sc 12. With C: sc2tog, sc 1. (24 sts: 12 C, 12 R)
The two gusset rounds remove the 4 extra pick-up sts, so the foot is back to the leg’s 24 sts.
Foot Rnd 4: 12 C, 12 R. (24 sts)
Foot Rnd 5 (instep dots): 12 C, then 2 R, 1 C, 1 R; rep from * 2 more times. (24 sts: 15 C, 9 R)*
Foot Rnds 6–7: 12 C, 12 R. (24 sts)
Fasten off R, leaving a 6 in (15.2 cm) tail. The 7 foot rnds measure 1 in (2.5 cm).
Checkpoint 4: the foot flat width is 1.7 in (4.3 cm).
Rounded Toe (Cream)
The 4 decrease points are evenly spaced, and each round has one fewer sc between decreases. This shapes a smooth dome rather than a point.
Toe Rnd 1: Sc 4, sc2tog; rep from * 3 more times. (20 sts)*
Toe Rnd 2: Sc 3, sc2tog; rep from * 3 more times. (16 sts)*
Toe Rnd 3: Sc 2, sc2tog; rep from * 3 more times. (12 sts)*
Toe Rnd 4: Sc 1, sc2tog; rep from * 3 more times. (8 sts)*
Toe Rnd 5: Sc2tog; rep from * 3 more times. (4 sts)*
Fasten off, leaving an 8 in (20.3 cm) tail. Thread it through the front loops of the last 4 sts, pull closed, and weave in on the inside. The toe is 5 rnds, about 0.7 in (1.8 cm).
Border: Top Edge and Hanging Loop
Border gauge: the border matches the body at 7 sc per in. No density change is needed.
Border Rnd: With the cuff top facing you, join C in the free loop of the foundation ch at the round’s starting point. Ch 1, sc in each of the 24 free loops around, sl st to first sc.
This is a conversion round: 24 sc worked one into each existing foundation loop, plus 0 extra sts. (24 sts; 12 per side when flat)
Hanging loop: Count to the 6th sc of the Border Rnd. This sits at center back, directly above the heel. Sl st into it, ch 16, and sl st back into the same st. The loop is about 1 in (2.5 cm) tall. Fasten off and weave the tail back through the chain to firm it.
Why the math works: the cuff ring is 24 sts. Laid flat, that is 12 sts per side. At 7 sc per in, 12 sts = 1.7 in (4.3 cm), the same width as the cuff below. Because the border places exactly 1 sc per foundation loop at the body gauge, it adds height (0.15 in / 0.4 cm) without flaring or pulling in. Cuff Rnds 1–5 plus the border make 6 rnds, about 0.85 in (2.2 cm) of cream.
Final Blocking
- Weave in all tails on the inside. Bury each one through same-color stitches.
- Lightly mist the stocking with water, or hover a steam iron over it without touching.
- Lay it flat with the heel pointing to one side. Center the hearts so 3 show on the front.
- Optional: slip in a cardboard shape cut to 1.7 in (4.3 cm) wide to hold an even tube.
- Pin to 3.5 in (8.9 cm) tall and 2.5 in (6.4 cm) heel to toe.
- Press the heel corner into a clean angle and round the toe with your fingertips.
- Let it dry completely, then remove the pins.
Final Quality-Control Checklist
- Cuff: 6 cream rounds total, with visible BLO ridges.
- Hearts: 6 hearts, each 3 sts wide and 3 rnds tall, right side up.
- Dots: 6 cream dots in Rnd 11, centered between hearts.
- Heel: cream, 6 rows, cupped, with no gaps at the pick-up corners.
- Foot: 24 sts after the gusset, with the cream sole and red instep aligned.
- Toe: rounded, closed with no hole.
- Loop: centered above the heel and secure.
- Finished size: 3.5 in (8.9 cm) tall, 2.5 in (6.4 cm) heel to toe.
Troubleshooting
Hearts lean or shift slightly each round: This is the natural spiral jog. Keep color counts exact and block the hearts straight.
Cream shows through the red: Your carried strand is too tight or too loose. Hold it snug against the stitch tops and work fully over it.
Holes at the heel corners: Pick up 1 extra sc at each corner in Foot Rnd 1, then work 1 extra sc2tog in the same spot in Foot Rnd 2.
Fabric puckers: Your carried yarn is pulled tight. Stretch the work gently every few stitches.
Toe looks pointed: Check that the 4 decreases stack evenly in Toe Rnds 1–5.
Ornament too large: Re-check gauge and change hook size. Do not drop stitches, or the 4-st heart repeat will break.
Care
Spot clean with cool water and mild soap. Reshape and dry flat. Store flat or hanging, away from heat.

Final Notes
The whole ornament comes from one measurement chain: 7 sc per in turns 24 sts into a 1.7 in (4.3 cm) flat tube. Thirteen rounds above the heel give 1.85 in (4.7 cm). The foot’s 1.7 in (4.3 cm) depth brings the total to 3.5 in (8.9 cm). The 12-stitch heel flap and 4-stitch gussets turn the corner and return the foot to 24 sts. Five rounded toe rounds and the heel complete the 2.5 in (6.4 cm) foot. Keep that 24-stitch count steady and the hearts, heel, and toe will all line up.
Optional: make several stockings in different color pairs for a matching ornament set.
Happy crocheting!