

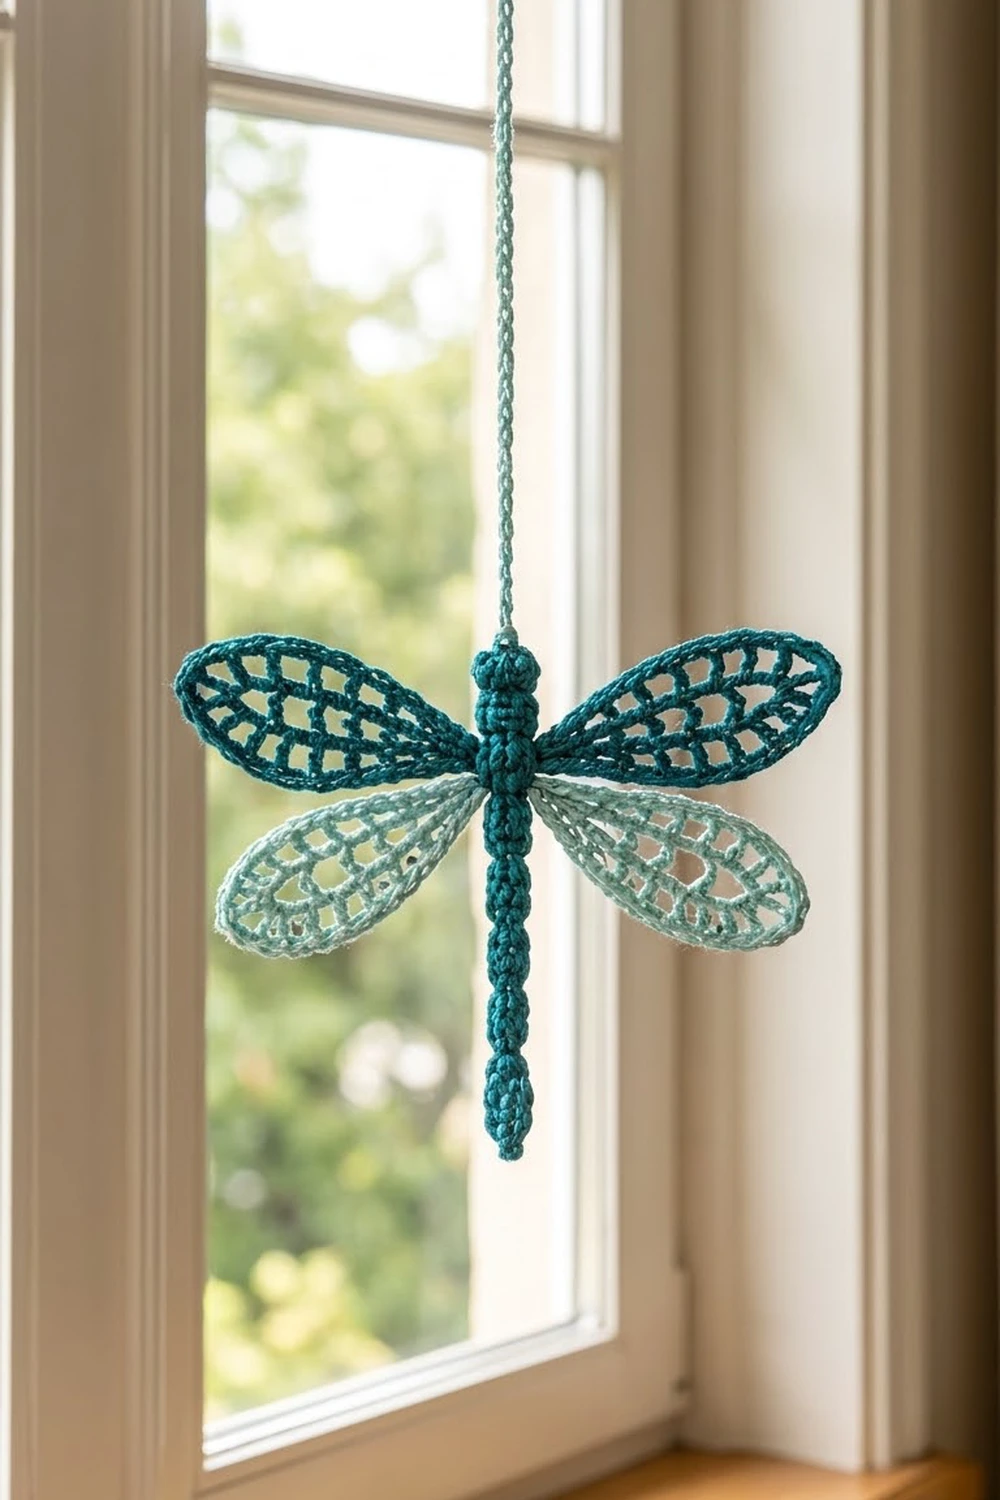
The Teal Lace Dragonfly is a single crochet motif with a firm, segmented body and four see-through wings. The body and upper wings are deep teal. The lower wings are soft mint, so the shape reads clearly from across a room.
Each wing has a center chain “vein” with rectangular mesh windows on both sides, a ring of small arched openings and a smooth single crochet outline that looks like a thin cord. The body is a narrow, lightly stuffed tube shaped into a round head, a wider thorax and ten bead-like abdomen segments.
This pattern uses US crochet terms. The finished dragonfly measures about 7 in (17.8 cm) across the upper wings and 6 in (15.2 cm) from head to tail tip.
You crochet the body in continuous rounds, stuff it lightly and close the tail. Then you join thread directly to the thorax and work each wing around its own foundation chain, so there is no sewing. An optional loop at the head lets you hang the motif.
Finished Size and Construction
- Finished size: 7 in (17.8 cm) upper wingspan × 6 in (15.2 cm) body length
- Lower wingspan: about 6.5 in (16.5 cm)
- Skill level: Intermediate
- Terminology: US crochet terms
- Yarn weight: Size 3 cotton crochet thread (lace/fingering)
- Hook: 2.25 mm (B-1)
- Number of pieces: 1 (the wings are worked directly onto the body)
- Layout: single motif, with two upper wings above two lower wings
- Upper wing size: 3.25 in (8.3 cm) long × 1.25 in (3.2 cm) wide
- Lower wing size: 3 in (7.6 cm) long × 1.25 in (3.2 cm) wide
- Wing size before border: upper about 3.1 in (7.9 cm) × 1 in (2.5 cm); lower about 2.9 in (7.4 cm) × 1 in (2.5 cm)
- Border depth: about 0.125 in (0.3 cm) on each edge
Materials
Use a mercerized cotton thread. It keeps the mesh openings crisp and blocks well. Fuzzy fibers will blur the lace.
- Color A, Dark Teal: 15 g (about 42 m), for the body and upper wings
- Color B, Mint: 8 g (about 22 m), for the lower wings
These amounts assume a thread with about 140 m per 50 g. They include a margin for tails and a little re-working.
Tools:
- 2.25 mm (B-1) crochet hook
- Small pinch of polyester fiberfill
- Blunt tapestry needle
- 4 locking stitch markers
- Scissors
- Blocking mat, rustproof pins and a spray bottle
- Optional: fabric stiffener
Abbreviations (US Terms)
- ch = chain
- sl st = slip stitch
- sc = single crochet
- hdc = half double crochet
- dc = double crochet
- inc = 2 sc in the same stitch
- dec = invisible decrease (see below)
- MR = magic ring
- st(s) = stitch(es)
- sp(s) = space(s)
- rnd = round
- rep = repeat
Invisible decrease (dec): Insert the hook into the front loop only of each of the next 2 sts. Yarn over and pull through both front loops, then yarn over and pull through both loops on the hook.
Position: In the wing rounds, a “position” is any single stitch or ch-1 space from the previous round. Counting positions keeps the lace even.
Gauge and Checkpoints
- Body gauge: 8 sc and 8 rnds = 1 in (2.5 cm), in tight continuous rounds
- Wing chain gauge: 8 ch = 1 in (2.5 cm)
- Outline gauge: about 9 sc = 1 in (2.5 cm) along the wing edge
The body is your gauge swatch. Measure it at each checkpoint before you go on.
- After Rnd 12 (head and thorax): 1.5 in (3.8 cm) long
- After Rnd 42 (abdomen done): 5.25 in (13.3 cm) long
- After Rnd 48 (body done): 6 in (15.2 cm) long
- Upper wing after Rnd 1: 3 in (7.6 cm) long, about 0.6 in (1.5 cm) wide
- Lower wing after Rnd 1: 2.75 in (7.0 cm) long, about 0.6 in (1.5 cm) wide
If the body is too long, change to a 2 mm hook. If it is too short, change to a 2.5 mm hook. If only the wings are off, adjust your chain tension. Loose chains make long, floppy wings. Tight chains make the mesh pucker.
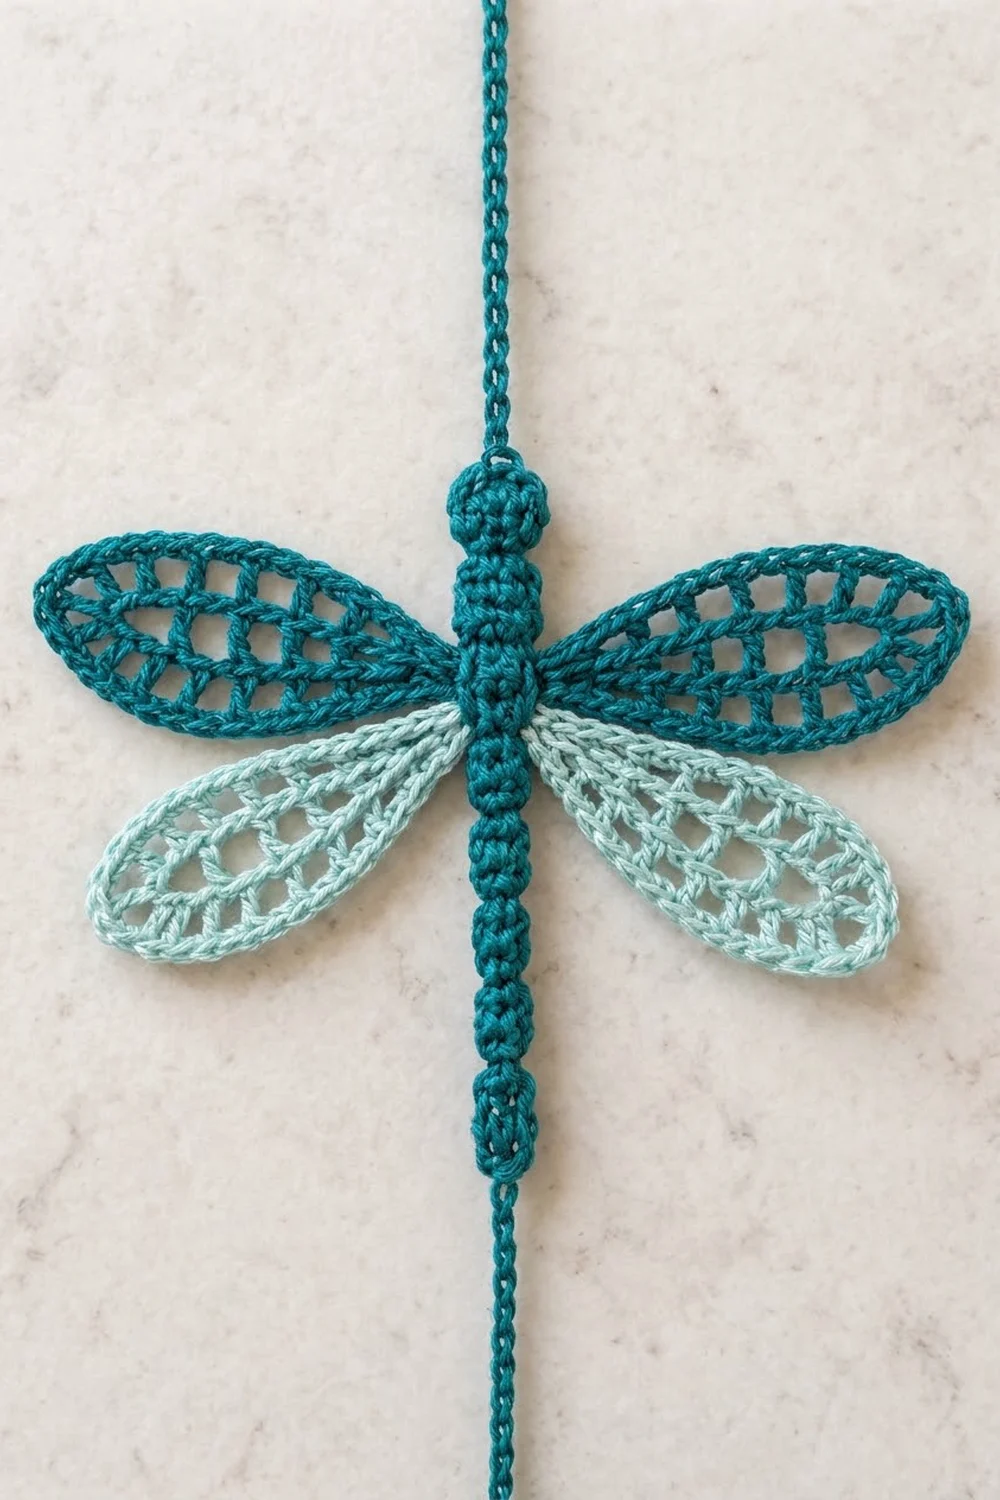
Body (Color A)
Work in continuous rounds without joining. Move a marker up to the first stitch of each round. That first stitch is st 1, and it sits on the underside of the body.
Head
- Rnd 1: 6 sc in MR. (6)
- Rnd 2: (sc, inc) 3 times. (9)
- Rnd 3: sc in each st around. (9)
- Rnd 4: (sc, dec) 3 times. (6)
Push a small pinch of fiberfill into the head.
Thorax
- Rnd 5: (sc, inc) 3 times. (9)
- Rnd 6: (2 sc, inc) 3 times. (12)
- Rnds 7–10: sc in each st around. (12)
In Rnd 7, place a marker in st 4 and another in st 10. In Rnd 9, do the same. These are the four wing anchors. Sts 4 and 10 are each 3 stitches away from st 1, so they sit on opposite sides of the body.
- Rnd 11: (2 sc, dec) 3 times. (9)
Stuff the thorax just enough to hold a round shape.
- Rnd 12: (sc, dec) 3 times. (6)
Checkpoint: 1.5 in (3.8 cm) from the top of the head.
Abdomen
Each segment takes 3 rounds and makes one small bead shape.
- Segment Rnd A: (2 sc, inc) 2 times. (8)
- Segment Rnd B: sc in each st around. (8)
- Segment Rnd C: (2 sc, dec) 2 times. (6)
Work Segment Rnds A–C 10 times in total (Rnds 13–42). After every 2 segments, push in a tiny wisp of fiberfill with the back of your hook.
Checkpoint: 5.25 in (13.3 cm) long.
Tail
- Rnds 43–47: sc in each st around. (6)
- Rnd 48: dec 3 times. (3)
Fasten off. Thread the tail through the remaining front loops, pull it closed and weave it in.
Checkpoint: 6 in (15.2 cm) long and about 0.5 in (1.3 cm) wide at the thorax.
Optional hanging loop: Join Color A with a sl st at the center top of the head, ch 16, then sl st in the same st. Fasten off. The loop stands about 1 in (2.5 cm) tall.
Upper Wings (Color A, make 2)
Setup: Join Color A with a sl st in a marked Rnd 7 st, then ch 25. Ch 1 is the base chain beside the body, and ch 25 is at the tip.
Rnd 1 (vein and mesh):
- Side A: sc in the 2nd ch from the hook (ch 24), hdc in the next ch, dc in the next ch, then (ch 1, sk 1 ch, dc in the next ch) 10 times. The last dc lands in ch 2.
- Base: 3 sc in the base chain.
- Side B: Working along the opposite side of the chain, dc in ch 2, then (ch 1, sk 1 ch, dc in the next ch) 10 times. Hdc in ch 23 and sc in ch 24.
- Tip: 3 sc in ch 25. Sl st to the first sc.
Count: 13 sts and 10 ch-1 sps on each side, plus 3 sc at the base and 3 sc at the tip. That makes 32 sts and 20 ch-1 sps, or 52 positions.
Rnd 2 (arched openings): Ch 1, sc in the first sc. *Ch 2, sk the next position, sc in the next position; rep from * 24 more times. Ch 2, sk the last position and sl st to the first sc. (26 sc, 26 ch-2 sps)
Each sc lands on a dc top or on the center sc at the base or tip. That gives 12 sc on Side A, 1 at the base, 12 on Side B and 1 at the tip.
Checkpoint: about 3.1 in (7.9 cm) × 1 in (2.5 cm).
Lower Wings (Color B, make 2)
Setup: Join Color B with a sl st in a marked Rnd 9 st, directly below an upper wing. Ch 23.
Rnd 1:
- Side A: sc in the 2nd ch from the hook (ch 22), hdc in the next ch, dc in the next ch, then (ch 1, sk 1 ch, dc in the next ch) 9 times. The last dc lands in ch 2.
- Base: 3 sc in the base chain.
- Side B: dc in ch 2, then (ch 1, sk 1 ch, dc in the next ch) 9 times. Hdc in ch 21 and sc in ch 22.
- Tip: 3 sc in ch 23. Sl st to the first sc.
Count: 12 sts and 9 ch-1 sps on each side, plus 3 sc at the base and 3 sc at the tip. That makes 30 sts and 18 ch-1 sps, or 48 positions.
Rnd 2: Ch 1, sc in the first sc. *Ch 2, sk the next position, sc in the next position; rep from * 22 more times. Ch 2, sk the last position and sl st to the first sc. (24 sc, 24 ch-2 sps)
That gives 11 sc on Side A, 1 at the base, 11 on Side B and 1 at the tip.
Checkpoint: about 2.9 in (7.4 cm) × 1 in (2.5 cm).
Border (Wing Outline Round)
The border is Rnd 3 of each wing. It closes the arches into a smooth, cord-like outline. Work it firmly, at about 9 sc = 1 in (2.5 cm).
Upper wing, Rnd 3: Ch 1.
- Side A: (sc in sc, 2 sc in ch-2 sp, sc in sc, sc in ch-2 sp) 6 times. (30 sc)
- Base: sc in sc, sl st into the thorax beside the wing base (not counted), 3 sc in ch-2 sp. (4 sc)
- Side B: (sc in sc, 2 sc in ch-2 sp, sc in sc, sc in ch-2 sp) 6 times. (30 sc)
- Tip: sc in sc, 3 sc in the last ch-2 sp. (4 sc)
Sl st to the first sc and fasten off. (68 sc)
Lower wing, Rnd 3: Ch 1.
- Side A: (sc in sc, 2 sc in ch-2 sp, sc in sc, sc in ch-2 sp) 5 times, then sc in sc, 2 sc in ch-2 sp. (28 sc)
- Base: sc in sc, sl st into the thorax beside the wing base (not counted), 3 sc in ch-2 sp. (4 sc)
- Side B: Repeat Side A. (28 sc)
- Tip: sc in sc, 3 sc in the last ch-2 sp. (4 sc)
Sl st to the first sc and fasten off. (64 sc)
Why the math works: A finished upper wing is an oval about 3.25 in (8.3 cm) by 1.25 in (3.2 cm), with an outer edge of about 7.4 in (18.8 cm). At 9 sc per inch, that edge needs about 67 sc, and Rnd 3 gives 68. The lower wing edge is about 7 in (17.8 cm), which needs about 63 sc, and Rnd 3 gives 64. Along the long sides, the loops alternate 2 sc and 1 sc, so the straight edges lie flat. The base and tip loops each get 3 sc because the curve is tightest there. Using 2 and 1 sc all the way around would cup the tips, and 3 sc in every loop would make the sides ruffle.
Final Blocking
- Weave in all tails along the outline, not through the mesh.
- Spray the wings until they are damp but not dripping. Keep the body as dry as you can.
- Lay the dragonfly right side up on the mat and pin the body straight at 6 in (15.2 cm).
- Pin the upper wing tips so the upper wingspan is 7 in (17.8 cm).
- Angle the lower wings slightly toward the tail. Pin their tips so the lower wingspan is 6.5 in (16.5 cm).
- Pin each wing edge in 3 or 4 places so every oval is 1.25 in (3.2 cm) wide.
- Open each mesh window with the tip of a pin.
- If you want firmer wings, dab fabric stiffener onto the wings only.
- Let the piece dry completely before you unpin it.
Final Quality-Control Checklist
- The body is 6 in (15.2 cm) long, with a round head, a wider thorax and 10 even segments.
- The upper wings are Color A on Rnd 7, and the lower wings are Color B on Rnd 9.
- The upper wingspan is 7 in (17.8 cm), and the lower wingspan is 6.5 in (16.5 cm).
- Rnd 3 has 68 sc on each upper wing and 64 sc on each lower wing.
- Each wing has a center vein with 10 (upper) or 9 (lower) mesh windows per side.
- The outlines lie flat, and all tails are hidden.
Troubleshooting
The wing curls toward the body. Your foundation chain is too tight. Remake it with looser tension.
The outline ruffles. You may be working 2 sc in every loop. Recount Rnd 3 against 68 or 64.
The wing tip is pointed or cupped. Check that the tip loop has 3 sc.
The wings are uneven left to right. Make sure each wing starts on st 4 or st 10 of the correct round. Then recount the Rnd 1 positions: 52 for upper wings, 48 for lower wings.
The body segments look flat. Check that each Segment Rnd A increases to 8 sts, and add a little fiberfill.
Stuffing shows through. Make the body with a 2 mm hook and keep the 2.25 mm hook for the wings.
Care
Hand wash in cool water with mild soap. Press out the water in a towel and re-block flat to dry.
Final Notes
The measurement chain is short. A body gauge of 8 sc and 8 rnds per 1 in (2.5 cm) gives a 6 in (15.2 cm) body. A chain gauge of 8 ch per 1 in (2.5 cm) gives Rnd 1 wings of 3 in (7.6 cm) and 2.75 in (7.0 cm). Rnd 2 widens each wing to about 1 in (2.5 cm). The firm outline round then brings the wings to 3.25 in (8.3 cm) and 3 in (7.6 cm) long and 1.25 in (3.2 cm) wide. With the 0.5 in (1.3 cm) thorax between them, the upper wingspan is 7 in (17.8 cm).
If every checkpoint matches, the finished dragonfly will match too.
Happy crocheting!