

This tiny bell ornament is worked in cream, off-white cotton thread. It has a rounded dome-shaped body covered in an open lattice of bobble stitches. The bobbles sit in a repeating staggered grid, so small open windows show between them.
A scalloped shell-stitch trim finishes the bottom edge, and each shell ends in a picot-like point. A small matching crocheted ball hangs from the base, and a loop at the top lets you hang the bell.
The pattern uses US crochet terms. The finished bell measures approximately 0.8 in (2.0 cm) tall from the crown to the trim points. That makes this a micro-crochet project in fine thread with a steel hook.
The body starts at the crown and is worked in joined rounds. Six-fold increases build a rounded dome, a few even rounds form the sides, and one more increase round starts the flare. A conversion round of single crochet sets up the shell trim. You then add the hanging loop to the crown, make the tiny ball separately, and attach it at the base.
Finished Size and Construction
- Finished size: approximately 0.8 in (2.0 cm) tall, crown to trim points
- Rim width: 0.8 in (2.0 cm) across the shell points
- Skill level: Advanced (micro thread work); the stitches themselves are intermediate
- Terminology: US crochet terms
- Yarn weight: Lace (0), size 40 cotton crochet thread
- Hook: 0.75 mm steel hook (US steel 12)
- Number of pieces: 1 ornament, made of the bell body (with the loop worked onto it) plus 1 small ball sewn on
- Layout: single bell; it is not an assembled multi-piece project
- Body size before trim: 0.6 in (1.5 cm) tall, 0.7 in (1.8 cm) across the opening
- Trim (border) depth: 0.2 in (0.5 cm)
- Extras beyond the bell: loop about 0.3 in (0.8 cm) and ball about 0.2 in (0.5 cm), which hangs on a 0.1 in (0.3 cm) cord
Materials
Thread advice: Use mercerized cotton crochet thread in size 40. Mercerized cotton holds crisp bobbles, shows the lattice windows clearly, and takes fabric stiffener well. Avoid fuzzy or very stretchy fibers. At this scale, they blur the grid.
- Cream / off-white, size 40 cotton thread: 2 g, about 20 m (22 yd)
Tools:
- 0.75 mm steel crochet hook (US steel 12)
- Fine sewing or beading needle with an eye that fits the thread
- Small sharp scissors
- Locking stitch marker or a short strand of contrasting thread
- Fabric stiffener or a sugar-water solution
- Small dome-shaped form about 0.5–0.7 in (1.3–1.8 cm) wide, such as a marker cap or a rounded bead
- Rust-proof pins
- Magnifier and good light (strongly recommended)
The thread quantity includes a margin for a gauge swatch and weaving in ends.
Abbreviations (US Terms)
- ch – chain
- sl st – slip stitch
- sc – single crochet
- dc – double crochet
- sc2tog – single crochet 2 together
- sk – skip
- sp(s) – space(s)
- st(s) – stitch(es)
- rnd – round
- MR – magic ring
- yo – yarn over
Special stitches:
- Bobble (3-dc bobble): Yo, insert hook in the indicated sp, yo and pull up a loop, yo and pull through 2 loops. Repeat from * to * 2 more times in the same sp. Yo and pull through all 4 loops on hook.
- Beg bobble (beginning bobble): Ch 2. Yo, insert hook in the indicated sp, yo and pull up a loop, yo and pull through 2 loops. Repeat from * to * once more in the same sp. Yo and pull through all 3 loops on hook.
- Picot: Ch 3, sl st in 3rd ch from hook.
- Shell: (2 dc, picot, 2 dc) in the same st.
Gauge and Checkpoints
Gauge:
- 11 bobble-and-ch-1 repeats = 1 in (2.5 cm) around
- 10 bobble rounds = 1 in (2.5 cm) tall
At this scale, gauge is easier to check with checkpoints than with a swatch. Work Rnds 1–3, measure, and adjust before continuing.
Checkpoints:
- After Rnd 2: about 0.4 in (1.0 cm) across.
- After Rnd 3: about 0.3 in (0.8 cm) tall from the ring. The piece should start to cup and should not lie flat. That cupping is the dome forming.
- After Rnd 5: 0.5 in (1.3 cm) across the opening.
- After Rnd 6: 0.6 in (1.5 cm) tall, 0.7 in (1.8 cm) across the opening.
- After trim: 0.8 in (2.0 cm) tall, 0.8 in (2.0 cm) across the shell points.
If the piece is too big: go down to a 0.6 mm hook or switch to size 80 thread.
If the piece is too small: go up to a 0.9 mm hook.
If Rnd 3 ruffles instead of cupping: your chains are loose. Tighten your ch-1 spaces, not your bobbles.
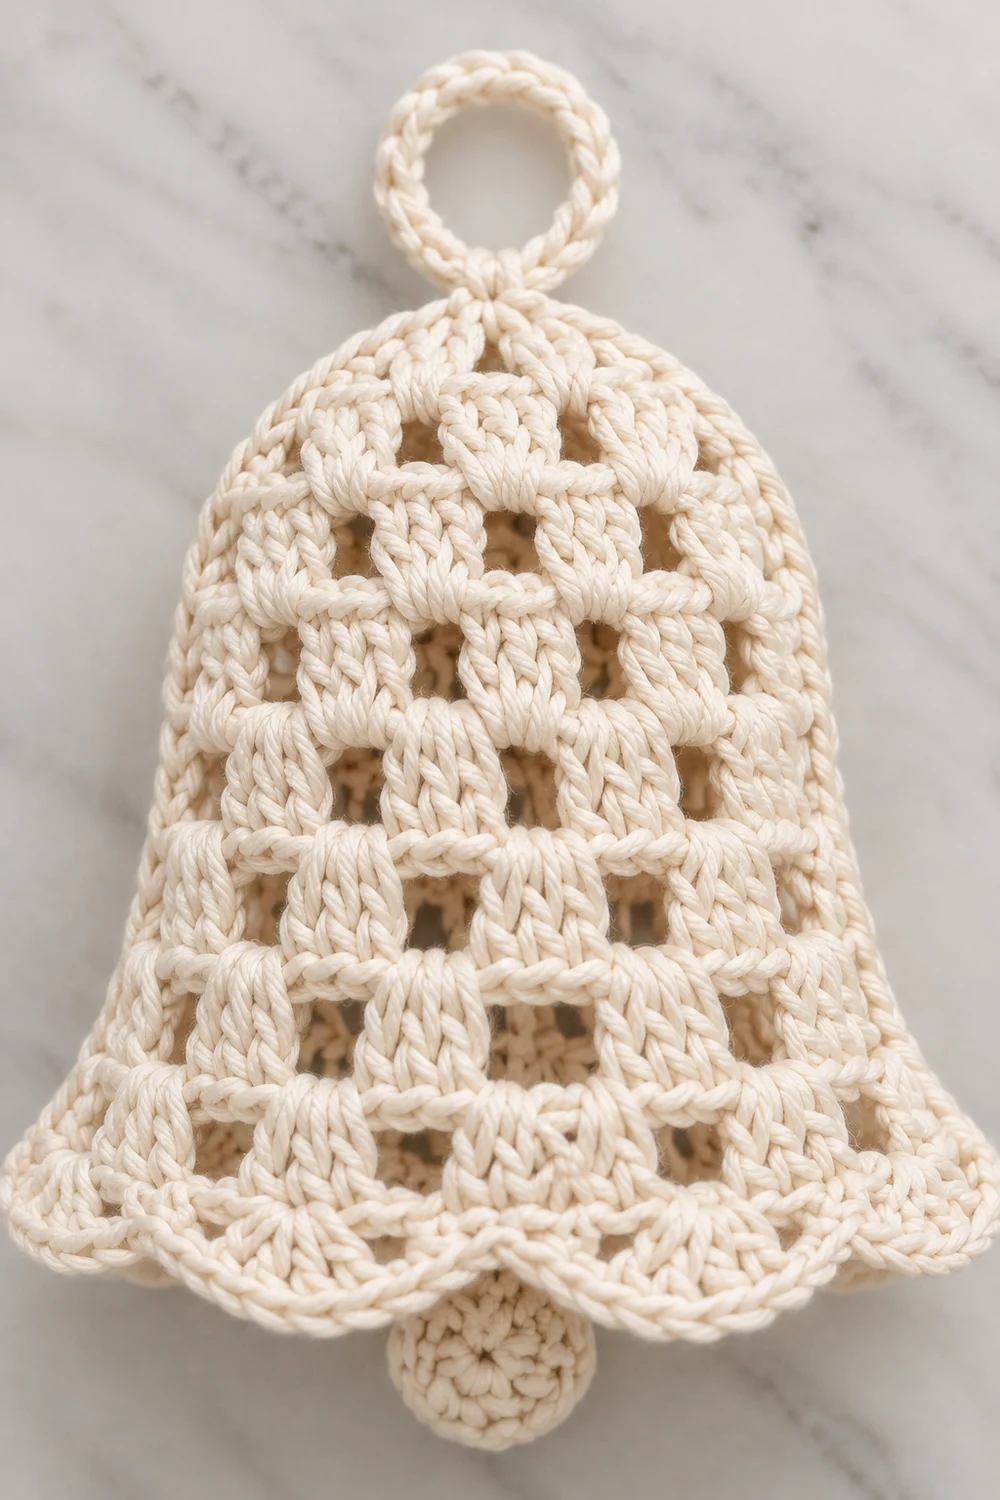
Bell Body
Every round is worked on the right side and joined. Do not turn. Every round after Rnd 1 begins with a sl st into the first ch-1 sp. Each round count below is that round’s own complete total.
Dome (Rnds 1–3)
The crown is shaped like an amigurumi dome. Each round increases six times, evenly spaced, and then the increases stop. Because the stitches stop growing outward, the piece curves down into a rounded top instead of tapering to a point.
Rnd 1: Make a MR. Beg bobble in ring, ch 1. [Bobble in ring, ch 1] 5 times. Pull the ring closed. Sl st to top of beg bobble.
(6 bobbles, 6 ch-1 sps)
Rnd 2: Sl st into next ch-1 sp. (Beg bobble, ch 1, bobble, ch 1) in same sp. [(Bobble, ch 1, bobble, ch 1) in next ch-1 sp] 5 times. Sl st to top of beg bobble.
(12 bobbles, 12 ch-1 sps)
Rnd 3: Sl st into next ch-1 sp. (Beg bobble, ch 1, bobble, ch 1) in same sp. (Bobble, ch 1) in next sp. [(Bobble, ch 1, bobble, ch 1) in next sp, (bobble, ch 1) in next sp] 5 times. Sl st to top of beg bobble.
(18 bobbles, 18 ch-1 sps)
Check: 6 increase sps × 2 bobbles + 6 plain sps × 1 bobble = 18. The piece now cups into a dome about 0.3 in (0.8 cm) tall.
Sides (Rnds 4–5)
Rnds 4–5: Sl st into next ch-1 sp. (Beg bobble, ch 1) in same sp. [(Bobble, ch 1) in next sp] 17 times. Sl st to top of beg bobble.
(18 bobbles, 18 ch-1 sps in each round)
Each bobble sits over a ch-1 sp from the round below, so the grid staggers like a checkerboard. The open windows appear between the bobbles. The sides now drop straight, 0.5 in (1.3 cm) across.
Flare (Rnd 6)
Rnd 6: Sl st into next ch-1 sp. (Beg bobble, ch 1) in same sp. (Bobble, ch 1) in next sp. (Bobble, ch 1, bobble, ch 1) in next sp. [(Bobble, ch 1) in each of next 2 sps, (bobble, ch 1, bobble, ch 1) in next sp] 5 times. Sl st to top of beg bobble.
(24 bobbles, 24 ch-1 sps)
Check: 6 repeats × (2 + 2) = 24. The opening now flares to 0.7 in (1.8 cm) across, and the body is 0.6 in (1.5 cm) tall.
Border: Scalloped Shell Trim
Border gauge: The trim is worked on a conversion round of sc. Each scallop uses 6 sc. The sc round is worked at the same density as the bobble grid. It places 2 sc in the width of each bobble-and-ch-1 repeat, so the rim keeps its 0.7 in (1.8 cm) opening.
This piece is a single round bell, so it has no sides. The counts below are given per scallop repeat around the whole rim.
Rnd 7 (conversion round): Ch 1. Sc in top of each bobble and work 1 sc in each ch-1 sp all the way around. Sl st to first sc.
- Count: 24 sc worked 1 into each existing bobble + 24 sc worked into the 24 ch-1 sps = 48 sc.
- This round only converts the edge to sc. It does not continue the bobble increases.
Rnd 8 (shell round): Ch 1. [Sc in next sc, sk 2 sc, shell in next sc, sk 2 sc] 8 times. Sl st to first sc. Fasten off and weave in the end.
- Count: 8 scallops, made of 8 sc, 32 dc, and 8 picots.
Why the math works: Each repeat uses 1 sc + 2 skipped + 1 shell stitch + 2 skipped = 6 sc. Since 48 ÷ 6 = 8 exactly, the scallops close evenly with no partial repeat.
The picot at the center of each shell creates the small pointed tips along the scalloped edge. The trim adds 0.2 in (0.5 cm), so the finished bell is 0.8 in (2.0 cm) tall and 0.8 in (2.0 cm) across the shell points.
Hanging Loop
- Join thread with a sl st at the center of the crown, through the closed magic ring.
- Ch 14 and sl st into the same spot to form a ring.
- Work 20 sc over the chain ring, then sl st to the base.
- Fasten off. Pass the tail down through the ring and secure it inside the dome.
The finished loop stands about 0.3 in (0.8 cm) tall.
Ball Motif
The ball is worked in continuous rounds. Mark the first stitch of each round.
Rnd 1: 6 sc in MR. Pull the ring closed. (6 sc)
Rnd 2: 2 sc in each st around. (12 sc)
Rnd 3: Sc in each st around. (12 sc)
Rnd 4: Sc2tog around. (6 sc)
To finish:
- Tuck the thread tails inside as stuffing.
- Weave the end through the front loops of the last 6 sts and pull tight.
- Leave a 6 in (15.2 cm) tail.
The ball measures about 0.2 in (0.5 cm) across.
Attaching the ball:
- With the tail, ch 4 directly from the ball.
- Sew the end of the chain to the base of the bell, at the Rnd 8 sc between two scallops at center front.
- Knot the thread inside the bell and trim.
The ball hangs about 0.1 in (0.3 cm) below the trim.
Final Blocking
- Mix the fabric stiffener according to the package directions, or use equal parts sugar and water.
- Soak the bell for 1 minute, then blot it gently in a paper towel.
- Slide the bell over the dome form so the crown rounds out evenly.
- Use a fine pin tip to open each lattice window.
- Pull each of the 8 scallops outward and pin each picot point. Check that the rim measures 0.8 in (2.0 cm) across.
- Shape the loop upright and lay the ball so it hangs straight down.
- Dry completely for 12–24 hours, then remove the bell from the form.
Final Quality-Control Checklist
- The bell measures 0.8 in (2.0 cm) tall and 0.8 in (2.0 cm) across the shell points.
- The crown is smoothly rounded, with no point or flat top.
- The rounds have 6, 12, 18, 18, 18, and 24 bobbles.
- The lattice windows are open and evenly staggered.
- The conversion round has exactly 48 sc.
- There are 8 even scallops, each with a visible picot point.
- The loop is centered on the crown and firmly secured.
- The ball is about 0.2 in (0.5 cm) across and hangs straight from center front.
- All ends are woven in and invisible.
Troubleshooting
- The dome is pointed: Your increases are stacking in the same place. Check that Rnd 3 alternates increase sps with plain sps.
- Rnd 3 lies flat or ruffles: The ch-1 sps are too loose. Redo the round with tighter chains.
- The windows have closed up: Your bobbles are too fat. Pull each loop up to the hook’s shank only, never higher.
- The scallops don’t close evenly: Recount Rnd 7. It must be exactly 48 sc, because 48 ÷ 6 = 8.
- The rim cups inward: Your sc are too tight. Redo Rnd 7 with a slightly looser tension.
- The ball looks lumpy: Tuck the tails in more evenly, or add a small wisp of extra thread.
- The bell is too big overall: Switch to size 80 thread with a 0.6 mm hook.
Care
Spot clean only with a damp cloth. If the bell softens, re-dip it in stiffener and reshape it on the form.
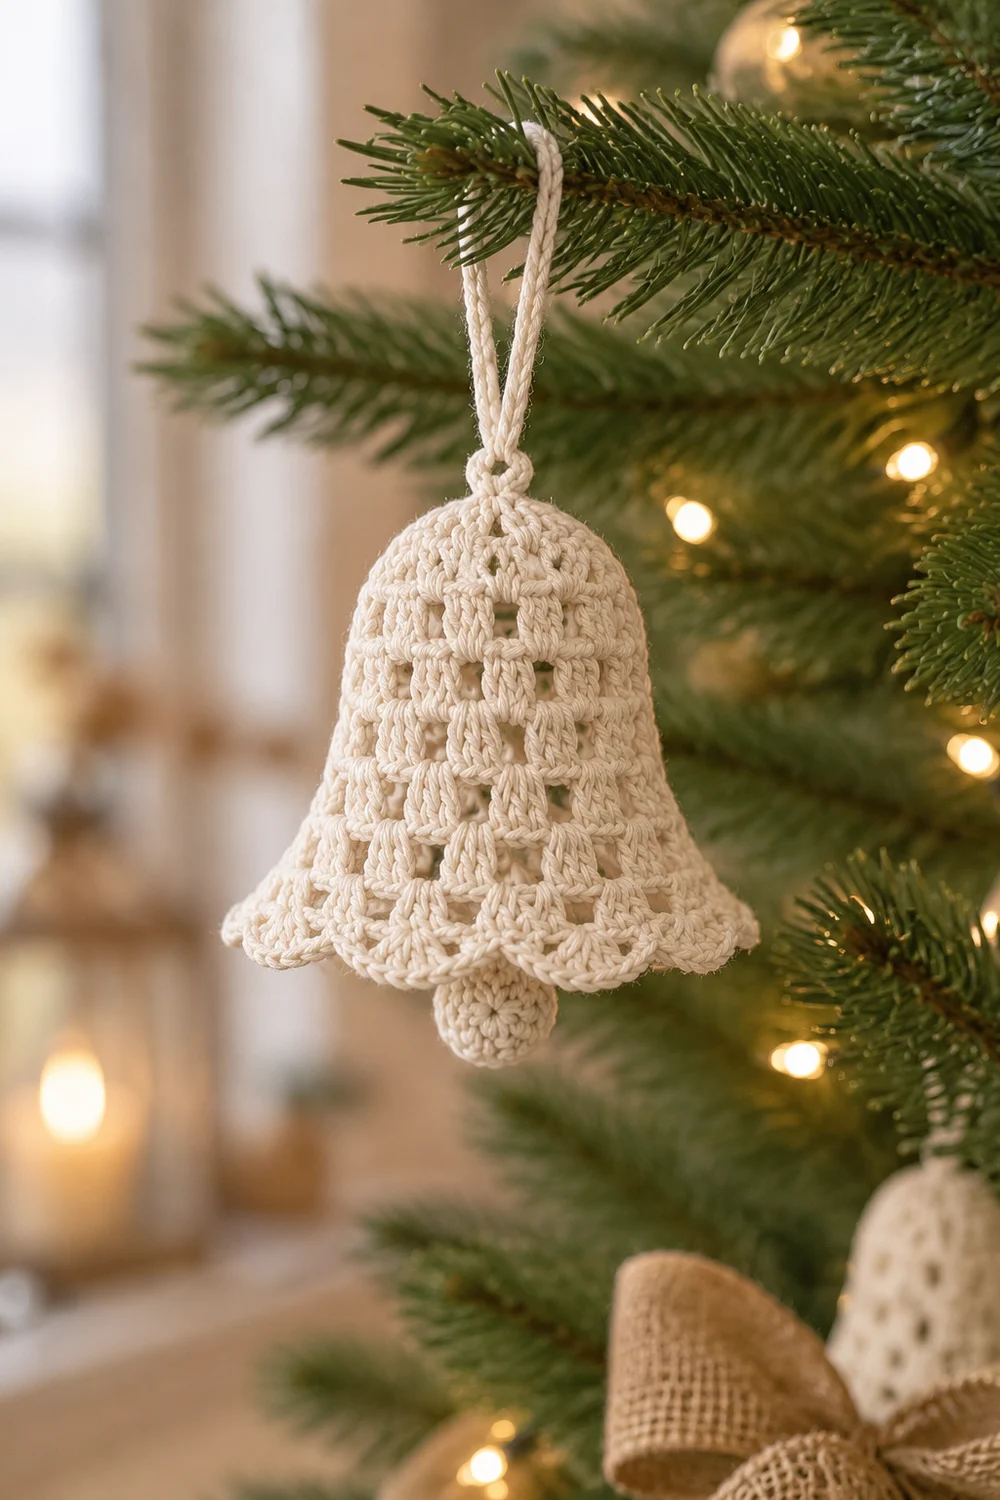
Final Notes
The measurement chain is short but exact:
- The dome cups at 0.3 in (0.8 cm).
- The sides drop straight at 0.5 in (1.3 cm) across.
- The flare opens to 0.7 in (1.8 cm) at 0.6 in (1.5 cm) tall.
- A 48-sc conversion round sets up 8 picot scallops.
- The finished bell measures 0.8 in (2.0 cm) tall and wide.
Check each stage against these numbers and your tiny bell will come out right.
Optional: if you would like a larger version, the same round counts in size 10 thread with a 1.5 mm hook make a bigger bell. Your measurements will change accordingly.
Happy crocheting!